

Easter is a time for family, fun, and food—and this Easter Dirt Cake is the perfect way to celebrate all three! It’s a whimsical, delicious dessert that brings joy to the table with its playful presentation and irresistible flavors. Layers of creamy pudding, fluffy whipped topping, and chocolate cookie crumbs come together to make this a fun treat for everyone. Trust me, once you take a bite, you’ll be hooked!
Why You’ll Love Easter Dirt Cake
This recipe isn’t just about being cute—it’s all about satisfying your sweet tooth and creating a dessert that will make everyone smile. Here’s why this dirt cake is perfect for your Easter celebrations:
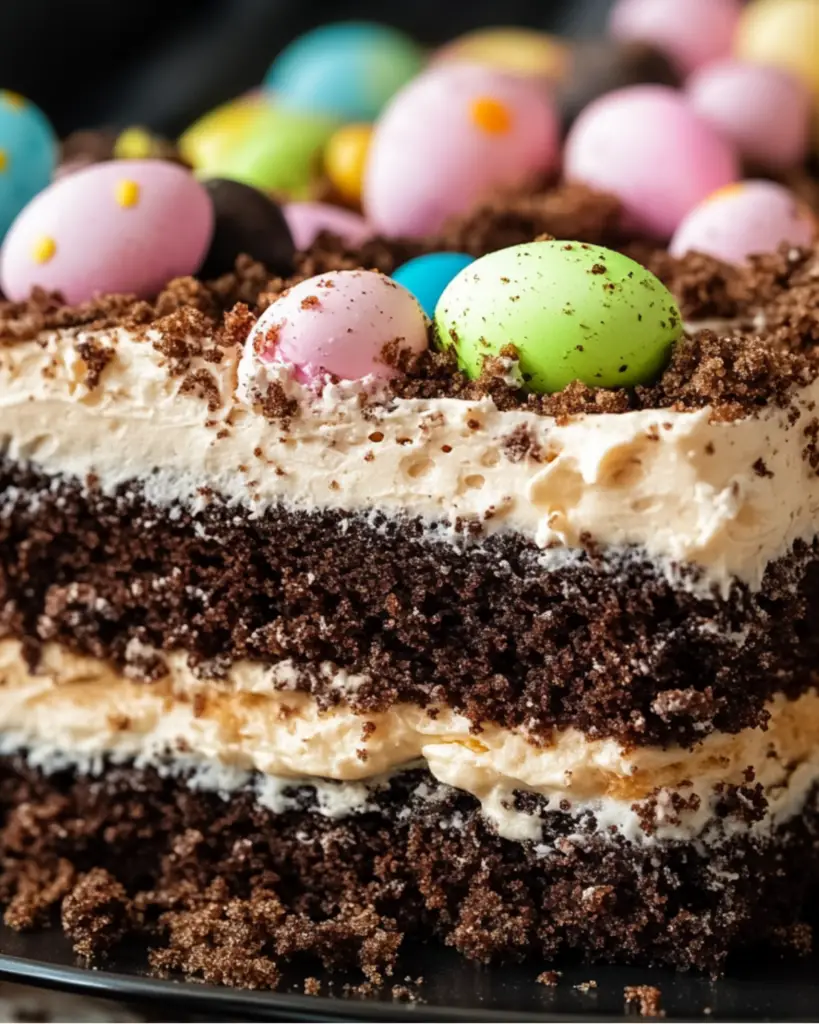
- Fun and Festive: With its “dirt” made from crushed cookies and colorful gummy worms, this cake is an absolute crowd-pleaser at Easter gatherings. It’s a showstopper that adds excitement to the dessert table.
- No-Bake: If you’re not a fan of baking, this dessert is for you! It’s super easy to make and doesn’t require an oven. Simply layer, chill, and you’re good to go.
- Family-Friendly: The kids will love this one, and it’s a great opportunity to get them involved in the kitchen. Plus, it’s a sweet treat that appeals to both kids and adults.
- Customizable: While this recipe is already perfect for Easter, you can make it your own. Switch up the decorations or add different candies to suit your theme or preferences.
- Delicious: It’s creamy, chocolatey, and just the right amount of sweet. The pudding and whipped cream filling complement the crunch of the cookies for a texture that’s simply divine.
Ingredients
Here’s what you need to make this fun, no-bake Easter Dirt Cake:
Oreos: These make up the “dirt” layer. Crushed into crumbs, they give this dessert that perfect chocolate crunch.
Butter: To bind the cookie crumbs together for the crust. You’ll want this for a smooth, buttery base.
Cream Cheese: A key ingredient in the creamy filling. It provides a rich, tangy flavor that balances out the sweetness of the pudding.
Powdered Sugar: Adds sweetness to the filling without being overly sugary.
Vanilla Pudding: The creamy, smooth base that holds everything together and gives this cake its luscious texture.
Whipped Topping: Light and airy, this gives the filling its fluffy consistency.
Gummy Worms: The classic “dirt” decoration! They’re fun, colorful, and totally irresistible on top of the dessert.
(Note: The full ingredients list, including measurements, is provided in the recipe card directly below.)
Instructions
Let’s break down how to make this adorable and tasty Easter Dirt Cake:
Prepare the Crust
Start by crushing the Oreos in a food processor or by placing them in a Ziploc bag and using a rolling pin. Crush until the cookies are finely ground. Mix the crumbs with melted butter and press the mixture into the bottom of a 9×13-inch pan. This forms the base of your cake.
Make the Creamy Filling
In a large bowl, beat together the cream cheese, powdered sugar, and vanilla pudding mix until smooth and well-combined. Fold in the whipped topping to create a fluffy, creamy mixture.
Layer the Dirt Cake
Spread the creamy filling over the Oreo crust in an even layer. Then, crush more Oreos and sprinkle the crumbs generously over the top to make it look like “dirt.”
Add the Gummy Worms
To finish, place the gummy worms on top of the “dirt” to make your Easter Dirt Cake look just like a fun, garden-themed masterpiece!
Chill
Cover the cake with plastic wrap and refrigerate for at least 4 hours, or overnight for the best flavor and texture.
Nutrition Facts
Servings: 12
Calories per serving: 290
Preparation Time
Prep Time: 20 minutes
Chill Time: 4 hours
Total Time: 4 hours 20 minutes
How to Serve Easter Dirt Cake
Easter Dirt Cake is a delightful dessert that pairs perfectly with your Easter meal. Here are some fun ways to serve it:
- Easter Brunch: Serve slices of dirt cake as a fun addition to your Easter brunch spread. The kids will love it!
- On Its Own: Sometimes, this cake is so delicious, it doesn’t need anything else. Just grab a spoon and dig in.
- With Fresh Fruit: Serve alongside fresh strawberries or raspberries for a burst of fruity freshness to balance the rich, creamy cake.
- In Individual Cups: Make individual servings by layering the cake in small cups. It’s perfect for parties or Easter egg hunts!
Presentation matters too! Consider garnishing with fresh mint or extra colorful sprinkles for added charm.
Additional Tips
Here are some tips to help you make the most out of your Easter Dirt Cake:
- Prep Ahead: This cake is best when it sits for a few hours, so it’s perfect to make ahead the night before your Easter celebration.
- Use Different Cookies: You can mix things up by using other cookies like chocolate chip cookies or golden Oreos for the crust.
- Customize the Toppings: Add Easter-themed candies like jelly beans, mini chocolate eggs, or marshmallow bunnies for an extra festive touch.
- Make It Dairy-Free: For a dairy-free version, use dairy-free cream cheese and whipped topping, and opt for a dairy-free pudding mix.
- Storage Tips: Store leftovers in the fridge for up to 3 days. Just cover with plastic wrap to keep it fresh.
FAQ Section
Q1: Can I use regular Oreos instead of chocolate Oreos?
A1: Yes, regular Oreos work perfectly! The chocolate flavor is a classic, but the choice is up to you.
Q2: Can I make this cake the day before Easter?
A2: Absolutely! In fact, it’s best made ahead. Just refrigerate it overnight for the perfect texture and flavor.
Q3: Can I freeze Easter Dirt Cake?
A3: While the cake can be frozen, it’s best enjoyed fresh. If you do freeze it, make sure to wrap it tightly and allow it to thaw in the fridge before serving.
Q4: Can I add other toppings?
A4: Of course! You can get creative with toppings. Try adding crushed candy, mini chocolate eggs, or even edible flowers for a springtime touch.
Q5: Can I use homemade whipped cream instead of whipped topping?
A5: Yes, you can. Just make sure to whip it to stiff peaks before folding it into the pudding mixture for the right texture.
Q6: How long can I store leftovers?
A6: Leftovers can be stored in the fridge for up to 3 days. Just cover it well with plastic wrap to keep it fresh.
Q7: Can I make this cake in individual servings?
A7: Yes! Just layer the ingredients into small cups or jars, and serve them as individual portions. They’re perfect for parties or picnics.
Q8: Can I make this recipe gluten-free?
A8: Yes! You can use gluten-free cookies as a substitute for Oreos to make this recipe gluten-free.
Q9: How do I know when it’s ready to serve?
A9: Once it’s had time to chill and the filling is set, it’s ready! You want the layers to be firm and the cake chilled to perfection.
Q10: Can I add a layer of fruit to this cake?
A10: Yes! You can add fresh fruit like berries between the layers or on top for added sweetness and texture.
Conclusion
This Easter Dirt Cake is an Easter tradition in the making—fun to make, fun to eat, and guaranteed to put a smile on everyone’s face. It’s creamy, crunchy, and playful, with a festive twist that’s perfect for the holiday. Whether you’re hosting an Easter dinner or just looking for a fun family dessert, this one’s a winner. Enjoy every delicious bite and happy Easter!
PrintEaster Dirt Cake

This fun and festive Easter Dirt Cake is the perfect treat for your holiday celebrations! A creamy, delicious dessert layered with Oreo cookie crumbs and topped with colorful decorations like Peeps and M&Ms. It’s easy to make, and sure to be a crowd-pleaser! #EasterDessert #DirtCake #EasterTreat #OreoCake #EasterBaking
- Prep Time: 15 minutes
- Total Time: 15 minutes + chilling time (at least 10 minutes in fridge)
- Yield: Serves 8–10 people 1x
- Category: Dessert
- Method: No-bake
- Cuisine: American
- Diet: Vegetarian
Ingredients
- 2 small boxes instant vanilla pudding
- 1 8oz block cream cheese
- 1 cup confectioners sugar
- 1 stick butter
- 3 cups milk
- 1 12oz container Cool Whip (regular/light)
- 1–1/2 packages Oreo cookies
- Peeps (optional for decorations)
- Colored M&Ms (optional for decorating)
Instructions
- Grind Oreo cookies using a food processor until crumbly and set aside.
- Mix pudding and milk and let settle in the fridge for at least 10 minutes.
- Mix cream cheese, butter, and confectioners sugar. Add in pudding mixture and combine until smooth.
- Fold in Cool Whip until everything is well combined.
- Layer the bottom of a trifle dish with a layer of cookie crumbs. Follow with pudding mixture, alternating with cookie crumbs until everything is used up.
- Decorate as desired with Peeps, M&Ms, or any other festive toppings.
- Serve and enjoy!
Notes
- For an extra creamy texture, use full-fat cream cheese and regular Cool Whip.
- You can customize the decorations to suit your preferences or make it extra colorful for Easter.
- You can also refrigerate it overnight for better flavor.
Nutrition
- Serving Size: 1 slice (based on 10 servings)
- Calories: 400kcal
- Sugar: 40g
- Sodium: 150mg
- Fat: 22g
- Saturated Fat: 8g
- Unsaturated Fat: 9g
- Trans Fat: 0g
- Carbohydrates: 50g
- Fiber: 2g
- Protein: 3g
- Cholesterol: 40mg