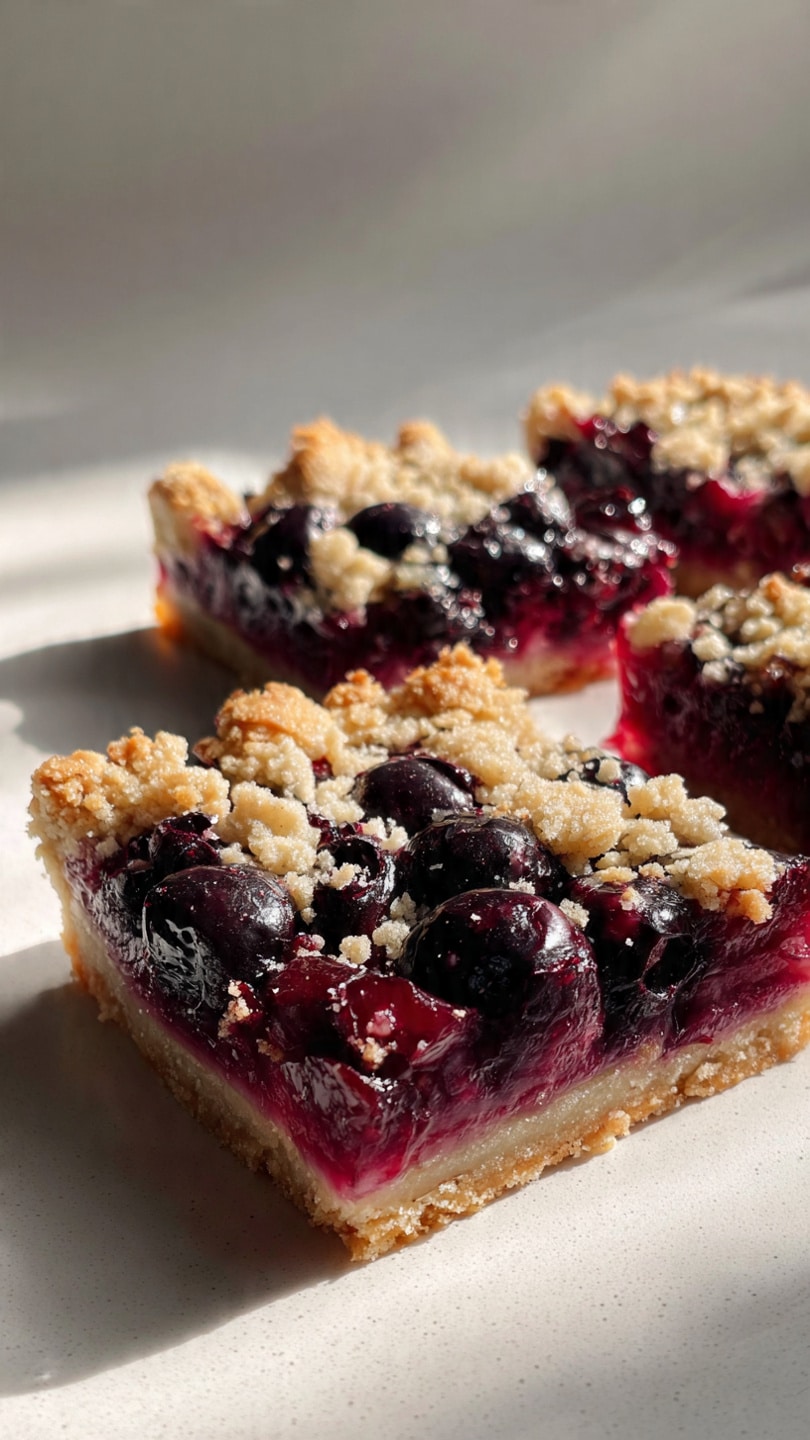
Blueberry & Cranberry Crumble Slice
There is something truly magical about the way a kitchen smells when a fresh tray of fruit bars is cooling on the counter. Imagine the scent of bursting blueberries and tart cranberries mingling with toasted oats and sweet butter. This Blueberry & Cranberry Crumble Slice is exactly that kind of comfort, offering a perfect balance between the zing of the berries and the rich, melt-in-your-mouth texture of the crust. Trust me, you’re going to love this, because it captures the essence of a cozy afternoon in every single bite. Let me tell you, it’s worth every bite, and it’s about to become a staple in your baking rotation.
The Heartwarming History of the Fruit Crumble
While we often think of crumbles as a quick modern dessert, they actually have a fascinating history rooted in necessity. During World War II, when ingredients like flour and butter were strictly rationed, bakers had to get creative. Instead of heavy pastry lids for pies, they used a simple mix of crumbs to cover whatever fruit was in season. This specific combination of blueberry and cranberry represents a beautiful meeting of summer and autumn flavors, bringing together the sweetness of July and the sharp brightness of November into one timeless treat.
Why This Fruit Slice Will Be Your New Favorite
I’ve made countless desserts over the years, but I keep coming back to this one for a few very specific reasons. It’s the kind of recipe that just works, whether you’re a seasoned pro or a first-time baker.
Versatile: This treat works just as well as a mid-morning snack with coffee as it does served warm with a scoop of vanilla ice cream for a fancy dessert.
Budget-Friendly: You likely already have the staples like flour, sugar, and butter in your pantry, and frozen berries work perfectly here.
Quick and Easy: The dough for the base actually doubles as the crumble topping, which means less mixing and even less cleanup for you.
Customizable: If you aren’t a fan of cranberries, you can easily swap them for extra blueberries or even some chopped raspberries to suit your taste.
Crowd-Pleasing: I’ve never taken a tray of these to a potluck or office party and come home with leftovers.
Make-Ahead Friendly: You can bake these a day in advance, as the flavors actually deepen and the crust sets beautifully overnight.
Great for Leftovers: These slices stay moist for days, and they actually taste incredible when eaten straight out of the fridge.
Pro Tips for the Perfect Crumble
Getting that signature golden crunch without a soggy bottom is an art, but it’s one you can easily master. Now let’s dive into some of my favorite secrets for success.
- Keep Your Butter Cold: Use chilled butter to ensure the crumble stays pebbly and light rather than melting into a flat sheet.
- Press the Base Firmly: Use the bottom of a flat glass to press the bottom layer down so the bars don’t fall apart when you slice them.
- Don’t Overmix the Berries: Toss the fruit gently with the sugar and cornstarch so they release their juices naturally during the bake.
- Let Them Cool Completely: This is the hardest part, but waiting for them to cool ensures clean, sharp squares when you cut them.
Essential Tools for Your Baking Journey
Before we get started, let’s make sure your kitchen is ready for action. You don’t need a professional bakery setup, but a few key items make a huge difference.
- 9×9 Inch Square Baking Pan: This size provides the perfect thickness for your layers.
- Parchment Paper: Lining your pan with an overhang makes it easy to lift the entire block out for slicing.
- Large Mixing Bowl: You’ll need plenty of room to cut the butter into the flour without making a mess.
- Pastry Cutter or Fork: This helps you achieve that perfect crumbly texture for the topping.
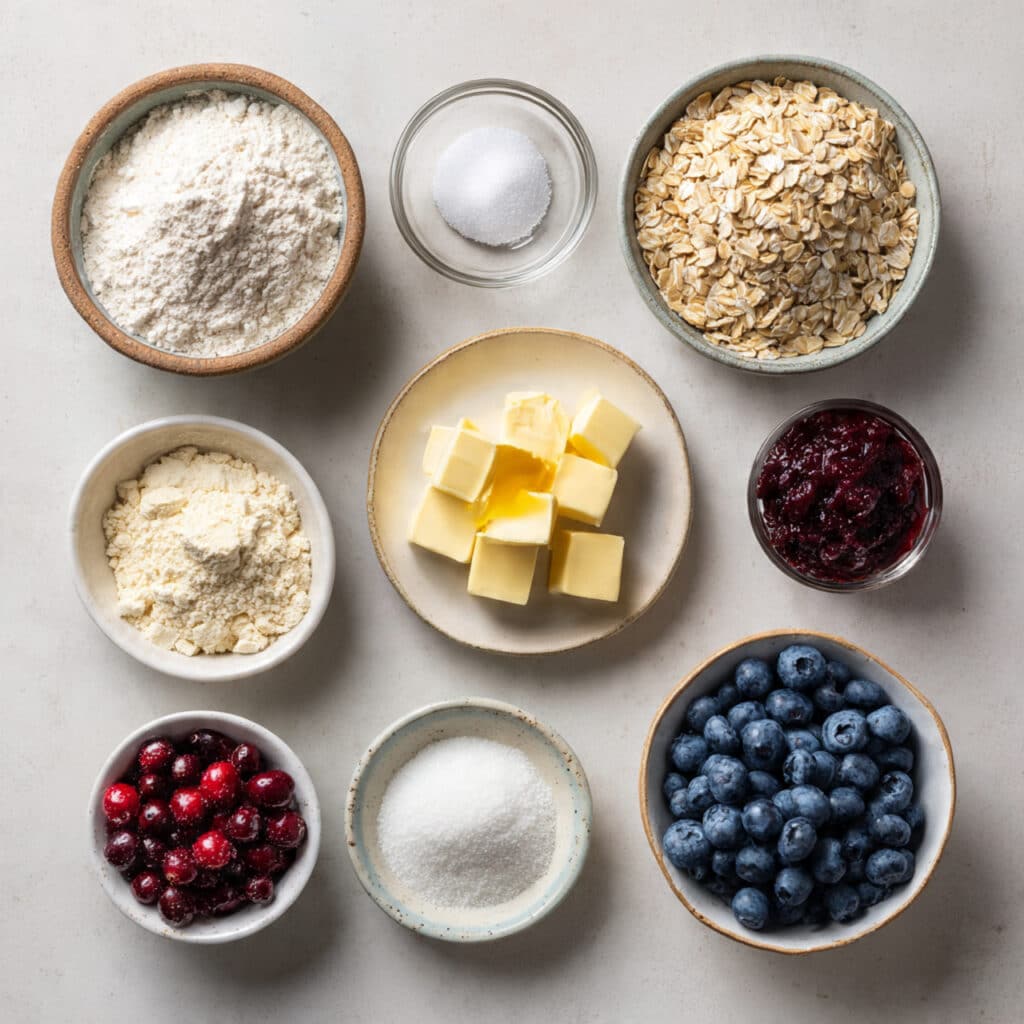
Ingredients You Will Need For This Recipe
The secret to this recipe is the harmony between the simple pantry staples and the vibrant, fresh fruit. And now let’s dive to the specific items you’ll need to gather.
- All-Purpose Flour: 2 cups, which provides the sturdy structure for our base and the golden topping.
- Rolled Oats: 1 cup, used to add a nutty flavor and an extra bit of crunch to the crumble.
- Granulated Sugar: 1 cup, divided to sweeten both the dough and the tart berry filling.
- Cold Unsalted Butter: 1 cup, cubed to create that signature flaky, buttery mouthfeel.
- Fresh or Frozen Blueberries: 1.5 cups, providing a deep, sweet berry flavor.
- Fresh or Frozen Cranberries: 1 cup, adding a necessary tartness that balances the sugar perfectly.
- Cornstarch: 1 tablespoon, which helps thicken the fruit juices into a jammy consistency.
- Lemon Juice: 1 tablespoon, used to brighten the flavors and keep the fruit looking vibrant.
- Vanilla Extract: 1 teaspoon, adding a warm, aromatic depth to the crust.
Flexible Substitutions for Every Pantry
Don’t worry if you’re missing an item, because this recipe is very forgiving.
Rolled Oats: Quinoa flakes or extra flour.
Unsalted Butter: Cold coconut oil for a dairy-free version.
Granulated Sugar: Light brown sugar or coconut sugar.
Blueberries: Blackberries or pitted cherries.
Key Ingredient Spotlight
The Cranberry: These little red gems are the secret weapon here. While blueberries provide the sweetness, the cranberries offer a sharp, acidic punch that prevents the dessert from feeling too heavy.
The Rolled Oats: By using whole oats in the topping, we create a rustic texture that contrasts beautifully with the soft, cooked fruit.
Step-by-Step Guide to Baking Success
I love the process of putting these together, and it’s quite therapeutic to watch the crumbs form. Here are the steps you’re going to follow to reach berry perfection.
- Preheat Your Equipment: Set your oven to 350°F and line your square pan with parchment paper, leaving a little bit hanging over the sides.
- Combine Ingredients: In your large bowl, whisk together the flour, oats, and half of the sugar, then work in the cold butter until the mixture looks like coarse crumbs.
- Prepare Your Cooking Vessel: Take about two-thirds of that crumb mixture and press it firmly into the bottom of your prepared baking pan.
- Assemble the Dish: Toss the berries with the remaining sugar, cornstarch, and lemon juice, then spread this colorful mixture evenly over the base.
- Cook to Perfection: Sprinkle the remaining crumbs over the top of the berries and bake for 45 minutes until the top is golden and the fruit is bubbling.
- Finishing Touches: Remove the pan from the oven and let it sit on a wire rack until it reaches room temperature.
- Serve and Enjoy: Once cooled, lift the bars out using the parchment paper and slice them into even squares for serving.
Texture and Flavor Development
As the slice bakes, the butter melts into the flour to create a shortbread-like foundation, while the berries break down into a thick, glossy sauce. The oats on top stay toasted and crisp, providing a delightful “crunch” that meets the “squish” of the fruit. This one’s a total game-changer because every bite gives you something different.
Helpful Cooking Tips and Tricks
- Use a mix of fresh and frozen berries for a more varied texture.
- Zest the lemon before juicing it and add the zest to the crust for an extra citrus kick.
- If the topping is browning too fast, loosely cover the pan with foil for the last 10 minutes.
Common Mistakes to Avoid
- Using Melted Butter: This will result in a greasy, tough crust rather than a light crumble.
- Underbaking: Ensure the fruit is bubbling in the center, or the filling won’t set properly.
- Cutting While Hot: The bars will crumble into a mess if you don’t give the filling time to firm up as it cools.
Estimated Nutrition Facts
Servings: 12 slices
Calories per serving: 285
Note: These are approximate values.
Total Preparation Time
Prep Time: 20 minutes
Cook Time: 45 minutes
Total Time: 65 minutes
Make-Ahead and Storage Tips
These bars are perfect for meal prep or planning for a party. You can store them in an airtight container at room temperature for up to two days, or in the refrigerator for up to five days. If you want to freeze them, wrap individual slices in plastic wrap and they will stay fresh for three months.
How to Serve Your Berry Crumble
I highly recommend serving these slightly warm with a dollop of whipped cream or a drizzle of custard. For a brunch vibe, they are excellent alongside a sharp Greek yogurt.
Creative Leftover Transformations
If you have a few slices left over, crumble them up and use them as a topping for your morning oatmeal. You can also layer the crumbs with yogurt and fresh fruit to make a quick breakfast parfait.
Additional Tips for Success
For an even richer flavor, try browning your butter and then chilling it back to a solid state before mixing. It adds a deep, toffee-like note to the crust that is absolutely incredible.
Make It a Showstopper
To give these a professional finish, dust the top with a light coating of powdered sugar right before serving. You can also garnish the platter with a few fresh mint leaves and whole raw cranberries for a pop of color.
Creative Variations to Try
- Spiced Berry: Add a teaspoon of cinnamon and a pinch of nutmeg to the crumble mix.
- Nutty Crunch: Fold in half a cup of chopped walnuts or pecans to the topping.
- Chocolate Chip: Sprinkle a handful of white chocolate chips over the fruit layer before adding the crumble.
- Orange Twist: Replace the lemon juice with orange juice and zest for a warmer citrus profile.
FAQ’s
Q1: Can I use different fruits?
A1: Yes, this recipe works beautifully with apples, peaches, or any other type of berry you enjoy.
Q2: Is it possible to make this gluten-free?
A2: Absolutely, just substitute the all-purpose flour for a high-quality gluten-free flour blend.
Q3: Why is my crumble topping soggy?
A3: This usually happens if the fruit was too wet or if the oven temperature was too low.
Q4: Can I use honey instead of sugar?
A4: You can, but it will change the texture of the crust, making it softer and less crisp.
Q5: How do I know when they are done?
A5: Look for golden edges and juices that are bubbling thickly around the sides.
Q6: Can I double the recipe?
A6: Yes, just use a 9×13 inch pan and increase the baking time by about 10 minutes.
Q7: Do I need to thaw frozen berries?
A7: No, you can use them straight from the freezer, but you may need to add 5 minutes to the bake time.
Q8: My crust is falling apart, what happened?
A8: You may not have pressed the base firmly enough into the pan before baking.
Q9: Can I add ginger to this?
A9: Yes, a little bit of grated fresh ginger in the fruit mix is a fantastic addition.
Q10: How should I reheat them?
A10: A quick 15 seconds in the microwave or 5 minutes in a toaster oven will bring back that fresh-baked warmth.
Conclusion
This Blueberry & Cranberry Crumble Slice is more than just a dessert; it’s a bright, flavorful reminder of how simple ingredients can create something extraordinary. Whether you’re sharing them with friends or keeping a secret stash for yourself, these bars are guaranteed to bring a little bit of sweetness to your day. I really hope you give this one a try soon, your kitchen will thank you for the amazing aroma, and your taste buds will thank you for the treat!

Blueberry & Cranberry Crumble Slice
A delightful balance of sweet blueberries and tart cranberries topped with a buttery oat crumble.
- Total Time: 65 minutes
- Yield: 12 slices 1x
Ingredients
- 2 cups all-purpose flour
- 1 cup rolled oats
- 1 cup granulated sugar, divided
- 1 cup cold unsalted butter, cubed
- 1.5 cups blueberries
- 1 cup cranberries
- 1 tablespoon cornstarch
- 1 tablespoon lemon juice
- 1 teaspoon vanilla extract
Instructions
- Preheat oven to 350°F and line a 9×9 inch pan with parchment paper.
- Mix flour, oats, and 1/2 cup sugar; cut in butter until crumbly.
- Press 2/3 of the mixture into the bottom of the pan.
- Toss berries with remaining sugar, cornstarch, and lemon juice.
- Spread fruit over the base and sprinkle with remaining crumbs.
- Bake for 45 minutes until golden and bubbling.
- Cool completely before slicing.
Notes
- Use cold butter for a better crumble texture.
- Wait for the bars to cool fully to get clean slices.
- Frozen berries work just as well as fresh ones.
- Prep Time: 20 minutes
- Cook Time: 45 minutes
- Category: Dessert
- Method: Baking
- Cuisine: American
- Diet: Vegetarian
Nutrition
- Serving Size: 1 slice
- Calories: 285
- Sugar: 18g
- Sodium: 5mg
- Fat: 15g
- Saturated Fat: 9g
- Unsaturated Fat: 6g
- Trans Fat: 0g
- Carbohydrates: 36g
- Fiber: 3g
- Protein: 3g
- Cholesterol: 40mg
Keywords: blueberry cranberry crumble, fruit bars, oat crumble slice, berry dessert