Cherry Pie Bars
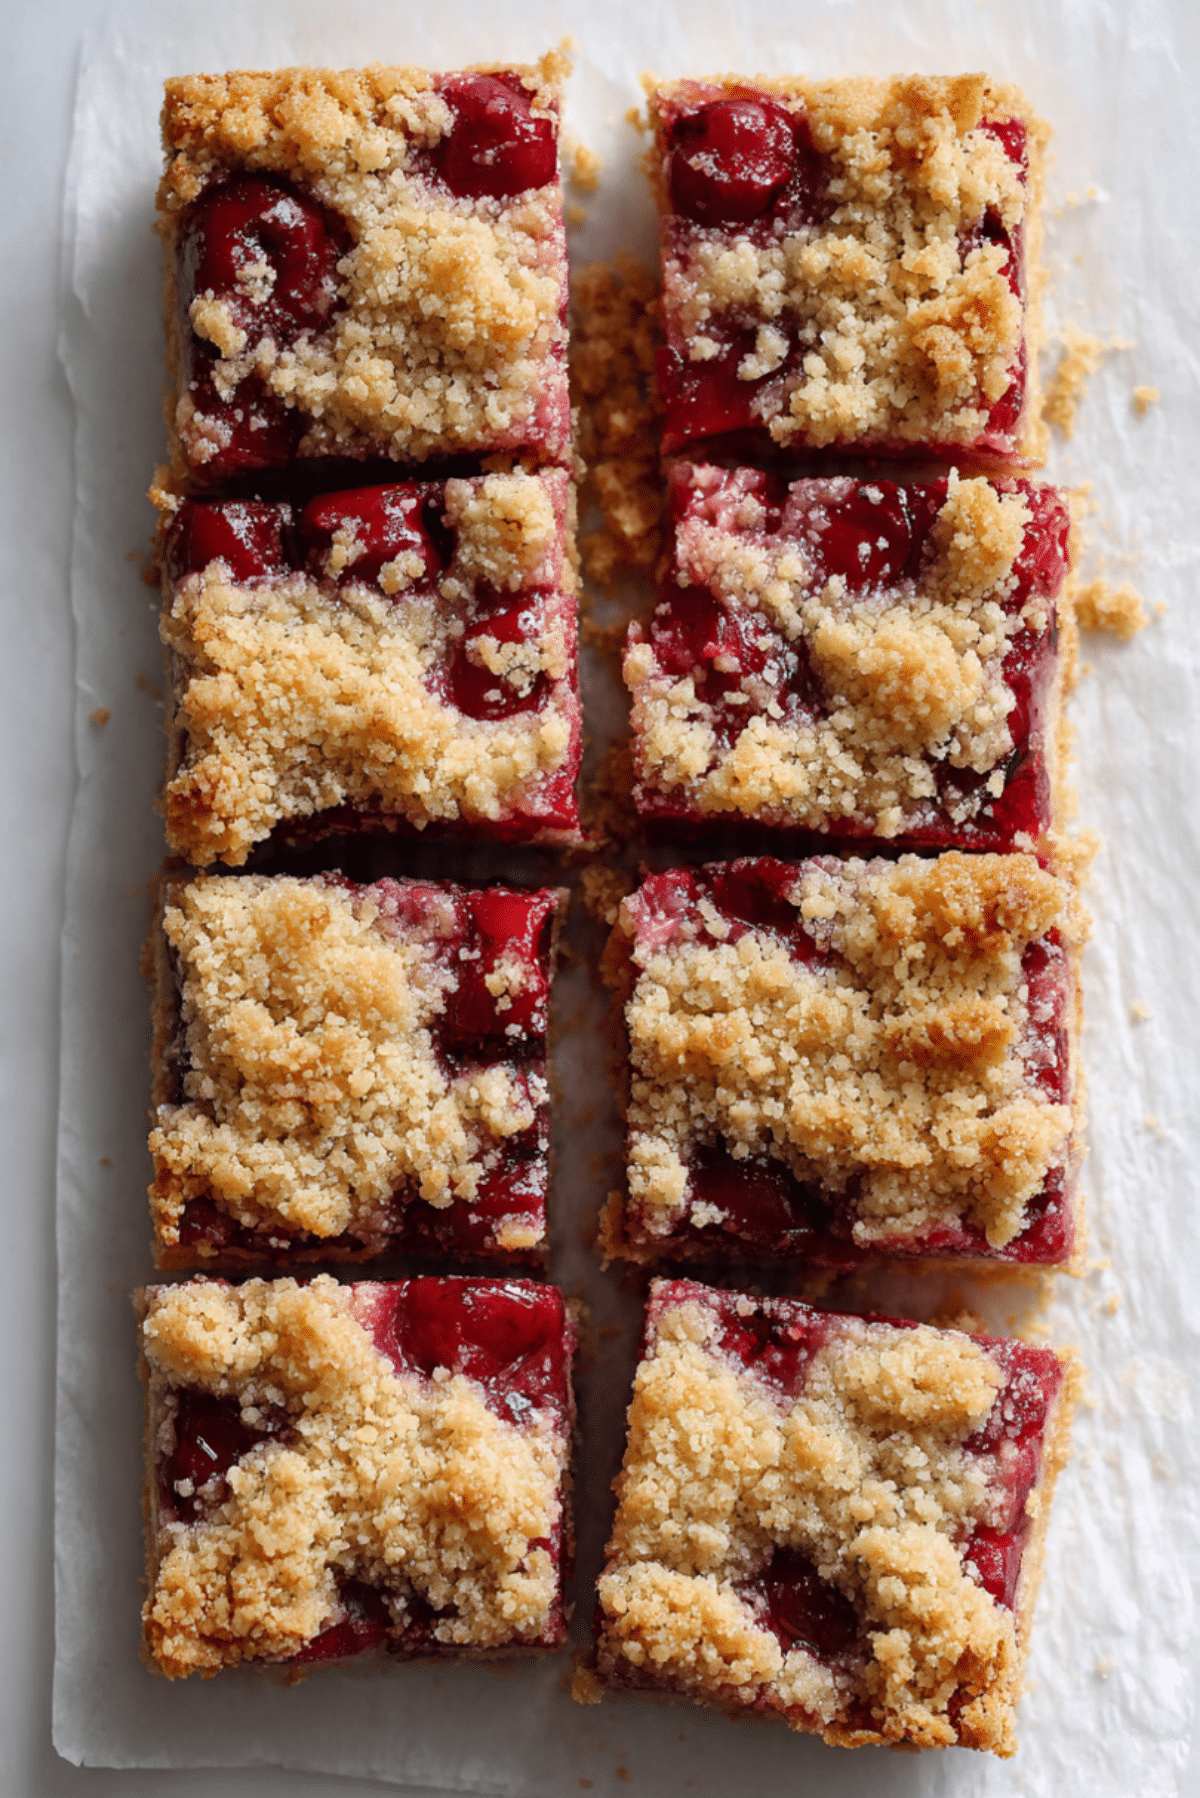
Sweet, gooey, and beautifully crumbly, these cherry pie bars bring together everything you love about a classic cherry pie in a much easier, handheld form. Picture buttery crust, jammy cherry filling, and a crumbly golden top that melts in your mouth. They’re the kind of treat that fills the kitchen with the warm scent of vanilla and fruit, inviting everyone to sneak a bite straight from the pan.
Behind the Recipe
This recipe comes from a nostalgic love for summer desserts. I remember picking cherries with my grandmother, hands stained deep red, and the reward was always a big slice of her homemade cherry pie. But when you’re short on time or baking for a crowd, pie bars are the perfect solution. They’re easy to slice, even easier to serve, and honestly, just as delicious.
Recipe Origin or Trivia
Cherry pie has long been a symbol of Americana, often linked to July 4th celebrations and small-town diners. The origins of cherry pie can be traced back to early European settlers who brought their pastry techniques to the New World. Bars like these evolved later, offering all the flavor of pie without the fuss of shaping dough or waiting for it to cool in a tin. Cherry pie bars became a Midwest bake-sale favorite, especially during peak cherry season.
Why You’ll Love Cherry Pie Bars
These bars are the kind of treat that disappears quickly from the dessert table. Here’s why:
Versatile: Perfect for picnics, potlucks, or a simple family dessert.
Budget-Friendly: Made with pantry staples and frozen or canned cherries.
Quick and Easy: No fancy techniques or tools needed, and no rolling out dough.
Customizable: Swap cherries for berries or peaches if you’d like.
Crowd-Pleasing: Sweet, tart, and buttery they hit all the right notes.
Make-Ahead Friendly: Bake a day ahead and keep them chilled for the perfect texture.
Great for Leftovers: Store beautifully and taste even better the next day.
Chef’s Pro Tips for Perfect Results
These little tricks make a big difference:
- Use cold butter: Cold butter helps create that perfect crumbly texture in the crust and topping.
- Line your pan with parchment: Makes cleanup easier and helps lift the bars out neatly.
- Let them cool completely: It’s tempting, but cooling fully allows the bars to set and slice cleanly.
- Don’t skimp on the cherry filling: A generous layer keeps each bite juicy and flavorful.
- Dust with powdered sugar before serving: Adds a beautiful finish and just a hint of sweetness.
Kitchen Tools You’ll Need
You won’t need anything fancy, just a few reliable basics:
- Mixing Bowls: For combining the crust and filling ingredients.
- Pastry Cutter or Fork: To cut the butter into the flour mixture for that crumbly texture.
- 9×13-inch Baking Pan: The perfect size to spread and bake the bars evenly.
- Parchment Paper: For easy lifting and less mess.
- Measuring Cups and Spoons: Accuracy matters for that ideal texture.
Ingredients in Cherry Pie Bars
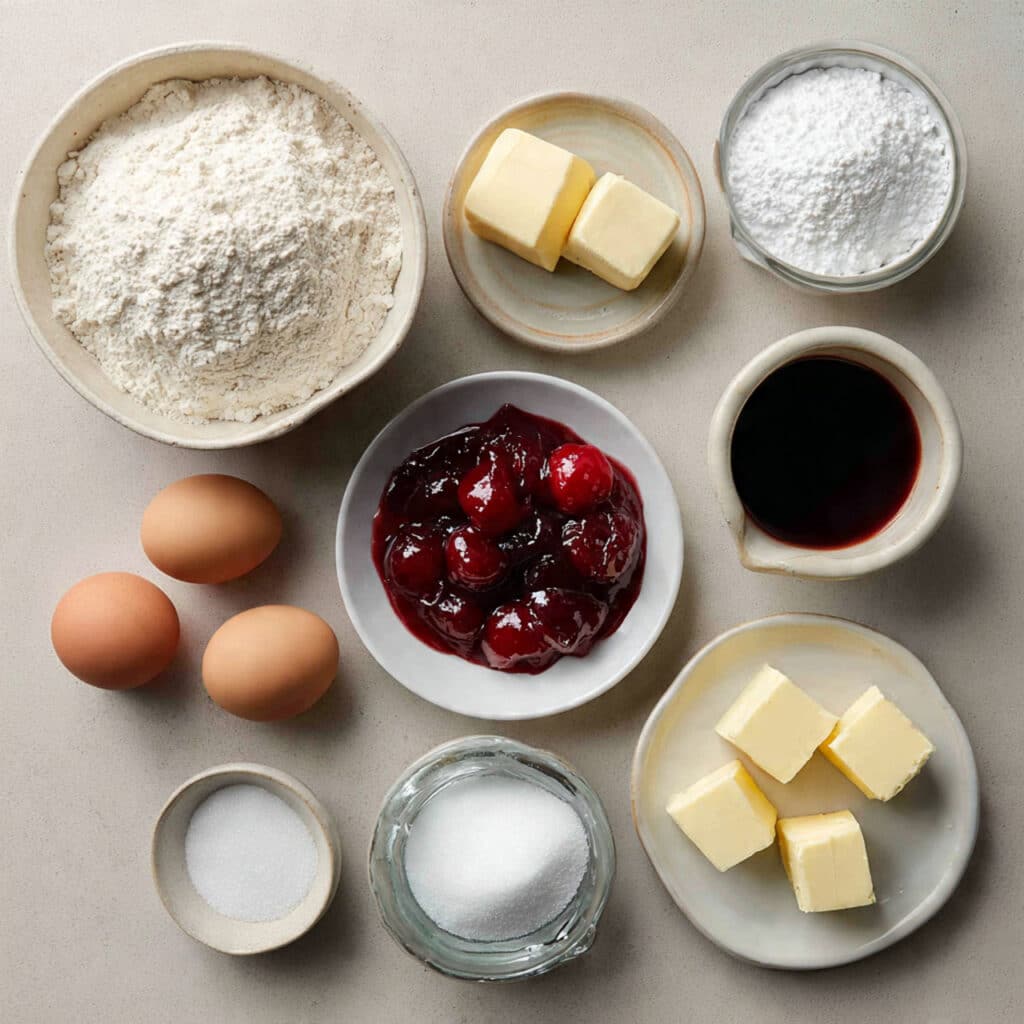
Each ingredient plays its part in creating the perfect balance of sweet, tart, and buttery goodness.
- All-Purpose Flour: 2 ½ cups – Provides structure for the crust and topping.
- Granulated Sugar: 1 cup – Sweetens both the base and the crumb topping.
- Salt: ½ teaspoon – Enhances all the flavors.
- Unsalted Butter: 1 cup (cold and cubed) – Creates a rich, tender crust and crumble.
- Large Eggs: 2 – Add moisture and binding to the crust.
- Vanilla Extract: 1 teaspoon – Brings out the flavor in the dough.
- Cherry Pie Filling: 1 (21 oz) can or 2 cups homemade – The star of the show, juicy and sweet with a slight tartness.
- Powdered Sugar: For optional dusting on top.
Ingredient Substitutions
Need to tweak things? No problem.
All-Purpose Flour: Use gluten-free flour blend if needed.
Granulated Sugar: Swap for coconut sugar or light brown sugar for a deeper flavor.
Unsalted Butter: Use plant-based butter for a dairy-free version.
Cherry Pie Filling: Try blueberry, raspberry, or apple filling for a twist.
Vanilla Extract: Almond extract pairs beautifully with cherries too.
Ingredient Spotlight
Cherry Pie Filling: Whether store-bought or homemade, this filling adds bold fruity flavor and a burst of color to each bite. Its balance of sweet and tart is what gives the bars their signature flavor.
Butter: Using cold butter ensures the crust and crumble have that flaky, melt-in-your-mouth texture. It’s what gives these bars their bakery-worthy finish.
Instructions for Making Cherry Pie Bars
Get ready to fill your kitchen with the smell of warm cherry pie and buttery goodness. Here are the steps you’re going to follow:
- Preheat Your Equipment:
Preheat your oven to 350°F (175°C). Line a 9×13-inch baking pan with parchment paper. - Combine Ingredients:
In a large bowl, whisk together flour, granulated sugar, and salt. Cut in the cold butter using a pastry cutter or fork until the mixture resembles coarse crumbs. - Prepare Your Cooking Vessel:
Take about 2/3 of the crust mixture and press it evenly into the bottom of your prepared pan. - Assemble the Dish:
Spread the cherry pie filling evenly over the crust layer. Sprinkle the remaining crumb mixture on top. - Cook to Perfection:
Bake for 35 to 40 minutes or until the top is lightly golden and bubbly. - Finishing Touches:
Allow to cool completely in the pan. Dust with powdered sugar if desired. - Serve and Enjoy:
Slice into squares and serve at room temperature or slightly chilled.
Texture & Flavor Secrets
What makes these bars special is the harmony of textures. The base is buttery and firm, the filling is lush and fruity, and the topping is crumbly with just the right crunch. The mix of sweet and tart in the cherries paired with the richness of the crust creates that perfect bite every time.
Cooking Tips & Tricks
- Use a glass or metal baking dish for even browning.
- If using fresh cherries, add a bit of cornstarch and sugar to create your own filling.
- Add a touch of lemon zest to the crust for a fresh twist.
What to Avoid
- Don’t overbake it can dry out the crust and make the filling rubbery.
- Avoid using warm butter it won’t create the crumbly texture you need.
- Don’t skip the cooling time it’s crucial for clean cuts and set filling.
Nutrition Facts
Servings: 12
Calories per serving: 290
Note: These are approximate values.
Preparation Time
Prep Time: 15 minutes
Cook Time: 40 minutes
Total Time: 55 minutes
Make-Ahead and Storage Tips
You can easily make these bars a day in advance. Let them cool, then store them in an airtight container in the fridge. They last up to 4 days. For longer storage, freeze individual bars with parchment between layers. To serve, thaw in the fridge or enjoy slightly chilled.
How to Serve Cherry Pie Bars
They’re perfect just as they are, but you can also:
- Top with whipped cream or a scoop of vanilla ice cream.
- Serve slightly warm with a drizzle of caramel.
- Add to a dessert tray with cookies and brownies for variety.
Creative Leftover Transformations
Leftovers? No problem. Here’s how to enjoy them differently:
- Crumble over vanilla yogurt or oatmeal for a breakfast treat.
- Layer into a trifle with whipped cream and berries.
- Reheat gently and serve with a splash of cream.
Additional Tips
- Try using almond extract in the filling for a more intense cherry flavor.
- Add slivered almonds to the topping for extra crunch.
- Use a serrated knife to slice through the bars cleanly once they’re cooled.
Make It a Showstopper
Presentation is key. Arrange the bars on a white platter with fresh cherries scattered around. Dust lightly with powdered sugar and add a sprig of mint for a pop of color. Their vibrant red hue and golden topping are naturally eye-catching.
Variations to Try
- Blueberry Pie Bars: Swap cherries for blueberries and add lemon zest to the crust.
- Peach Pie Bars: Use canned or fresh peaches with a cinnamon twist.
- Nutty Crumb Topping: Add chopped pecans or almonds to the crumble layer.
- Chocolate Cherry Bars: Mix mini chocolate chips into the cherry filling.
- Glazed Bars: Drizzle a simple icing made from powdered sugar and milk over the cooled bars.
FAQ’s
1. Can I use fresh cherries instead of canned filling?
Yes, just cook them down with sugar and cornstarch to make a quick homemade filling.
2. Can I freeze cherry pie bars?
Absolutely. Freeze them in a single layer, then stack with parchment between.
3. How do I prevent a soggy bottom?
Make sure your bottom crust is firmly pressed and bake until lightly golden.
4. Can I double the recipe?
Yes, just use a larger baking dish or two pans.
5. What’s the best way to slice cleanly?
Let them cool completely and use a serrated knife for neat cuts.
6. Can I make these gluten-free?
Yes, use a gluten-free flour blend in the same quantity.
7. Are these bars good warm or cold?
Both. Chilled bars hold better, but slightly warm ones are super comforting.
8. Can I use almond extract instead of vanilla?
Yes, it adds a delicious depth that pairs beautifully with cherries.
9. What type of butter works best?
Use cold unsalted butter for the best texture and flavor.
10. Can I add nuts to the topping?
Definitely. Chopped almonds or pecans are a great addition.
Conclusion
Cherry pie bars are that nostalgic bite of summer, easy to make and impossible to resist. Whether you’re baking them for a party or sneaking one with your morning coffee, they’re sure to become a go-to favorite. Trust me, they’re worth every bite.
Print
Cherry Pie Bars
These cherry pie bars combine a buttery crust, juicy cherry filling, and a golden crumb topping in one irresistible treat. Perfect for potlucks, picnics, or anytime you’re craving a slice of summer.
- Total Time: 55 minutes
- Yield: 12 bars 1x
Ingredients
- 2 ½ cups all-purpose flour
- 1 cup granulated sugar
- ½ teaspoon salt
- 1 cup unsalted butter, cold and cubed
- 2 large eggs
- 1 teaspoon vanilla extract
- 1 (21 oz) can cherry pie filling or 2 cups homemade
- Powdered sugar, for optional dusting
Instructions
- Preheat your oven to 350°F (175°C). Line a 9×13-inch baking pan with parchment paper.
- In a large bowl, whisk together flour, granulated sugar, and salt.
- Cut in the cold butter using a pastry cutter or fork until the mixture resembles coarse crumbs.
- Add eggs and vanilla extract. Mix until combined and dough begins to form.
- Press about 2/3 of the dough mixture into the bottom of the prepared pan to form the crust.
- Spread the cherry pie filling evenly over the crust.
- Crumble the remaining dough evenly over the cherry filling.
- Bake for 35 to 40 minutes or until the top is golden and bubbly.
- Allow to cool completely before slicing into bars. Dust with powdered sugar if desired.
Notes
- Use parchment paper to lift the bars out easily after baking.
- Let the bars cool completely for the cleanest slices.
- Try with blueberry or peach filling for a fruity variation.
- Store in the fridge for up to 4 days or freeze for longer storage.
- Prep Time: 15 minutes
- Cook Time: 40 minutes
- Category: Dessert
- Method: Baking
- Cuisine: American
- Diet: Vegetarian
Nutrition
- Serving Size: 1 bar
- Calories: 290
- Sugar: 18g
- Sodium: 95mg
- Fat: 14g
- Saturated Fat: 9g
- Unsaturated Fat: 4g
- Trans Fat: 0g
- Carbohydrates: 38g
- Fiber: 1g
- Protein: 3g
- Cholesterol: 50mg
Keywords: cherry pie bars, cherry dessert, fruit bars, easy summer dessert, crumb bars