Fried cheese stuffed dorito
There is something almost impossible to resist about biting into a crisp golden shell and finding a warm, stretchy center waiting inside. That first crackle gives way to creamy melted cheese, and suddenly this snack feels bigger than it looks. It is fun, comforting, a little over the top, and completely worth it. Trust me, you’re going to love this, especially when you want something crunchy, cheesy, and seriously satisfying.
Why These Crispy Cheese Bites Are So Hard to Stop Eating
Some recipes are practical, and some are memorable, and this one somehow manages to be both. The outside is bold and crunchy from the crushed cheese chips, while the inside stays smooth, rich, and melty. That contrast is what makes every bite feel exciting. This one’s a total game-changer when you need a party snack, a movie-night treat, or just something fun to make when plain appetizers are not cutting it.
And now that you can already imagine that crunchy coating and gooey center, let’s dive into where this kind of snack spirit comes from and why people keep coming back to it.
A Playful Twist on Fried Snack Favorites
Fried cheese snacks have shown up in different forms all over the place, from mozzarella sticks to stuffed jalapeños to crunchy cheese bites served at fairs and game-day tables. This version leans into that same comfort-food tradition, but gives it a playful spin by using crushed cheese chips for the coating. It feels modern, a little nostalgic, and perfect for anyone who loves bold snack flavors.
At heart, it belongs to that wonderful family of finger foods that are meant to be passed around, dipped, shared, and talked about. It is casual food, but it still delivers a huge payoff. Let me tell you, it’s worth every bite.
Reasons This Snack Earns a Spot on Your Table
Before we get into the details, it helps to know why this one is such a reliable little winner. It is not just about the cheese pull, although that definitely helps.
Versatile: These bites work as an appetizer, a party snack, or even a fun side dish for burgers, sandwiches, or soup. They fit in just about anywhere a crispy, cheesy treat would be welcome.
Budget-Friendly: Most of the ingredients are simple and easy to find, which means you can make a batch without stretching your grocery budget too far. A little cheese and a handful of pantry staples go a long way here.
Quick and Easy: The prep is simple, and once the coating station is set up, things move pretty fast. You do not need fancy techniques to get that crisp, golden finish.
Customizable: You can switch up the cheese, play with the seasoning, or adjust the heat level to suit your taste. It is one of those snacks that happily adapts.
Crowd-Pleasing: Crunchy outside, melty inside, bold flavor all around, this is the kind of tray that disappears fast. Even picky eaters tend to reach for seconds.
Make-Ahead Friendly: You can assemble the bites in advance and chill them until you are ready to fry. That makes entertaining feel a whole lot easier.
Great for Leftovers: If you somehow have extras, they reheat surprisingly well and still keep that appealing contrast between crisp coating and soft center.
Smart Tricks for Extra Crunch and Better Melt
A few small choices can take these bites from good to ridiculously good. Once you know the little details, the whole process feels a lot smoother.
- Freeze the cheese pieces briefly before breading so they hold their shape better during frying.
- Crush the chips finely, but not into complete dust, because a little texture helps create a more interesting crust.
- Double coat the bites if you want extra insurance against cheese leakage.
- Keep the oil at a steady frying temperature so the coating crisps before the cheese escapes.
- Fry in small batches so the oil stays hot and each piece cooks evenly.
Kitchen Gear That Makes the Process Easier
Before the fun really starts, it helps to gather a few tools that keep everything tidy and stress-free.
Sharp Knife: Useful for cutting the cheese into evenly sized cubes or short sticks so they cook at the same pace.
Mixing Bowls: You will need a few shallow bowls for the flour, eggs, and crushed chips to build an easy breading station.
Rolling Pin or Food Bag: Handy for crushing the chips into small crunchy pieces without making a huge mess.
Heavy Pot or Deep Skillet: A sturdy pan holds heat better and helps the bites fry evenly.
Slotted Spoon or Spider Strainer: This makes it easier to lift the bites out of the hot oil without disturbing the crust.
Paper Towel Lined Plate or Wire Rack: Perfect for draining excess oil while keeping the coating crisp.
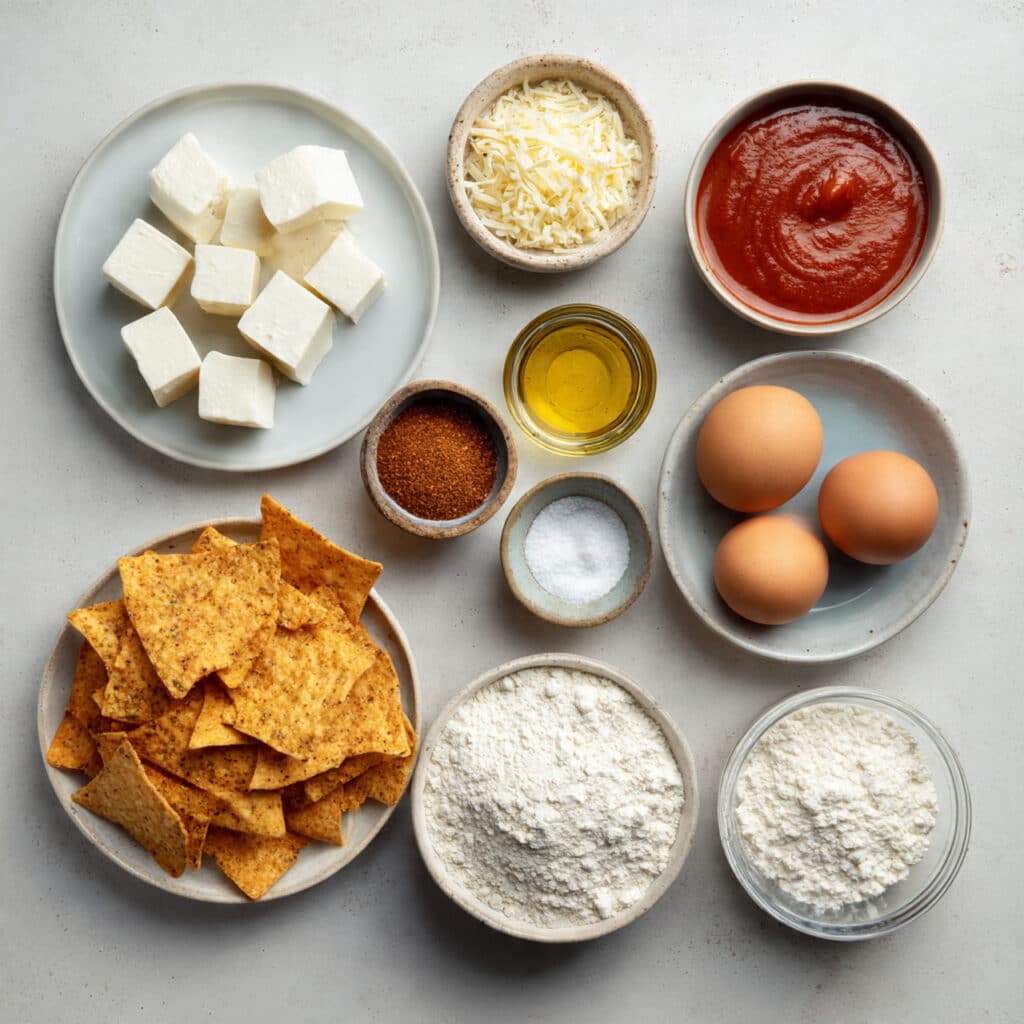
The Ingredients That Build All That Crunch and Cheese
The beauty of this snack is how a few familiar ingredients come together to make something that feels extra special. Every part has a job to do, from the creamy center to the crisp shell that turns beautifully golden in the oil.
- Mozzarella cheese: 8 ounces, cut into 16 small cubes or short sticks. This is the gooey heart of the dish, mild in flavor and wonderfully stretchy when melted.
- Nacho cheese tortilla chips: 2 cups, finely crushed. These create the bold, flavorful outer coating and bring that signature cheesy crunch.
- All-purpose flour: 1 cup. This gives the first layer something dry for the egg to cling to, helping the coating stay in place.
- Large eggs: 2, beaten. The eggs act like the glue that binds the crushed chips to the cheese.
- Garlic powder: 1 teaspoon. This adds a savory background note that makes the coating taste fuller and more rounded.
- Paprika: 1 teaspoon. It brings gentle warmth and a richer color to the crust.
- Black pepper: 1/4 teaspoon. Just enough to sharpen the flavor without overpowering the cheese.
- Salt: 1/4 teaspoon. A small amount helps balance the coating, especially if your chips are not heavily seasoned.
- Vegetable oil: 3 cups, for frying. A neutral oil lets the crunchy coating and cheese filling stay the focus.
- Marinara sauce or ranch dressing: 1/2 cup, for serving, optional. A cool or tangy dip turns these bites into an even more irresistible snack plate.
Easy Ingredient Swaps When You Want to Change Things Up
Once you know the basic formula, there is plenty of room to make it your own. That is one more reason this snack feels so approachable.
Mozzarella cheese: Cheddar cheese cubes, Monterey Jack, or low-moisture string cheese pieces.
Nacho cheese tortilla chips: Plain tortilla chips mixed with extra seasoning, or crunchy cheese crackers crushed finely.
All-purpose flour: Gluten-free all-purpose flour blend.
Garlic powder: Onion powder or a small pinch of taco seasoning.
Paprika: Smoked paprika for deeper flavor, or chili powder for a little kick.
Marinara sauce or ranch dressing: Salsa, queso-style dip, or a simple yogurt-based dipping sauce.
The Ingredients That Really Steal the Show
A couple of ingredients do most of the heavy lifting here, and they deserve a little spotlight before we move on.
Mozzarella cheese: This is what gives the snack its dreamy, stretchy center. It melts smoothly without turning greasy too quickly, which makes it ideal for frying.
Nacho cheese tortilla chips: These are the secret to the bold crust. They bring salty, tangy, cheesy flavor and a texture that feels way more exciting than plain breadcrumbs.
Let’s Get These Golden Bites Cooking
Now comes the part where everything starts to come together. The bowls are lined up, the oil is heating, and the kitchen already feels a little more exciting. Here are the steps you are going to follow to get that crisp outside and molten center just right.
- Preheat Your Equipment: Pour the vegetable oil into a heavy pot or deep skillet and heat it to 350°F. Line a plate or tray with paper towels or set out a wire rack for draining after frying.
- Combine Ingredients: In one shallow bowl, add the flour, garlic powder, paprika, black pepper, and salt, then stir to combine. Place the beaten eggs in a second bowl. Add the finely crushed tortilla chips to a third bowl.
- Prepare Your Cooking Vessel: Make sure the oil is hot but not smoking, and keep the breading station close to the stove so you can work efficiently. If needed, chill or freeze the cheese pieces for 15 to 20 minutes before coating so they stay firmer.
- Assemble the Dish: Dredge each piece of cheese in the seasoned flour, dip it into the beaten eggs, and coat it thoroughly in the crushed chips. For a sturdier shell, repeat the egg and chip coating one more time, then place the breaded pieces on a tray.
- Cook to Perfection: Fry the coated pieces in small batches for 1 to 2 minutes, or until the outside is deep golden and crisp. Turn them gently if needed so they brown evenly on all sides.
- Finishing Touches: Remove the bites with a slotted spoon and let them drain briefly on the prepared plate or rack. Give them a minute to settle so the coating stays crisp and the cheese inside does not spill too fast when opened.
- Serve and Enjoy: Arrange them on a plate while still warm and serve with marinara sauce or ranch dressing on the side. The best moment is that first bite, when the crust crackles and the cheese stretches.
Where the Crunch Meets the Melt
What makes these bites so satisfying is the contrast. The coating starts out crisp, craggy, and full of bold snack flavor, then the center softens everything with a smooth, creamy melt. You get saltiness from the chips, gentle warmth from the seasoning, and that rich dairy note from the cheese that ties it all together.
As they fry, the coating deepens in color and develops a toasty flavor that feels almost addictive. Meanwhile, the center turns just soft enough to pull and stretch without fully bursting out. It is that tiny window of perfect timing that makes these so special.
Handy Tips for Foolproof Results
By this point, you are already close to snack success, and these little pointers can make the process feel even easier.
- Chill the coated bites for 10 to 15 minutes before frying if your kitchen is warm, because that helps the crust stick better.
- Test one piece first so you can adjust the frying time before cooking the full batch.
- Use a thermometer if possible, because steady oil temperature makes a huge difference.
- Serve them right away for the best crunch and the most dramatic cheese pull.
Common Slip-Ups and How to Dodge Them
Even fun recipes have a few traps, but the good news is they are easy to avoid once you know what to watch for.
- Frying at oil that is too cool, which can make the coating greasy instead of crisp. Keep the oil around 350°F for the best texture.
- Skipping the second coating when your cheese pieces are small or very soft. A double coat offers extra protection.
- Overfrying the bites, which can cause the cheese to leak out. Pull them as soon as the crust turns deep golden.
- Crowding the pan, which lowers the oil temperature and leads to uneven browning. Fry in small batches.
A Quick Look at the Nutrition
These bites are definitely an indulgent treat, and that is part of their charm. They are rich, savory, and meant to be enjoyed warm and fresh.
Servings: 4
Calories per serving: 430
Note: These are approximate values.
Time Breakdown Before You Start
It is always nice to know how long a recipe will take before you begin, especially when you are planning for guests or a snack craving that cannot wait much longer.
Prep Time: 20 minutes
Cook Time: 10 minutes
Total Time: 30 minutes
Prep Ahead, Store Smart, and Reheat Well
If you are planning ahead, these bites are surprisingly cooperative. You can bread the cheese pieces a few hours in advance and keep them chilled on a tray until frying time. That makes them especially handy for parties, because most of the work is already done before guests arrive.
For storage, let leftovers cool completely, then place them in an airtight container in the refrigerator for up to 3 days. For freezing, arrange the uncooked breaded pieces on a tray until firm, then transfer them to a freezer-safe container or bag for up to 1 month. Reheat cooked bites in a hot oven or air fryer until crisp again. That keeps the shell from turning soft, which is really the whole magic here.
The Best Ways to Serve These Crispy Little Stars
Once they are hot and golden, these bites do not need much to shine, but a few serving ideas can make the whole plate feel extra special. Marinara adds bright tanginess, while ranch gives a cool, creamy contrast. Salsa is another great option if you want something punchier.
They also pair beautifully with burgers, sandwiches, tomato soup, or a casual snack board with crunchy veggies and dips. For a party spread, pile them high on a platter and serve them immediately while the centers are still soft and stretchy.
Smart and Tasty Ways to Use the Leftovers
In the rare event that leftovers happen, they can still be a lot of fun the next day. Reheated bites make an amazing topping for a warm bowl of tomato soup, where the crunchy shell softens just slightly and the cheese turns extra comforting.
You can also tuck them into a wrap with lettuce and a spoonful of dip, or chop them into chunky pieces and scatter them over a loaded salad for a playful crunch. They are even good alongside scrambled eggs for a bold brunch plate.
Extra Little Details That Make a Big Difference
Sometimes it is the smallest choices that make a recipe feel polished. Use low-moisture cheese if possible, because it melts well without releasing too much liquid. Crush the chips finely enough to coat evenly, but leave just enough texture so the crust still feels crunchy and interesting.
A tiny rest after frying helps too. Give the bites a minute before serving so the coating settles and the cheese inside becomes molten instead of explosive. It is a small step, but it makes the first bite much nicer.
Simple Ways to Make Them Look Party Ready
Presentation matters, especially with a snack this fun. Serve the bites on a clean white platter or a wooden board so the golden coating really stands out. A small bowl of dip in the center makes the plate feel inviting and easy to share.
You can also stack a few with one piece opened slightly so the melted center shows. That little peek at the gooey cheese makes the whole tray instantly more tempting, and honestly, it is hard to beat that visual.
Fun Twists to Keep in Your Back Pocket
Once you make the base version, it is easy to imagine a few creative spins for different moods and occasions.
Spicy version: Add a pinch of cayenne pepper or chili powder to the flour mixture for gentle heat.
Extra cheesy crust: Mix a few tablespoons of finely grated Parmesan into the crushed chips for even deeper savory flavor.
Herb-forward version: Stir a little dried oregano or Italian seasoning into the coating for a pizza-inspired vibe.
Different cheese center: Use Monterey Jack or cheddar cubes for a slightly sharper flavor and a richer finish.
Air fryer variation: Chill the coated bites well, spray them lightly with oil, and air fry until crisp for a lighter take with great crunch.
FAQ’s
Q1: Can I use string cheese instead of mozzarella cubes?
Yes, string cheese works really well because it is firm, easy to cut, and melts beautifully. Just cut each stick into shorter bite-sized pieces before coating.
Q2: Why did my cheese leak out during frying?
That usually happens when the coating is too thin or the oil is not hot enough. A double coating and properly heated oil help keep the cheese inside.
Q3: Can I make these ahead of time?
Yes, you can bread the cheese pieces ahead and keep them refrigerated for several hours. You can also freeze them before frying.
Q4: What oil is best for frying?
A neutral oil like vegetable oil works best because it handles heat well and does not overpower the flavor of the snack.
Q5: Do I have to use nacho cheese chips?
No, but they do give the coating its bold flavor. Plain tortilla chips with added seasoning can also work nicely.
Q6: Can I bake these instead of frying them?
You can, although the texture will be a bit less crisp and rich. A hot oven or air fryer will give better results than a lower-temperature bake.
Q7: What dip goes best with them?
Marinara and ranch are both great choices. Salsa is also delicious if you want a more zesty finish.
Q8: How do I keep them crispy after frying?
Drain them on a wire rack if possible, and avoid stacking them right away. Serve them fresh for the best texture.
Q9: Are these good for parties?
Absolutely. They are easy to grab, fun to dip, and they tend to disappear quickly, which is always a good sign.
Q10: Can I use a different coating besides crushed chips?
Yes, breadcrumbs or crushed crackers can work, but the chip coating gives a stronger crunch and more flavor.
Conclusion
Some snacks just know how to steal the spotlight, and this one does it with barely any effort. That crisp shell, that gooey center, that salty cheesy crunch, it all comes together in a way that feels playful and deeply satisfying. Whether you are making them for friends or just treating yourself to something fun, these bites bring a lot of joy to the table. Trust me, once you hear that first crunchy bite and see that melty center, you will already be thinking about making them again.
Print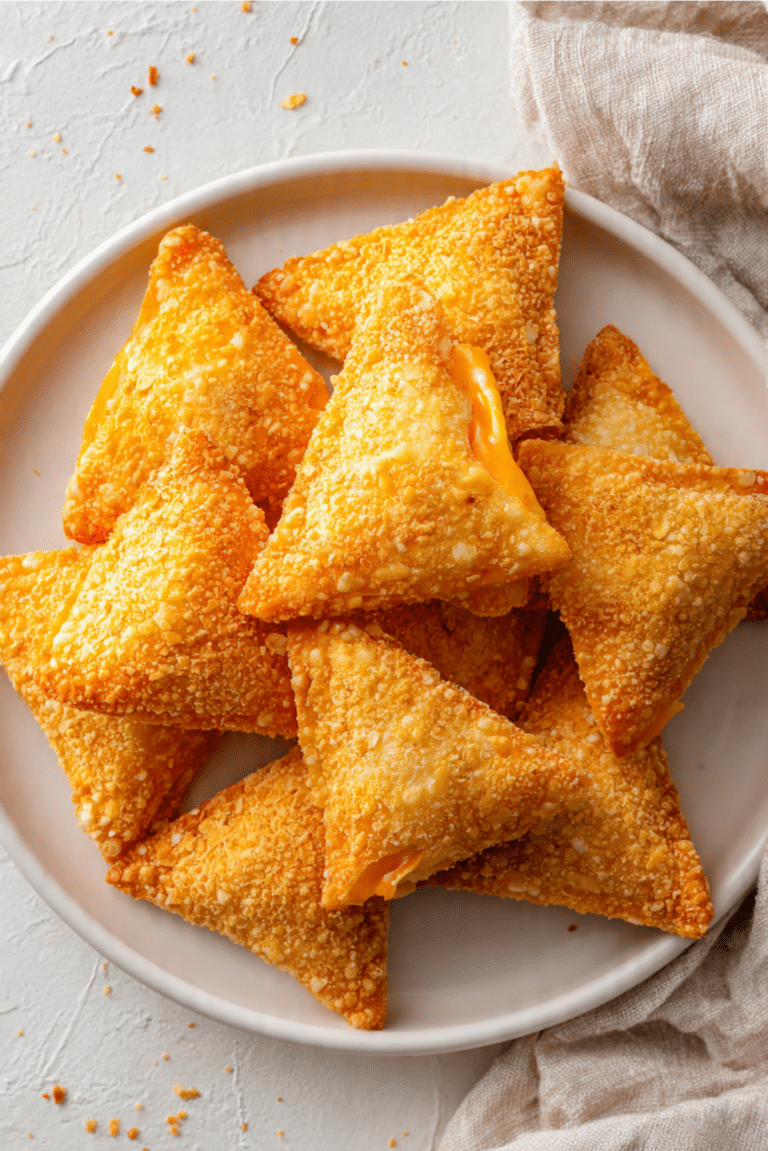
Fried cheese stuffed dorito
Crispy fried cheese bites coated in crushed nacho cheese tortilla chips with a warm, melty mozzarella center. This fun snack is bold, crunchy, and perfect for parties, game day, or a cozy movie night.
- Total Time: 30 minutes
- Yield: 4 servings 1x
Ingredients
- 8 ounces mozzarella cheese, cut into 16 small cubes or short sticks
- 2 cups nacho cheese tortilla chips, finely crushed
- 1 cup all-purpose flour
- 2 large eggs, beaten
- 1 teaspoon garlic powder
- 1 teaspoon paprika
- 1/4 teaspoon black pepper
- 1/4 teaspoon salt
- 3 cups vegetable oil, for frying
- 1/2 cup marinara sauce or ranch dressing, for serving, optional
Instructions
- Heat the vegetable oil in a heavy pot or deep skillet to 350°F. Line a plate with paper towels or set out a wire rack.
- In a shallow bowl, mix the flour, garlic powder, paprika, black pepper, and salt.
- Place the beaten eggs in a second bowl and the finely crushed tortilla chips in a third bowl.
- If needed, chill or freeze the cheese pieces for 15 to 20 minutes so they stay firm during frying.
- Coat each piece of cheese in the seasoned flour, then dip in the beaten eggs, then coat thoroughly in the crushed chips.
- For a thicker crust, repeat the egg and crushed chip coating one more time.
- Fry the coated cheese pieces in small batches for 1 to 2 minutes, until deep golden and crisp.
- Remove with a slotted spoon and drain briefly on the prepared plate or rack.
- Serve warm with marinara sauce or ranch dressing, if desired.
Notes
- Freeze the cheese briefly before breading for easier handling and less leakage.
- Double coating helps keep the cheese inside while frying.
- Do not overcrowd the pan, or the oil temperature will drop.
- These are best served hot for the ultimate crunchy coating and melty center.
- Prep Time: 20 minutes
- Cook Time: 10 minutes
- Category: Appetizer
- Method: Frying
- Cuisine: American
- Diet: Vegetarian
Nutrition
- Serving Size: 1/4 recipe
- Calories: 430
- Sugar: 2g
- Sodium: 620mg
- Fat: 27g
- Saturated Fat: 9g
- Unsaturated Fat: 16g
- Trans Fat: 0g
- Carbohydrates: 29g
- Fiber: 2g
- Protein: 16g
- Cholesterol: 110mg
Keywords: fried cheese stuffed dorito, cheese bites, fried cheese snack, crunchy appetizer, mozzarella bites, party snack