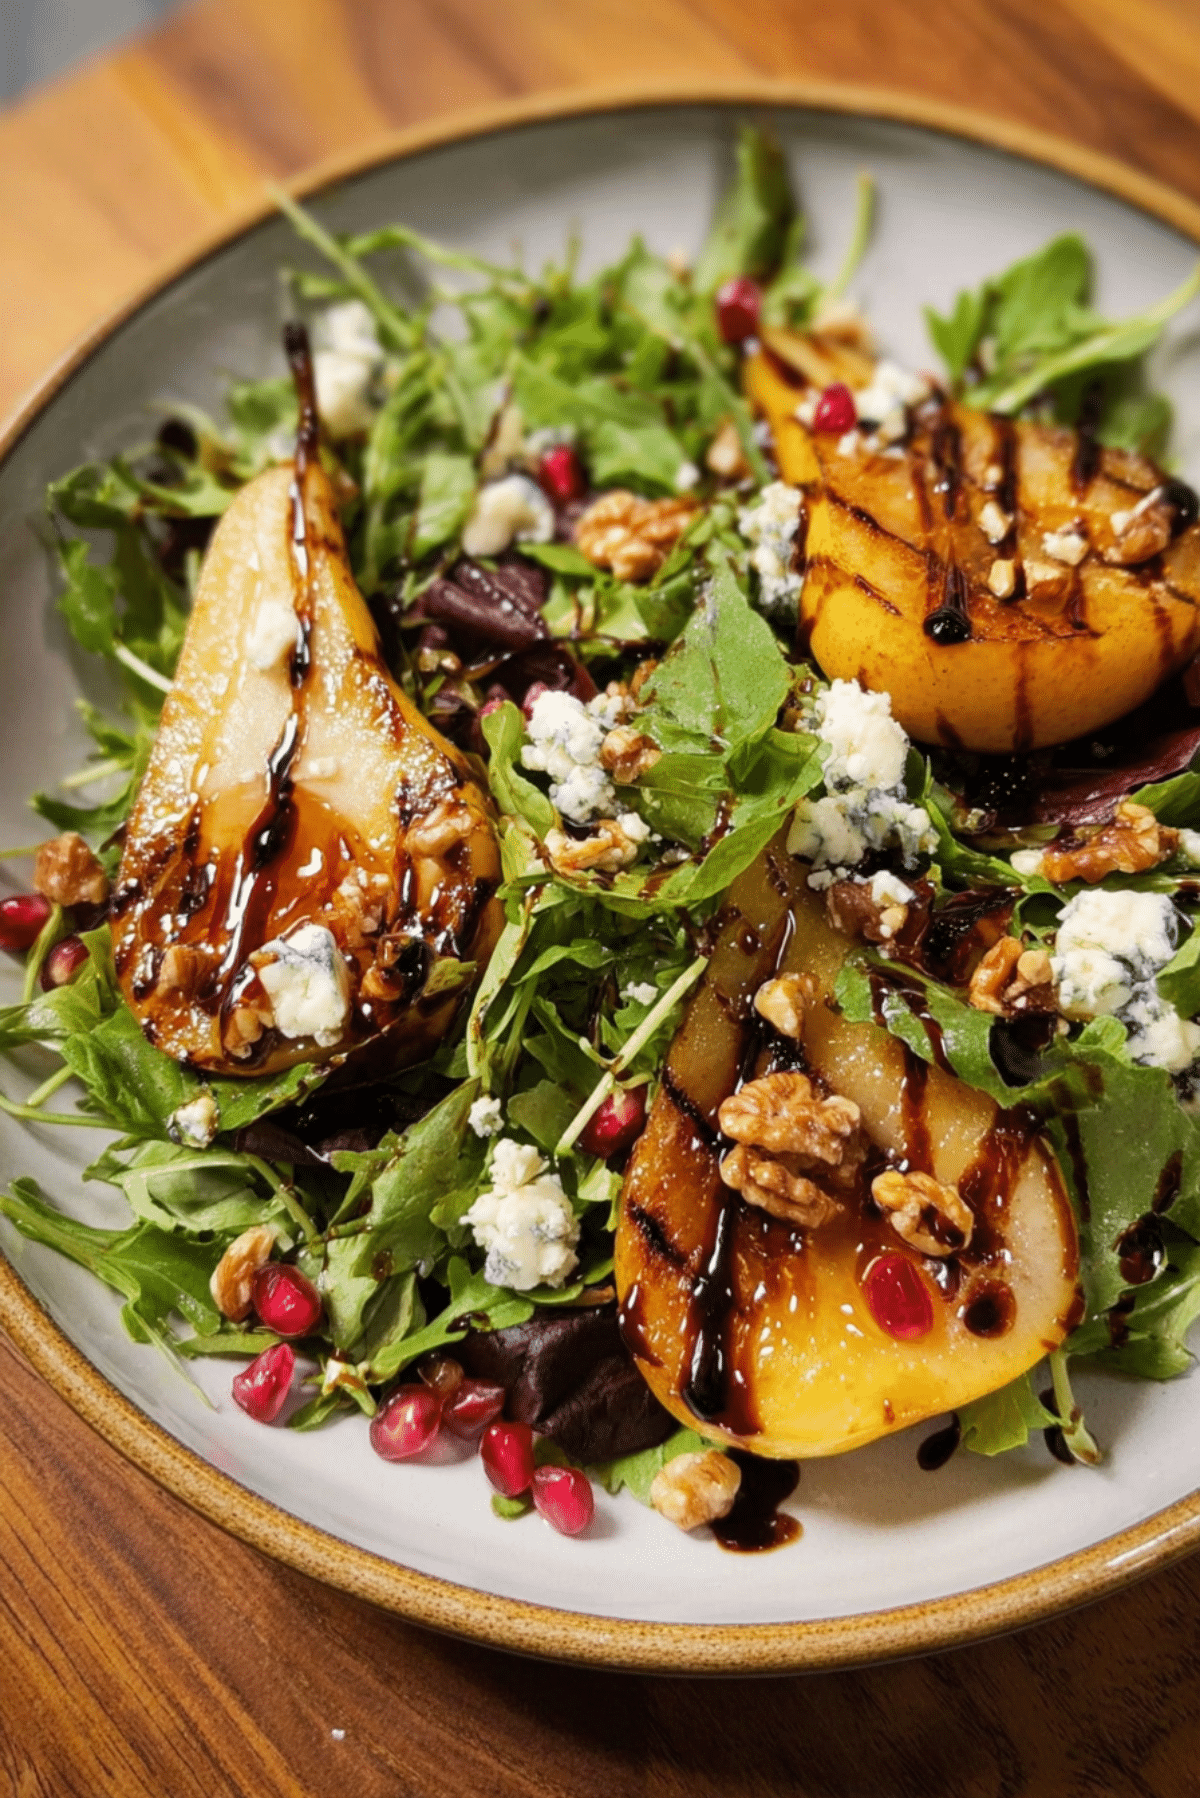
Grilled Pear Salad
There’s something about grilled fruit that turns an everyday dish into something truly special. And when it comes to salads, few combinations rival the elegance and balance of a grilled pear salad. The sweet caramelized edges of the pear meet the sharpness of blue cheese and the crunch of toasted nuts, all brought together on a bed of fresh greens. It’s fresh, warm, and satisfying in a way that surprises you with every bite.
Behind the Recipe
This salad was inspired by a late summer afternoon, when pears are just ripening and backyard grills are still going strong. I remember stumbling upon the idea while trying to use up extra pears and craving something fresh yet hearty. A quick brush with oil and a trip to the grill transformed the fruit, giving it a smoky depth that played beautifully with tangy cheese and earthy nuts. It became a staple ever since.
Recipe Origin or Trivia
While pears have long been used in salads across various cultures, grilling them adds a rustic twist that feels both European and distinctly homey. In Italy and France, fruit and cheese combinations are traditional, often served as a course unto themselves. The concept of mixing grilled fruit into savory dishes has found its way into modern American cuisine, and this salad is a perfect example of that delicious fusion.
Why You’ll Love Grilled Pear Salad
This dish is the perfect balance of sophistication and simplicity. Here’s why it will win you over:
Versatile: Great as a starter, light lunch, or even a show-stopping side dish for a holiday meal.
Budget-Friendly: Uses seasonal produce and pantry staples to create something elegant without breaking the bank.
Quick and Easy: From prep to plate in under 30 minutes, with just a handful of ingredients.
Customizable: Swap the greens, nuts, or cheese based on what you have or love.
Crowd-Pleasing: A beautiful dish that always gets compliments at gatherings.
Make-Ahead Friendly: Grill the pears ahead of time and assemble when ready to serve.
Great for Leftovers: Even the next day, the flavors deepen and hold up well.
Chef’s Pro Tips for Perfect Results
Let me walk you through a few tips to make your grilled pear salad unforgettable:
- Choose ripe but firm pears: They should hold their shape on the grill without turning to mush.
- Preheat your grill well: This ensures nice sear marks and prevents sticking.
- Brush pears lightly with oil: This helps caramelization and avoids burning.
- Toast your nuts: It adds a deep nutty aroma and a satisfying crunch.
- Dress the greens lightly: Too much dressing will overpower the delicate flavor of the pears.
Kitchen Tools You’ll Need
You don’t need a gourmet kitchen, just a few basics to pull this off effortlessly:
Grill or Grill Pan: Essential for getting that smoky char on the pears.
Sharp Knife: For slicing pears cleanly and uniformly.
Mixing Bowl: To toss your greens with dressing.
Tongs: Handy for flipping the pears without breaking them.
Serving Platter or Bowl: For that final beautiful presentation.
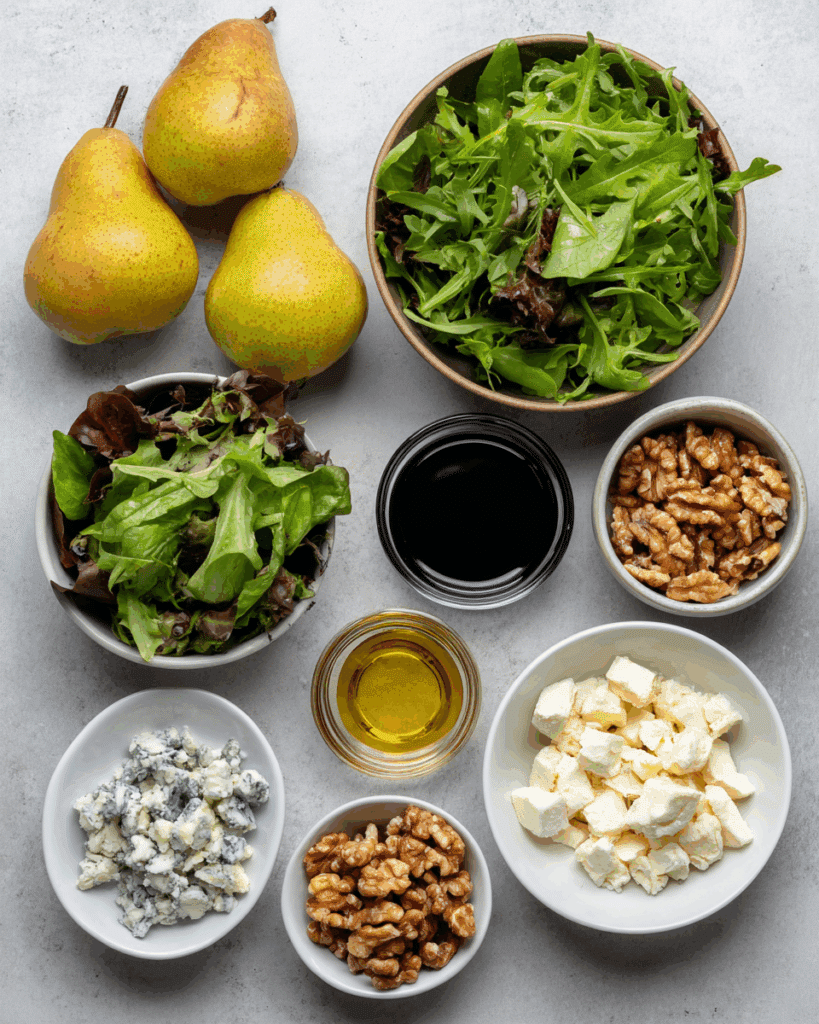
Ingredients in Grilled Pear Salad
Every ingredient here plays its part to create a salad that’s bright, bold, and irresistibly delicious.
- Ripe Pears: 2 medium, sliced into wedges These are the star, grilled to caramelized perfection.
- Mixed Greens: 5 cups A fresh, peppery base that balances the sweetness.
- Blue Cheese: 1/3 cup crumbled Adds a salty, creamy punch that pairs perfectly with the pears.
- Walnuts: 1/4 cup toasted Offers a crunchy, nutty contrast to the soft fruit.
- Balsamic Glaze: 2 tablespoons A sweet, tangy drizzle that ties all the flavors together.
- Olive Oil: 1 tablespoon Brushed on pears for grilling and a touch in the dressing.
- Salt and Pepper: to taste Essential seasonings to balance everything out.
Ingredient Substitutions
Whether you’re adjusting for preferences or pantry, here are easy swaps:
Pears: Apples or peaches.
Blue Cheese: Goat cheese or feta.
Walnuts: Pecans or almonds.
Mixed Greens: Arugula, spinach, or romaine.
Balsamic Glaze: Honey mixed with a splash of balsamic vinegar.
Ingredient Spotlight
Pears: When grilled, pears become tender and caramelized, releasing a subtle floral sweetness that elevates the dish.
Blue Cheese: Its creamy, pungent flavor cuts through the sweetness of the fruit, creating a rich and satisfying contrast.
Instructions for Making Grilled Pear Salad
We’re about to take your salad game up a notch. Follow these easy steps and enjoy the magic of grilled fruit done right.
- Preheat Your Equipment: Heat your grill or grill pan over medium-high heat until hot.
- Combine Ingredients: In a large bowl, toss the mixed greens with a touch of olive oil, salt, and pepper.
- Prepare Your Cooking Vessel: Lightly oil the grill grates or grill pan to prevent sticking.
- Assemble the Dish: Brush pear wedges with olive oil and place them cut side down on the grill.
- Cook to Perfection: Grill pears for about 2–3 minutes per side until charred but still firm.
- Finishing Touches: Arrange greens on a platter, top with grilled pears, blue cheese, and walnuts. Drizzle with balsamic glaze.
- Serve and Enjoy: Serve immediately while the pears are warm and the salad is crisp and fresh.
Texture & Flavor Secrets
This salad is all about contrast. You’ve got the juicy tenderness of grilled pears, the creamy richness of blue cheese, and the toasted crunch of nuts. Add in peppery greens and a sweet-tart glaze, and every forkful is a little flavor journey.
Cooking Tips & Tricks
Let’s make sure you nail this every time:
- Use a ripe-but-firm pear variety like Bosc or Anjou.
- Don’t overcrowd the grill. Give those pear slices room to breathe.
- Chill your salad plate before serving to keep greens crisp.
What to Avoid
A few common missteps and how to dodge them:
- Overripe pears: They’ll turn mushy and fall apart on the grill.
- Heavy dressing: It can make the salad soggy fast.
- Skipping the toast: Toasting nuts makes a huge difference in flavor.
Nutrition Facts
Servings: 4
Calories per serving: 260
Note: These are approximate values.
Preparation Time
Prep Time: 10 minutes
Cook Time: 10 minutes
Total Time: 20 minutes
Make-Ahead and Storage Tips
This salad is best served fresh, but there’s room to prep ahead. Grill the pears and toast the nuts a day in advance. Store everything separately, then assemble just before serving. Leftovers can be kept in the fridge for up to one day, though the greens may wilt slightly.
How to Serve Grilled Pear Salad
Perfect as a light entrée with crusty bread or as a standout side to roasted meats or grain-based mains. It also shines next to a bowl of soup or a hearty sandwich. For a fancier presentation, plate individually with a drizzle of glaze just before serving.
Creative Leftover Transformations
Don’t toss those leftovers! Here’s how to reinvent them:
- Toss with quinoa or couscous for a hearty grain bowl.
- Wrap in a tortilla with extra greens and grilled chicken.
- Use as a topping on a flatbread with extra cheese and a bake.
Additional Tips
Want to push the flavor even further?
- Add a sprinkle of sea salt flakes right before serving.
- A touch of lemon zest adds brightness to the pears.
- Store balsamic glaze in a squeeze bottle for easy drizzling.
Make It a Showstopper
Presentation is key. Use a large white platter to contrast the greens and pears. Layer everything with height in mind and place a few extra grilled pears on top for visual flair. A final drizzle of glaze right before serving makes it irresistible.
Variations to Try
Let’s play with flavors and textures:
- Add grilled chicken: Makes it a full meal.
- Sprinkle pomegranate seeds: Adds color and juicy pops.
- Swap blue cheese for brie: A milder, creamy twist.
- Add roasted beets: For earthy sweetness and color.
- Try arugula: For a peppery bite and bold base.
FAQ’s
Q1: Can I make this salad vegan?
A1: Yes, just skip the cheese or use a vegan alternative.
Q2: Can I use canned pears?
A2: Fresh is best for grilling, but canned pears drained well can work in a pinch.
Q3: What’s the best pear variety for grilling?
A3: Bosc or Anjou hold their shape and grill beautifully.
Q4: Can I make this without a grill?
A4: Yes, a stovetop grill pan or even a broiler will work.
Q5: Is there a nut-free option?
A5: Absolutely, try roasted seeds like pumpkin or sunflower.
Q6: Can I prep this ahead for a party?
A6: Grill pears and toast nuts in advance, then assemble just before serving.
Q7: Will the pears turn brown?
A7: A light brush of lemon juice helps prevent browning.
Q8: Can I use feta instead of blue cheese?
A8: Yes, it adds a tangy, salty flavor that pairs well with pears.
Q9: What dressing works best?
A9: A light balsamic vinaigrette or balsamic glaze is perfect.
Q10: How do I store leftovers?
A10: Store in an airtight container and eat within a day for best texture.
Conclusion
This grilled pear salad is one of those dishes that looks fancy, tastes amazing, and takes surprisingly little effort. With sweet smoky pears, creamy cheese, and crunchy nuts, it’s a flavor-packed plate that feels like a little luxury. Trust me, you’re going to love this.
Print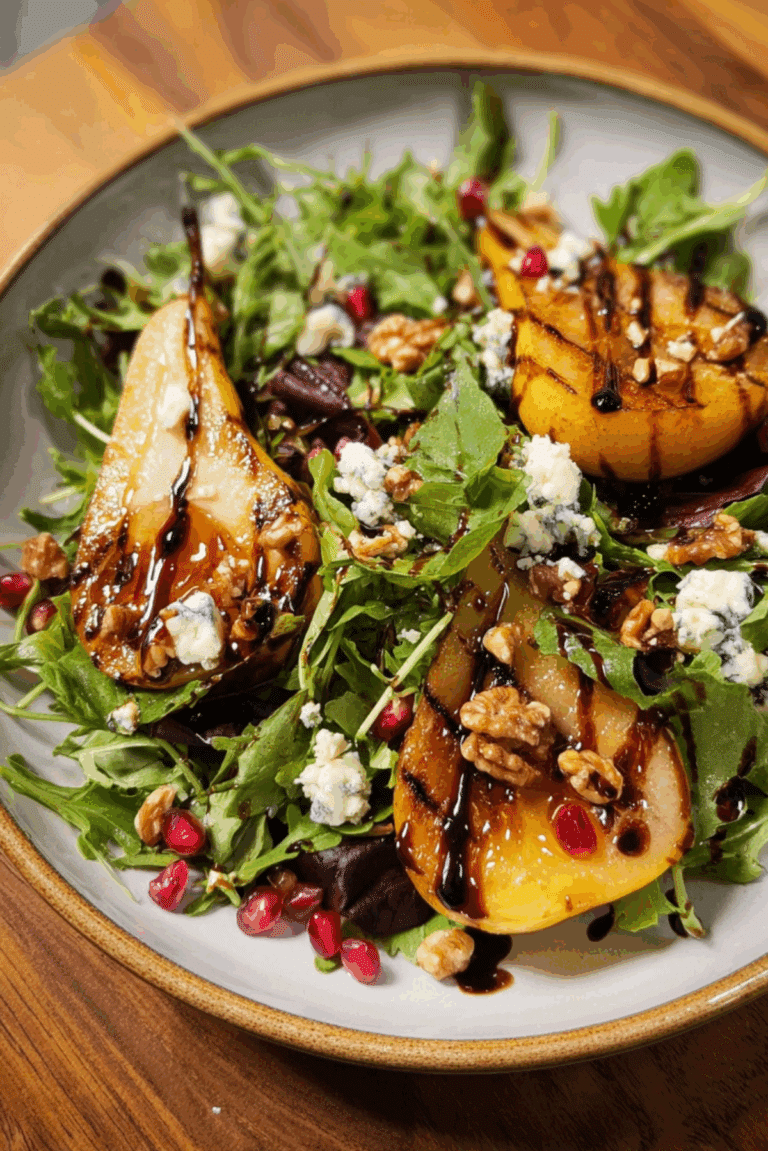
Grilled Pear Salad
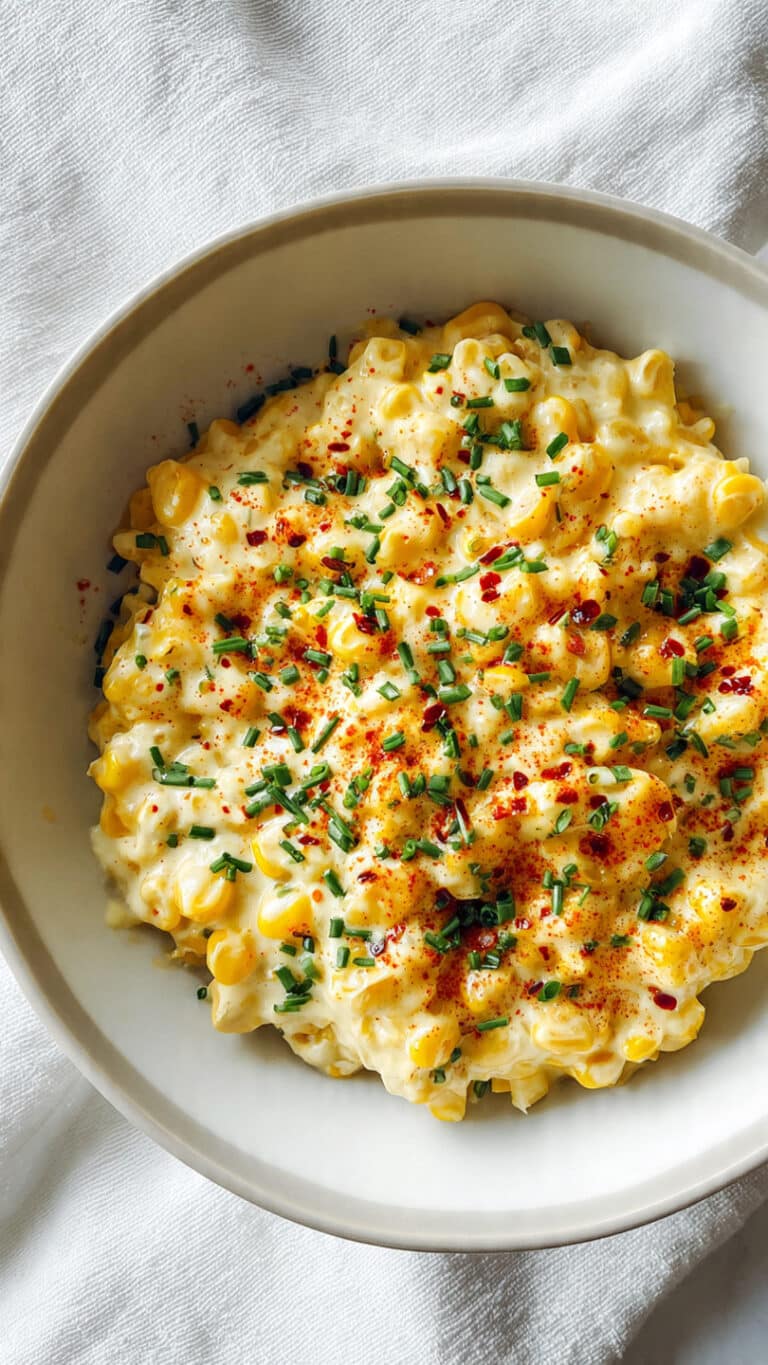
This vibrant Mexican-style corn salad blends sweet corn, creamy mayo, zesty lime, and crumbly cotija cheese into a bold, crowd-pleasing side dish. Perfect for summer cookouts or taco nights.
- Total Time: 15 minutes
- Yield: 6 servings 1x
Ingredients
- 4 cups corn kernels (fresh, grilled, or frozen and thawed)
- 1/4 cup mayonnaise
- 1/4 cup sour cream
- 1/2 cup crumbled cotija cheese
- 1/4 cup chopped fresh cilantro
- 1/4 cup finely diced red onion
- Juice of 2 limes
- 1 teaspoon chili powder
- 1/2 teaspoon garlic powder
- Salt to taste
Instructions
- Heat a grill or skillet over medium-high if using fresh corn. Grill or sauté the corn until lightly charred, then let cool and cut off the kernels.
- In a large mixing bowl, combine corn, mayonnaise, sour cream, cotija cheese, red onion, and cilantro.
- Add lime juice, chili powder, garlic powder, and salt. Mix gently until everything is well coated.
- Taste and adjust seasoning. Let sit for 10–15 minutes for flavors to meld.
- Top with extra cheese and chili powder before serving.
Notes
- Grilling the corn enhances the smoky flavor of the salad.
- Use fresh lime juice for the brightest flavor.
- This dish gets better after resting, so feel free to make it ahead.
- Add jalapeños if you want a spicier kick.
- Prep Time: 10 minutes
- Cook Time: 5 minutes
- Category: Side Dish
- Method: No-Cook or Grilled
- Cuisine: Mexican
- Diet: Vegetarian
Nutrition
- Serving Size: 1 cup
- Calories: 230
- Sugar: 3g
- Sodium: 310mg
- Fat: 15g
- Saturated Fat: 5g
- Unsaturated Fat: 8g
- Trans Fat: 0g
- Carbohydrates: 18g
- Fiber: 2g
- Protein: 5g
- Cholesterol: 20mg
Keywords: corn salad, Mexican side dish, esquites, summer salad, party food, grilled corn salad