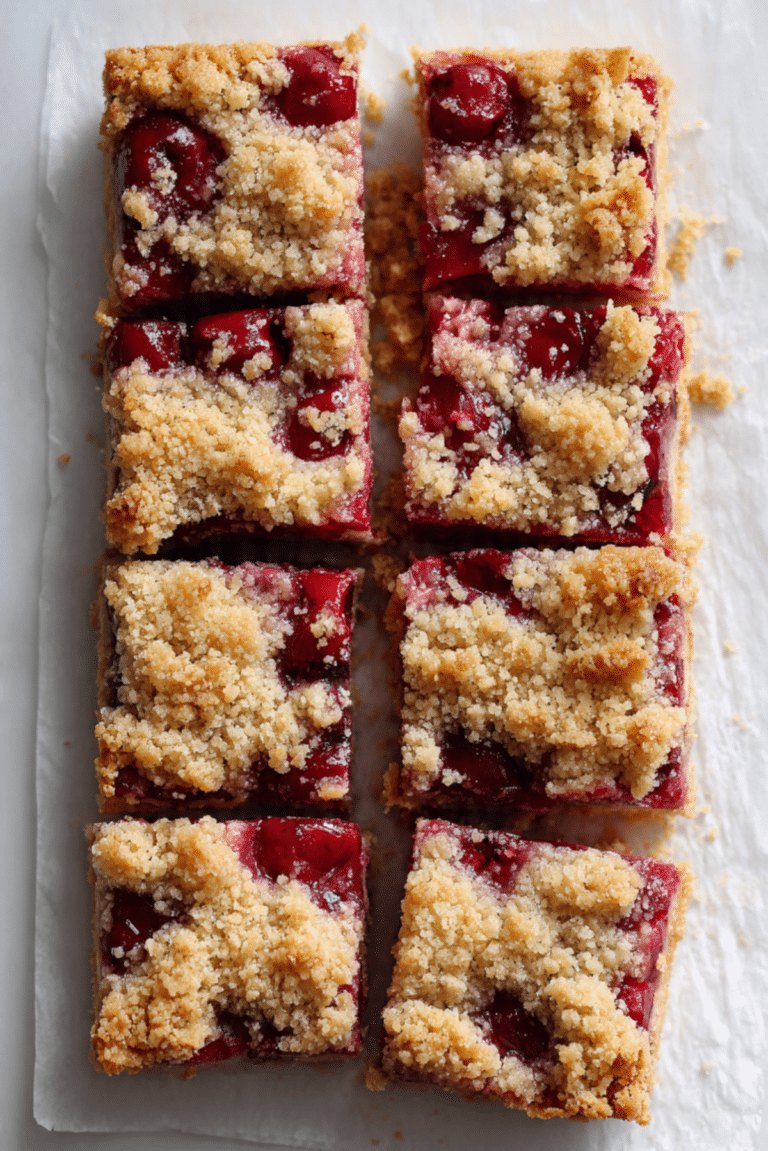
Healthy Berry Crisp
There is something deeply comforting about pulling a bubbling fruit crisp out of the oven, especially when the kitchen smells like warm berries and toasted oats. This healthy berry crisp is one of those desserts that feels both cozy and light at the same time. Trust me, you’re going to love this. It is the kind of treat that works just as well for a relaxed weeknight as it does for sharing with friends, and every spoonful feels worth it.
Why This Crisp Always Hits the Spot
What makes this dish so special is how effortlessly it balances comfort and freshness. The berries soften and release their juices, while the oat topping turns golden and slightly crunchy. You get that classic dessert satisfaction, but with ingredients that feel nourishing and thoughtful, which makes going back for seconds feel even better.
A Little Background Behind Fruit Crisps
Fruit crisps have long been a staple in home kitchens, especially in regions where berries are abundant in summer. Unlike pies, crisps were designed to be simple and forgiving, using pantry staples and whatever fruit was on hand. Over time, lighter versions like this one became popular as people looked for desserts that highlighted fruit rather than hiding it under heavy crusts.
Why You Can Count on This Recipe
This is one of those recipes you will come back to again and again, and here is why it works so well.
Versatile: You can use fresh or frozen berries, or even mix in other fruits depending on the season.
Budget-Friendly: Simple pantry staples and frozen fruit make this easy on the wallet.
Quick and Easy: From start to finish, this comes together without complicated steps.
Customizable: Sweetness and texture are easy to adjust based on your taste.
Crowd-Pleasing: It appeals to kids and adults alike, especially with a scoop of yogurt or ice cream.
Make-Ahead Friendly: You can prep it earlier and bake when ready.
Great for Leftovers: It reheats beautifully and tastes just as good the next day.
Pro Tips From the Kitchen
Before we jump into the details, let me share a few small tricks that make a big difference.
- Use a mix of berries for deeper flavor rather than just one type.
- Let the crisp rest for at least ten minutes after baking so the juices thicken slightly.
- Taste your berries first and adjust the sweetener if needed.
- Spread the topping evenly so every bite gets a bit of crunch.
Kitchen Tools You Will Need
Having the right tools ready makes the process smooth and enjoyable.
Mixing bowls: One for the fruit and one for the topping keeps things organized.
Baking dish: A round or square dish works well, about 9 inches wide.
Measuring cups and spoons: Accuracy helps with texture and balance.
Wooden spoon or spatula: Gentle mixing keeps the berries intact.
Ingredients You Will Need
Now let’s dive into what brings this crisp together. Each ingredient has a role to play, and together they create something really special.
- Mixed berries: 4 cups, fresh or frozen, these provide natural sweetness and a juicy base.
- Rolled oats: 1 cup, adds that classic crisp texture and hearty bite.
- Almond flour: 1/2 cup, keeps the topping tender and lightly nutty.
- Honey or maple syrup: 1/4 cup, gently sweetens without overpowering the fruit.
- Coconut oil: 1/4 cup, melted, helps the topping crisp up while keeping things light.
- Lemon juice: 1 tablespoon, brightens the berries and balances sweetness.
- Cinnamon: 1 teaspoon, adds warmth and depth.
- Vanilla extract: 1 teaspoon, rounds out the flavors.
- Salt: 1/4 teaspoon, enhances everything else.
Easy Ingredient Swaps
If you like to adjust based on what you have, this recipe is very forgiving.
Mixed berries: Swap in chopped apples or peaches.
Honey or maple syrup: Use agave syrup if needed.
Almond flour: Oat flour works as a good alternative.
Spotlight on Key Ingredients
Mixed berries: They are the heart of this dish, bringing color, tang, and natural sweetness.
Rolled oats: These create the signature crisp topping and add satisfying texture.

Let’s Get Cooking
And now let’s dive into the fun part. This process is simple and relaxed, just like baking should be.
- Preheat Your Equipment: Preheat your oven to 375°F and lightly grease your baking dish.
- Combine Ingredients: In a bowl, toss the berries with lemon juice and vanilla until evenly coated.
- Prepare Your Cooking Vessel: Spread the berry mixture evenly into the prepared baking dish.
- Assemble the Dish: In another bowl, mix oats, almond flour, cinnamon, salt, honey or maple syrup, and melted coconut oil until crumbly, then sprinkle over the berries.
- Cook to Perfection: Bake for 35 to 40 minutes, until the topping is golden and the berries are bubbling.
- Finishing Touches: Remove from the oven and let it cool slightly to set.
- Serve and Enjoy: Spoon into bowls and enjoy warm.
Texture and Flavor Magic
What really makes this crisp shine is the contrast. The berries turn soft and jammy, while the topping stays crunchy and lightly toasted. As it bakes, the flavors meld together, creating a dessert that tastes rich but never heavy.
Helpful Cooking Tips
A few extra pointers can help you nail it every time.
- Use frozen berries straight from the freezer, no need to thaw.
- Add chopped nuts to the topping for extra crunch if desired.
- Place the baking dish on a sheet pan to catch any bubbling juices.
What to Avoid
Even simple recipes have a few pitfalls to watch out for.
- Overbaking, which can dry out the topping.
- Skipping the rest time, which helps the filling set.
- Using too much sweetener, which can overpower the fruit.
Nutrition Facts
Servings: 6
Calories per serving: 210
Note: These are approximate values.
Preparation Time
Prep Time: 10 minutes
Cook Time: 40 minutes
Total Time: 50 minutes
Make-Ahead and Storage Tips
You can assemble this crisp a few hours ahead and keep it covered in the fridge until baking. Leftovers store well in the refrigerator for up to three days. Reheat gently in the oven or microwave to bring back that fresh-baked feel.
How to Serve
This crisp is wonderful on its own, but it also pairs beautifully with plain yogurt, vanilla ice cream, or a dollop of whipped coconut cream.
Creative Leftover Transformations
Leftovers can be spooned over oatmeal, layered into parfaits, or even enjoyed cold straight from the fridge, no judgment here.
Additional Tips
For extra flavor, add a pinch of nutmeg or ginger to the topping. Always adjust sweetness based on how ripe your fruit is.
Make It a Showstopper
Serve it in the baking dish for a rustic look, or plate individual portions with a sprinkle of oats on top for a more polished presentation.
Variations to Try
- Add chopped apples for a fall-inspired version.
- Use all blueberries for a deeper, richer flavor.
- Mix in shredded coconut for extra texture.
- Add chia seeds to the filling for thickness.
FAQ’s
Q1: Can I use frozen berries?
Yes, frozen berries work perfectly and require no thawing.
Q2: Is this crisp gluten free?
Yes, as long as you use certified gluten free oats.
Q3: Can I reduce the sweetener?
Absolutely, especially if your berries are very ripe.
Q4: Can I freeze it after baking?
Yes, let it cool completely, then freeze tightly wrapped.
Q5: How do I reheat leftovers?
Warm in the oven at 350°F or microwave individual portions.
Q6: Can I add nuts?
Yes, chopped almonds or walnuts work well in the topping.
Q7: Does it need to be served warm?
It is best warm, but it tastes great at room temperature too.
Q8: Can I double the recipe?
Yes, just use a larger baking dish and adjust bake time slightly.
Q9: What if my topping browns too fast?
Cover loosely with foil and continue baking.
Q10: Is this suitable for breakfast?
Let me tell you, it absolutely is.
Conclusion
This healthy berry crisp is one of those recipes that feels like a little gift to yourself. It is simple, comforting, and packed with flavor, and once you make it, you will see why it becomes a go-to favorite. This one’s a total game-changer, and honestly, it is worth every bite.
Print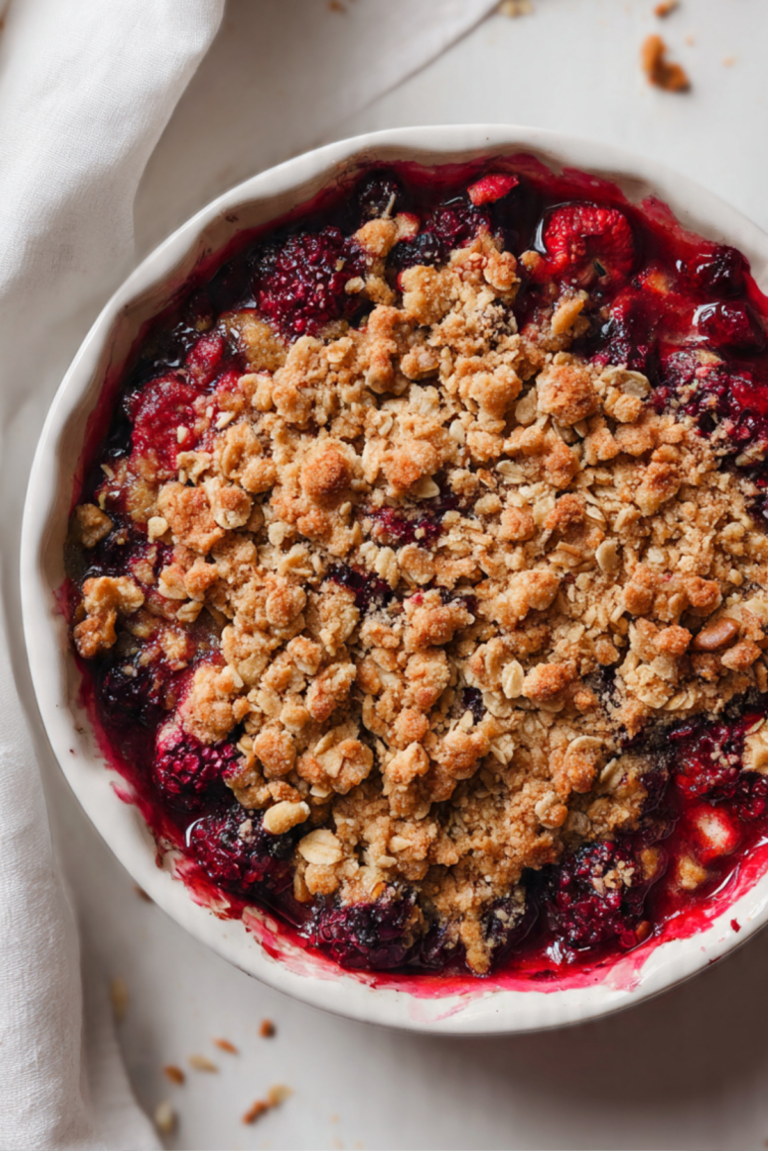
Healthy Berry Crisp
A warm, comforting berry crisp made with juicy mixed berries and a golden oat topping that feels indulgent yet light, perfect for dessert or even a cozy breakfast.
- Total Time: 50 minutes
- Yield: 6 servings 1x
Ingredients
- 4 cups mixed berries
- 1 cup rolled oats
- 1/2 cup almond flour
- 1/4 cup honey or maple syrup
- 1/4 cup coconut oil, melted
- 1 tablespoon lemon juice
- 1 teaspoon cinnamon
- 1 teaspoon vanilla extract
- 1/4 teaspoon salt
Instructions
- Preheat the oven to 375°F and lightly grease a baking dish.
- In a bowl, combine mixed berries with lemon juice and vanilla extract until evenly coated.
- Spread the berry mixture evenly into the prepared baking dish.
- In a separate bowl, mix rolled oats, almond flour, cinnamon, salt, honey or maple syrup, and melted coconut oil until crumbly.
- Sprinkle the oat topping evenly over the berries.
- Bake for 35 to 40 minutes, until the topping is golden and the berries are bubbling.
- Remove from the oven and let rest for about 10 minutes before serving.
Notes
- Frozen berries can be used without thawing.
- Adjust sweetener based on the natural sweetness of the fruit.
- Letting the crisp rest helps the filling thicken.
- Prep Time: 10 minutes
- Cook Time: 40 minutes
- Category: Dessert
- Method: Baking
- Cuisine: American
- Diet: Vegetarian
Nutrition
- Serving Size: 1 serving
- Calories: 210
- Sugar: 14g
- Sodium: 95mg
- Fat: 9g
- Saturated Fat: 6g
- Unsaturated Fat: 3g
- Trans Fat: 0g
- Carbohydrates: 32g
- Fiber: 5g
- Protein: 4g
- Cholesterol: 0mg
Keywords: healthy berry crisp, oat berry dessert, easy fruit crisp, baked berry dessert