Japanese Cheesecake with Espresso Shot
There is something quietly magical about a dessert that feels as light as air yet melts with creamy richness on your tongue. This Japanese cheesecake paired with a bold espresso shot brings that exact balance to your table. The first bite is soft, slightly sweet, and delicately cocoa-kissed, and then comes the deep warmth of espresso that ties everything together. Trust me, you’re going to love this.
A Cloud-Like Dessert That Feels Like a Hug
As you take your first forkful, you notice how the texture almost trembles, soft and airy like a soufflé, yet grounded by a creamy base. The cocoa dusting adds just a hint of bitterness that balances the sweetness perfectly. And now let’s talk about that espresso on the side, it is not just a drink, it is part of the experience, cutting through the richness and elevating every bite.
A Gentle Story Behind This Iconic Treat
Japanese cheesecake became popular for its unique approach to a classic dessert. Unlike dense Western versions, this one focuses on lightness and balance. Inspired by French techniques and refined in Japanese kitchens, it is known for its jiggly texture and delicate flavor. Pairing it with espresso is a modern twist, bringing together East and West in the most delicious way.
Why This Recipe Truly Works Every Time
This dessert is not just beautiful, it is reliable and surprisingly approachable.
Versatile: You can serve it warm, chilled, or even slightly frozen for a different texture experience.
Budget-Friendly: The ingredients are simple and easy to find in any kitchen.
Quick and Easy: While it looks impressive, the steps are straightforward and beginner-friendly.
Customizable: Add citrus zest, vanilla, or even a hint of chocolate to make it your own.
Crowd-Pleasing: Its light texture makes it a favorite even for those who usually skip heavy desserts.
Make-Ahead Friendly: It holds well in the fridge, making it perfect for planning ahead.
Great for Leftovers: The flavor deepens the next day, making each slice even more enjoyable.
Secrets That Elevate Your Cheesecake Game
Before diving into the kitchen, here are a few insider tips that make all the difference.
- Use room temperature ingredients for a smoother batter
- Fold the egg whites gently to keep that airy structure
- Bake in a water bath to prevent cracks and ensure even cooking
- Let it cool slowly to maintain its signature texture
Tools That Make the Process Smooth
Having the right tools makes everything feel easier and more enjoyable.
Mixing Bowls: Essential for separating and combining ingredients smoothly
Hand Mixer or Whisk: Helps achieve fluffy egg whites
Springform Pan: Makes it easier to remove the cheesecake without damage
Baking Tray: Needed for the water bath method
Fine Sieve: Perfect for dusting cocoa evenly on top
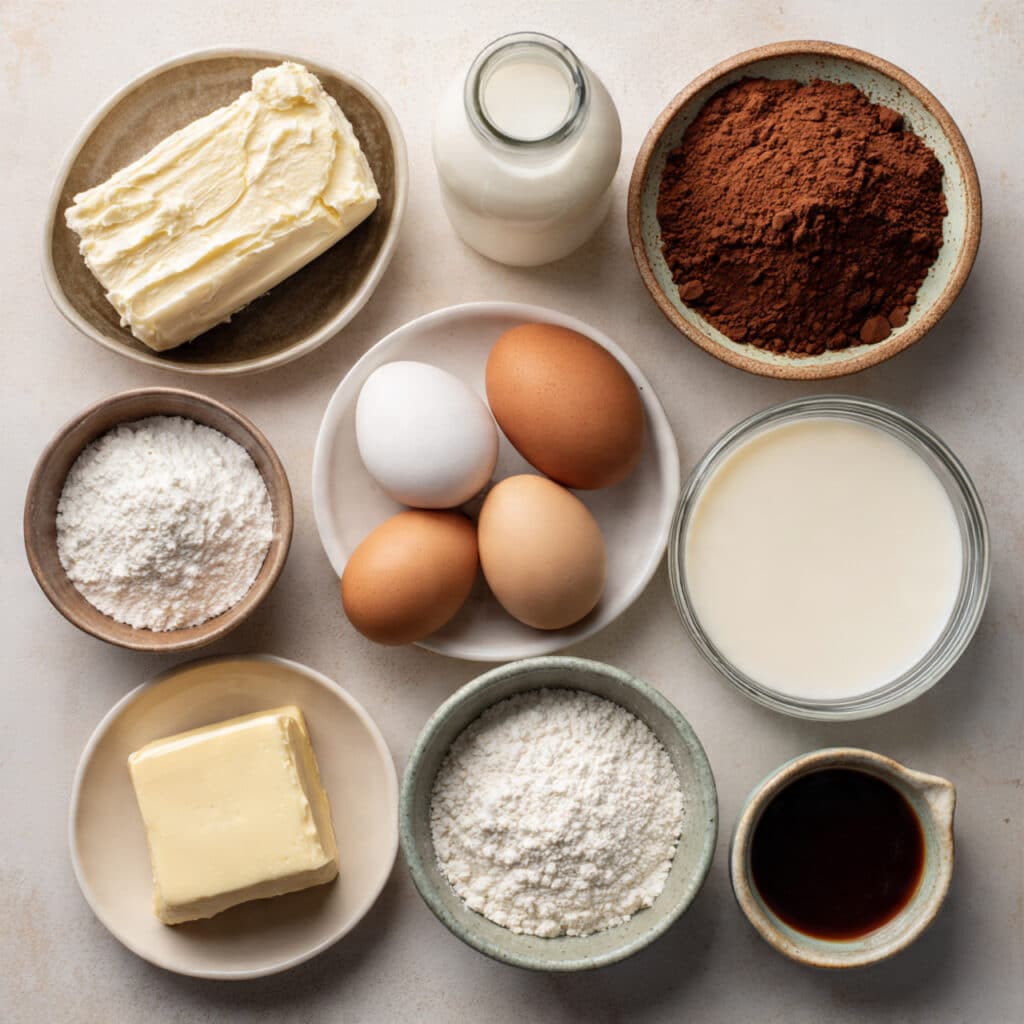
Ingredients That Come Together Beautifully
Every ingredient plays its role, creating that soft and balanced bite.
- Cream Cheese: 250 g, gives the cheesecake its rich and creamy base
- Milk: 100 ml, adds moisture and smoothness
- Unsalted Butter: 50 g, enhances richness and flavor
- Eggs: 5 large, separated, create structure and fluffiness
- Granulated Sugar: 100 g, balances sweetness
- Cake Flour: 60 g, keeps the texture light and tender
- Cornstarch: 20 g, stabilizes the batter
- Vanilla Extract: 1 teaspoon, adds warmth and aroma
- Cocoa Powder: 1 tablespoon, for a delicate bitter dusting
- Espresso: 1 small shot, served alongside for contrast
Easy Swaps If You Want to Experiment
Sometimes you want to tweak things a little, and that works beautifully here.
Cream Cheese: Mascarpone for a softer flavor
Milk: Plant-based milk like almond or oat
Sugar: Coconut sugar for a deeper sweetness
Cocoa Powder: Matcha powder for a unique twist
The Star Ingredients That Make It Shine
Let’s highlight what truly defines this dessert.
Cream Cheese: This is the heart of the recipe, giving it that smooth, melt-in-your-mouth texture.
Egg Whites: Whipped to perfection, they create that iconic airy structure.
Let’s Get Baking Step by Step
Now comes the fun part, bringing everything together.
- Preheat Your Equipment: Set your oven to 160°C and prepare a water bath setup
- Combine Ingredients: Melt cream cheese, milk, and butter together, then mix until smooth
- Prepare Your Cooking Vessel: Line your pan and wrap it to prevent water from seeping in
- Assemble the Dish: Fold whipped egg whites into the batter gently and pour into the pan
- Cook to Perfection: Bake in the water bath for about 60 minutes until set but slightly jiggly
- Finishing Touches: Let it cool gradually, then dust with cocoa powder
- Serve and Enjoy: Slice gently and serve with a fresh espresso shot
A Beautiful Balance of Texture and Flavor
Each bite offers a soft, airy texture that slowly melts, followed by a creamy richness that lingers. The cocoa adds a subtle bitterness, while the espresso enhances every flavor note. This one’s a total game-changer.
Extra Tips to Make It Even Better
- Chill the cheesecake before slicing for cleaner cuts
- Use high-quality cocoa for better flavor
- Serve with fresh berries for a fruity contrast
What to Avoid for Perfect Results
- Overmixing the batter which can deflate the air
- Skipping the water bath which leads to cracks
- Opening the oven too early which affects the rise
A Quick Look at Nutrition
Servings: 8
Calories per serving: 210
Note: These are approximate values.
Time Breakdown for Planning
Prep Time: 20 minutes
Cook Time: 60 minutes
Total Time: 80 minutes
Make-Ahead and Storage Tips
You can prepare this cheesecake a day in advance and store it in the refrigerator. Keep it covered to maintain freshness. It can also be frozen and thawed slowly in the fridge. Reheat slightly if you prefer a softer texture.
Serving Ideas That Elevate the Experience
Serve each slice with a freshly brewed espresso, or pair it with light whipped cream and berries. A dusting of extra cocoa just before serving adds a lovely finishing touch.
Turning Leftovers Into Something New
Leftover slices can be turned into parfaits layered with cream and fruit, or even blended into a creamy dessert base for shakes.
Little Extras That Make a Big Difference
Use fresh eggs for better structure, and always measure carefully to maintain the balance of ingredients.
Make It Look as Good as It Tastes
Dust cocoa evenly using a sieve and serve on a clean plate with a small espresso cup on the side for that café-style presentation.
Fun Variations to Try
- Add lemon zest for a citrus twist
- Swirl in melted chocolate for richness
- Use matcha instead of cocoa
- Add a berry topping for freshness
FAQ’s
Q1: Why did my cheesecake crack?
It usually happens when the water bath is skipped or the temperature is too high.
Q2: Can I make it without a water bath?
You can, but the texture will not be as soft and even.
Q3: How do I know it is done?
The center should still jiggle slightly when gently shaken.
Q4: Can I use all-purpose flour?
Yes, but cake flour gives a lighter texture.
Q5: How long can I store it?
Up to 3 days in the refrigerator.
Q6: Can I freeze it?
Yes, wrap it well and freeze for up to a month.
Q7: Why is my texture dense?
Overmixing or deflating the egg whites can cause this.
Q8: Can I skip cocoa powder?
Yes, it is optional and can be replaced with other toppings.
Q9: What pairs best with it?
Espresso, tea, or fresh fruit.
Q10: Can I make it smaller?
Yes, just adjust baking time accordingly.
Conclusion
This Japanese cheesecake with espresso shot is more than just a dessert, it is an experience. Light, creamy, and perfectly balanced, it is the kind of treat that feels both comforting and elegant. Let me tell you, it’s worth every bite.
Print
Japanese Cheesecake with Espresso Shot
A light and fluffy Japanese cheesecake with a delicate cocoa finish, served with a rich espresso shot for the perfect balance of sweetness and depth.
- Total Time: 80 minutes
- Yield: 8 servings 1x
Ingredients
- 250 g cream cheese
- 100 ml milk
- 50 g unsalted butter
- 5 large eggs, separated
- 100 g granulated sugar
- 60 g cake flour
- 20 g cornstarch
- 1 teaspoon vanilla extract
- 1 tablespoon cocoa powder
- 1 espresso shot
Instructions
- Preheat oven to 160°C and prepare a water bath.
- Melt cream cheese, milk, and butter together and mix until smooth.
- Whip egg whites until soft peaks form, gradually adding sugar.
- Mix egg yolks into the cream cheese mixture, then add flour, cornstarch, and vanilla.
- Gently fold egg whites into the batter.
- Pour into a lined pan and place in water bath.
- Bake for 60 minutes until slightly jiggly in the center.
- Cool gradually, dust with cocoa powder, and serve with espresso.
Notes
- Use room temperature ingredients for best texture
- Do not overmix to keep it airy
- Cool slowly to prevent cracks
- Prep Time: 20 minutes
- Cook Time: 60 minutes
- Category: Dessert
- Method: Baking
- Cuisine: Japanese
- Diet: Vegetarian
Nutrition
- Serving Size: 1 slice
- Calories: 210
- Sugar: 12 g
- Sodium: 120 mg
- Fat: 12 g
- Saturated Fat: 7 g
- Unsaturated Fat: 4 g
- Trans Fat: 0 g
- Carbohydrates: 18 g
- Fiber: 1 g
- Protein: 6 g
- Cholesterol: 95 mg
Keywords: japanese cheesecake, fluffy cheesecake, espresso dessert