Japanese Daifuku
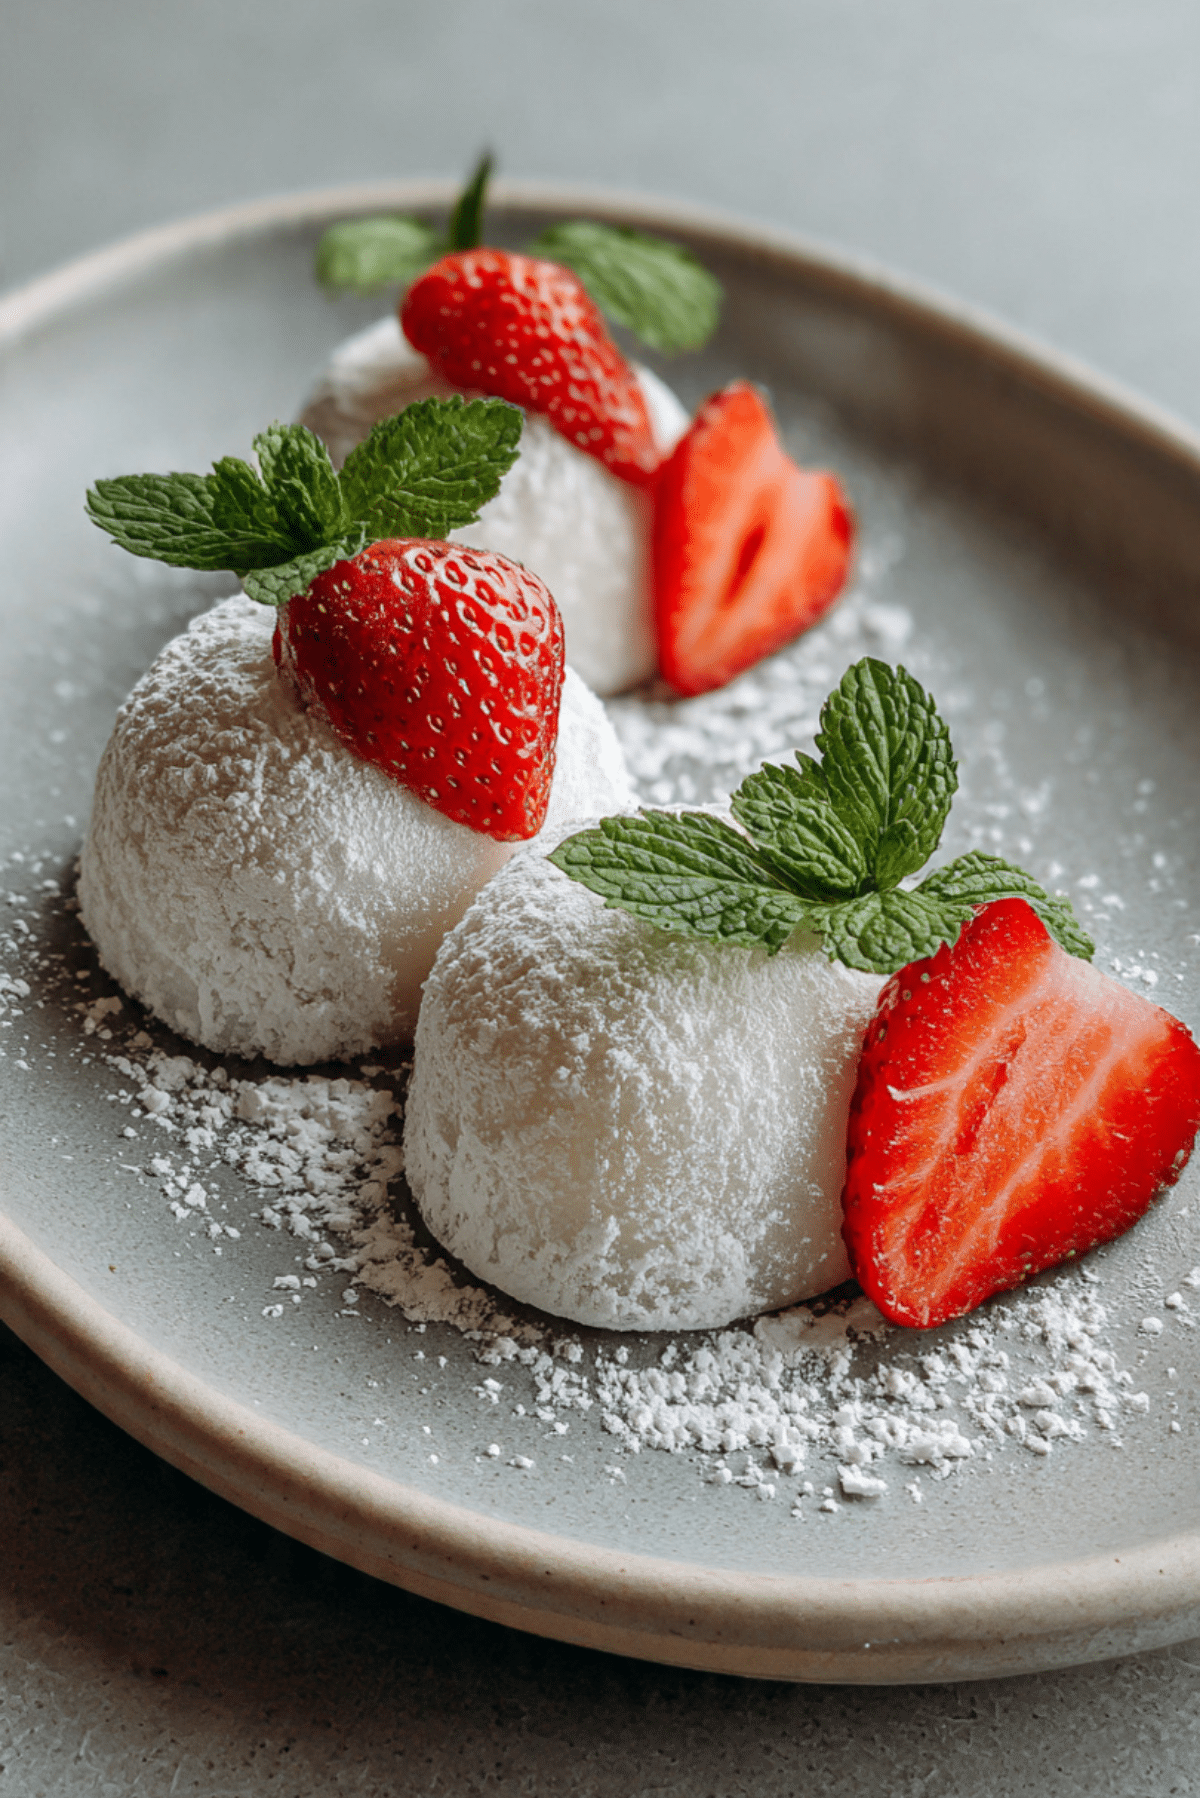
Delicate, chewy, and sweet with just the right touch of elegance, Japanese Daifuku is a dessert that instantly melts in your mouth. Each bite is filled with soft mochi that gives way to a luscious center whether it’s creamy red bean paste or a juicy whole strawberry. This dainty treat not only tastes like comfort, but it also carries a sense of calm and tradition. Perfect with a cup of green tea, Daifuku isn’t just a dessert, it’s an experience.
Behind the Recipe
There’s something truly nostalgic about Daifuku. I remember my first taste of it during a spring festival in Kyoto. The delicate pink cherry blossoms were in full bloom, and vendors lined the streets offering all kinds of wagashi, or traditional sweets. That first bite of Daifuku, with its soft mochi and sweet red bean filling, felt like a warm hug from a place I never wanted to leave. Ever since, this recipe has been a way to recreate that moment of peaceful indulgence at home.
Recipe Origin or Trivia
Daifuku, which translates to “great luck,” has been a beloved wagashi in Japan for centuries. Originally made with plain mochi and sweetened red bean paste, it has evolved to include modern fillings like strawberries (Ichigo Daifuku), chestnut cream, and even chocolate. This versatile sweet is typically enjoyed during special occasions like New Year’s, but you’ll find it year-round in Japanese confectionery shops. Its symbolism of happiness and good fortune makes it more than just a dessert it’s a wish wrapped in mochi.
Why You’ll Love Japanese Daifuku
Let me tell you why Daifuku is one of those desserts you’ll keep coming back to.
Versatile: From red bean paste to juicy strawberries or matcha cream, the fillings are endlessly customizable.
Budget-Friendly: Made with simple pantry staples like glutinous rice flour and sugar, it’s both affordable and impressive.
Quick and Easy: With a microwave method, you can have fresh Daifuku ready in under 30 minutes.
Customizable: Add different fillings, food coloring, or toppings like edible flowers for a unique twist.
Crowd-Pleasing: These pillowy treats look beautiful and taste even better, making them perfect for parties or gifts.
Make-Ahead Friendly: You can prepare them a day ahead and store them in the fridge without losing texture.
Great for Leftovers: Leftover mochi can be repurposed in other desserts like mochi ice cream or pan-fried for a crispy snack.
Chef’s Pro Tips for Perfect Results
Making Daifuku at home is easier than it looks especially with these insider tricks:
- Use Potato Starch Generously: It prevents sticking while shaping and handling the mochi. Don’t skimp on it.
- Microwave in Intervals: If using a microwave to cook the mochi, stir every minute for an even texture.
- Chill the Filling: Cold fillings are easier to wrap and won’t melt the mochi, keeping everything tidy.
- Work Quickly with Warm Mochi: Once cooled, the mochi becomes harder to shape. Have your fillings ready beforehand.
- Use Wet Hands: Slightly damp hands can help with sticking when shaping, along with the starch.
Kitchen Tools You’ll Need
To bring Daifuku to life in your kitchen, here’s what you’ll need:
Microwave-Safe Bowl: For cooking the mochi dough quickly and evenly.
Rubber Spatula: Helps stir the sticky dough without making a mess.
Plastic Wrap or Parchment Paper: Useful for shaping and storing each piece.
Fine Mesh Sieve: To dust with potato starch for a non-stick surface.
Kitchen Scale: For precise portioning, especially with fillings.
Small Spoon or Scoop: To measure and scoop the filling evenly.
Ingredients in Japanese Daifuku
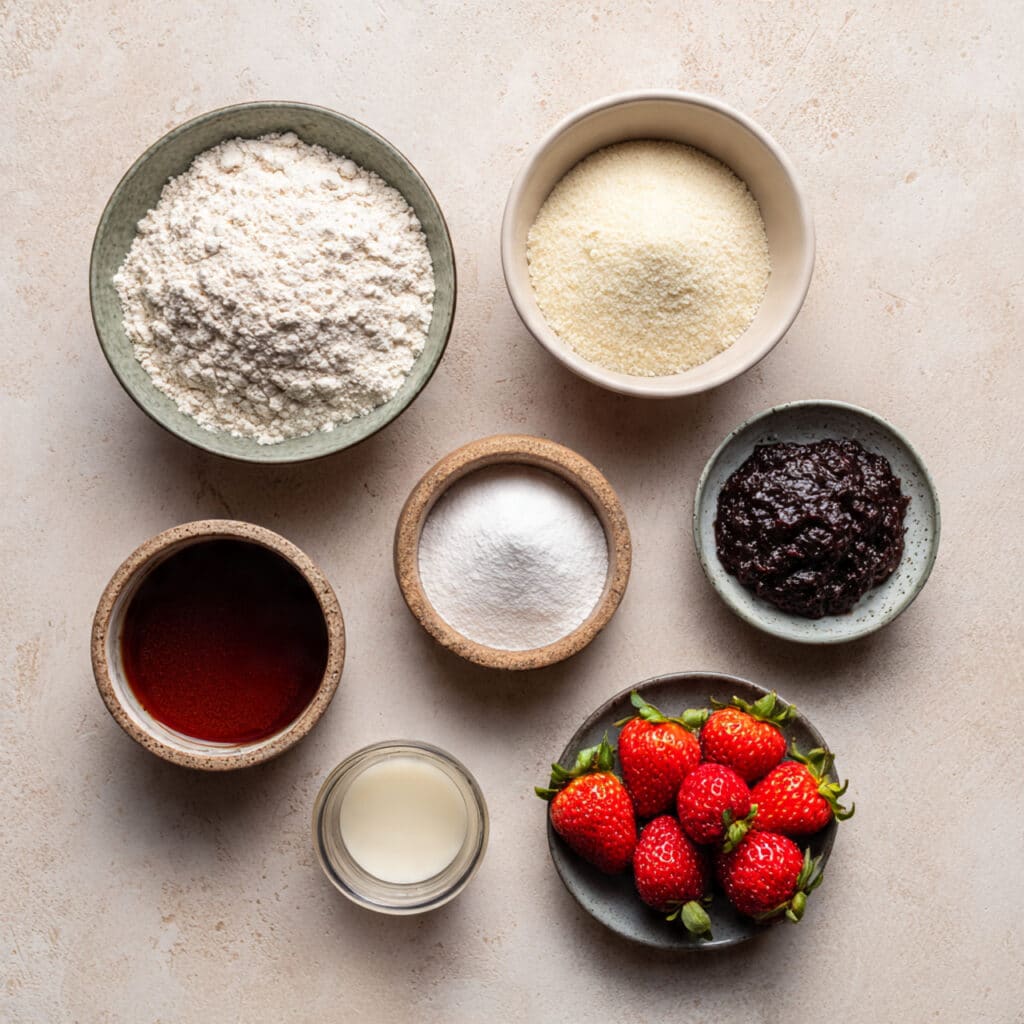
Daifuku is a magical blend of simple ingredients working in perfect harmony. Here’s what you’ll need:
- Glutinous Rice Flour (Mochiko): 1 cup – The base for the chewy mochi shell. Don’t confuse it with regular rice flour.
- Sugar: 1/4 cup – Adds just enough sweetness to the mochi dough.
- Water: 3/4 cup – Combines with the flour and sugar to form the dough.
- Red Bean Paste (Anko): 1/2 cup – A smooth, sweet filling made from azuki beans. Can be store-bought or homemade.
- Strawberries (Optional): 6 whole – If making Ichigo Daifuku, these add a juicy pop of freshness.
- Potato Starch (Katakuriko): For dusting – Keeps everything from sticking during shaping.
Ingredient Substitutions
Sometimes you need to make do with what’s on hand. Here are some handy swaps:
Glutinous Rice Flour: Use sweet rice flour if Mochiko isn’t available.
Red Bean Paste: Substitute with Nutella, peanut butter, or mashed sweetened dates.
Strawberries: Try other fruits like mango chunks or seedless grapes.
Potato Starch: Cornstarch works in a pinch, though the texture differs slightly.
Ingredient Spotlight
Glutinous Rice Flour: This flour is the secret to that stretchy, chewy texture. It absorbs water differently from regular flour and creates that signature mochi mouthfeel.
Red Bean Paste (Anko): A staple in Japanese sweets, it offers a mildly earthy sweetness that balances beautifully with the soft mochi shell.
Instructions for Making Japanese Daifuku
Ready to dive into this soft, sweet world? Here’s how to make your own Daifuku step-by-step.
- Preheat Your Equipment:
No oven needed! Just gather your tools and prep your workspace with potato starch on a cutting board or tray. - Combine Ingredients:
In a microwave-safe bowl, mix the glutinous rice flour, sugar, and water until smooth and lump-free. - Prepare Your Cooking Vessel:
Cover the bowl loosely with plastic wrap and microwave the mixture for 1 minute. Stir, then microwave for 1 more minute, stir again, and heat for another 30 seconds until the dough is thick and slightly translucent. - Assemble the Dish:
Dust your working surface generously with potato starch. Place the cooked mochi on it and sprinkle more starch on top. Let it cool slightly, then divide into 6 portions. - Cook to Perfection:
While not cooking per se, this is the point where you mold the dough. Flatten each piece gently, place a spoonful of red bean paste (and strawberry if using) in the center, and pinch the edges together to seal. - Finishing Touches:
Flip each Daifuku seam-side down and shape into a neat ball. Dust off excess starch. - Serve and Enjoy:
Serve fresh with green tea or chill in the fridge for a firmer texture. Either way, they’re delightful.
Texture & Flavor Secrets
The magic of Daifuku lies in the contrast. The outer mochi is chewy and slightly elastic, giving way to a creamy or juicy center. The sweetness is gentle, allowing the natural flavors of the filling to shine. When you bite into one, there’s a soft pull followed by a burst of flavor pure satisfaction.
Cooking Tips & Tricks
Here are a few more tips to help you ace it:
- Use plastic wrap while shaping to keep your hands clean and make wrapping easier.
- Try chilling the mochi slightly before eating for a firmer bite.
- If you’re making a big batch, work in small portions to keep the mochi soft.
What to Avoid
Don’t worry, mistakes happen! Here’s what to watch out for:
- Using the wrong flour: Only use glutinous rice flour or sweet rice flour. Regular rice flour won’t give you that stretchy texture.
- Not using enough starch: Your mochi will stick to everything if you skip this.
- Overcooking the dough: This can make it tough instead of tender. Stick to short microwave bursts.
Nutrition Facts
Servings: 6
Calories per serving: 160
Note: These are approximate values.
Preparation Time
Prep Time: 10 minutes
Cook Time: 5 minutes
Total Time: 15 minutes
Make-Ahead and Storage Tips
Daifuku is a great make-ahead treat. Store them in an airtight container in the fridge for up to 2 days. For longer storage, wrap each piece in plastic and freeze. Thaw in the fridge before eating. Note: the mochi may harden a bit over time, so it’s best fresh.
How to Serve Japanese Daifuku
Pair Daifuku with matcha tea for a traditional experience, or enjoy it as a dainty dessert after sushi. You can also plate them on a wooden tray with edible flowers or powdered sugar for an elegant touch.
Creative Leftover Transformations
If you have leftover Daifuku or mochi dough, try this:
- Slice and toast lightly for a crispy outer layer.
- Cut up and mix into vanilla ice cream for a DIY mochi sundae.
- Dip in melted chocolate and let set for a sweet twist.
Additional Tips
- Add food coloring to your dough for festive themes.
- Wrap your Daifuku in edible sakura leaves or decorate with cherry blossoms.
- Keep your hands and tools lightly dusted with starch at all times.
Make It a Showstopper
Presentation matters! Serve Daifuku on a black or wooden plate to make the colors pop. Garnish with edible flowers or gold leaf for a high-end dessert platter. Little touches go a long way with this delicate dessert.
Variations to Try
- Matcha Daifuku: Add 1 tsp of matcha powder to the mochi dough.
- Chocolate-Filled Daifuku: Replace red bean paste with a square of chocolate or Nutella.
- Fruit Combo Daifuku: Use mango or kiwi for a tropical surprise.
- Cream Daifuku: Add whipped cream with the fruit filling for a creamy contrast.
- Sakura Daifuku: Add sakura essence or leaves for a floral, springtime version.
FAQ’s
Q1: Can I make Daifuku without a microwave?
Yes, steam the mochi dough for 10–15 minutes instead, stirring halfway through.
Q2: What if I can’t find red bean paste?
You can use Nutella, fruit jam, or sweetened mashed sweet potatoes.
Q3: Can I freeze Daifuku?
Yes, wrap them individually and freeze. Thaw in the fridge before eating.
Q4: How long does Daifuku last?
It’s best eaten the same day, but can last up to 2 days in the fridge.
Q5: Is Daifuku gluten-free?
Yes, glutinous rice flour contains no gluten despite the name.
Q6: Can I use food coloring?
Absolutely. Add a few drops to the water before mixing with flour.
Q7: Can I double the recipe?
Yes, just double all ingredients. Work in small batches for best results.
Q8: What’s the best way to shape Daifuku?
Use a plastic wrap method or lightly oiled hands to shape easily.
Q9: Is Daifuku vegan?
Yes, if you use plant-based fillings like red bean or fruit.
Q10: Can I use other fruits?
Definitely. Mango, grapes, or kiwi work great in place of strawberries.
Conclusion
Whether you’re sharing them at a gathering or savoring one quietly with tea, Japanese Daifuku is a dessert that delivers charm in every bite. Trust me, you’re going to love this. The chewy mochi, the sweet filling, the gentle touch of tradition it’s worth every bite. So go ahead, give this delightful treat a try. Your taste buds will thank you.
Print
Japanese Daifuku
Soft, chewy, and filled with sweet red bean paste or fresh strawberries, Japanese Daifuku is a traditional wagashi dessert that’s simple yet elegant.
- Total Time: 15 minutes
- Yield: 6 servings
Ingredients
- Glutinous Rice Flour (Mochiko): 1 cup – Base for the mochi dough.
- Sugar: 1/4 cup – Adds sweetness to the mochi.
- Water: 3/4 cup – Combines ingredients to form the dough.
- Red Bean Paste (Anko): 1/2 cup – Traditional sweet filling.
- Strawberries (Optional): 6 whole – Juicy filling option.
- Potato Starch: For dusting – Prevents sticking while shaping.
Instructions
- Preheat Your Equipment: Prepare a working surface dusted with potato starch and gather all tools.
- Combine Ingredients: Mix glutinous rice flour, sugar, and water in a microwave-safe bowl until smooth.
- Prepare Your Cooking Vessel: Cover and microwave the mixture in 1-minute intervals, stirring between, until thick and sticky.
- Assemble the Dish: Dust surface with starch, place dough on it, divide into 6 parts, and flatten each piece.
- Cook to Perfection: Fill each piece with red bean paste or strawberry, seal by pinching the edges, and shape into a ball.
- Finishing Touches: Dust off excess starch and place seam-side down.
- Serve and Enjoy: Serve immediately or chill slightly before enjoying.
Notes
- Chill the filling before wrapping to make assembly easier.
- Use plenty of potato starch to prevent sticking.
- Mochi is best eaten fresh but can be refrigerated for up to 2 days.
- Prep Time: 10 minutes
- Cook Time: 5 minutes
- Category: Dessert
- Method: Microwave
- Cuisine: Japanese
- Diet: Vegetarian
Nutrition
- Serving Size: 1 daifuku
- Calories: 160
- Sugar: 12g
- Sodium: 5mg
- Fat: 0g
- Saturated Fat: 0g
- Unsaturated Fat: 0g
- Trans Fat: 0g
- Carbohydrates: 36g
- Fiber: 1g
- Protein: 2g
- Cholesterol: 0mg
Keywords: daifuku, mochi, Japanese dessert, red bean mochi, ichigo daifuku