Oreo Cream Mousse Cups
There is something instantly comforting about digging into a soft, creamy dessert layered with chocolatey crunch, and these Oreo cream mousse cups bring exactly that feeling to life. Each spoonful is light, airy, and packed with that familiar cookies and cream flavor that never gets old. Trust me, you’re going to love this, it is one of those desserts that feels fancy but comes together with surprising ease.
A Sweet Treat That Feels Like a Hug in Every Bite
As you take your first spoonful, you get that contrast between the silky mousse and the slightly crunchy cookie base, and it just works. This one’s a total game-changer for anyone who loves quick desserts that still feel indulgent. The layers look beautiful in the cup, making it just as pleasing to the eyes as it is to the taste buds.
A Little Story Behind This Cookies and Cream Favorite
Cookies and cream desserts have been a staple in many kitchens for years, inspired by the classic combination of chocolate sandwich cookies and creamy fillings. Over time, this pairing found its way into ice creams, cakes, and now these delightful mousse cups. It is a modern twist that keeps the nostalgia alive while adding a light, airy texture that feels just right after any meal.
Why This Dessert Always Works
Before we dive deeper, let me tell you why this one deserves a spot in your regular dessert rotation.
Versatile: You can serve it in cups, jars, or even a large dish for sharing, making it perfect for any occasion.
Budget-Friendly: The ingredients are simple and easy to find, which means no expensive shopping trips.
Quick and Easy: No baking required, and the steps are straightforward enough for any skill level.
Customizable: You can add toppings like chocolate chips or whipped cream to make it your own.
Crowd-Pleasing: Everyone loves cookies and cream, and this dessert proves it every time.
Make-Ahead Friendly: It actually tastes better after chilling, which makes planning ahead easy.
Great for Leftovers: If there are any, they hold up beautifully in the fridge for a couple of days.
Pro Tips for That Perfect Creamy Texture
Now let’s dive into a few insider tricks that make all the difference.
- Use cold heavy cream straight from the fridge for better whipping results.
- Crush the cookies finely but keep a few small chunks for texture.
- Fold gently when combining whipped cream to keep the mousse light.
- Chill long enough so the layers set nicely and hold their shape.
Tools That Make the Process Smooth
Before we start assembling, having the right tools makes everything easier.
Mixing Bowl: For whipping and combining ingredients smoothly.
Hand Mixer or Whisk: Helps achieve that fluffy mousse texture.
Spatula: Perfect for folding without deflating the mixture.
Serving Cups: Clear cups work best to show off those beautiful layers.
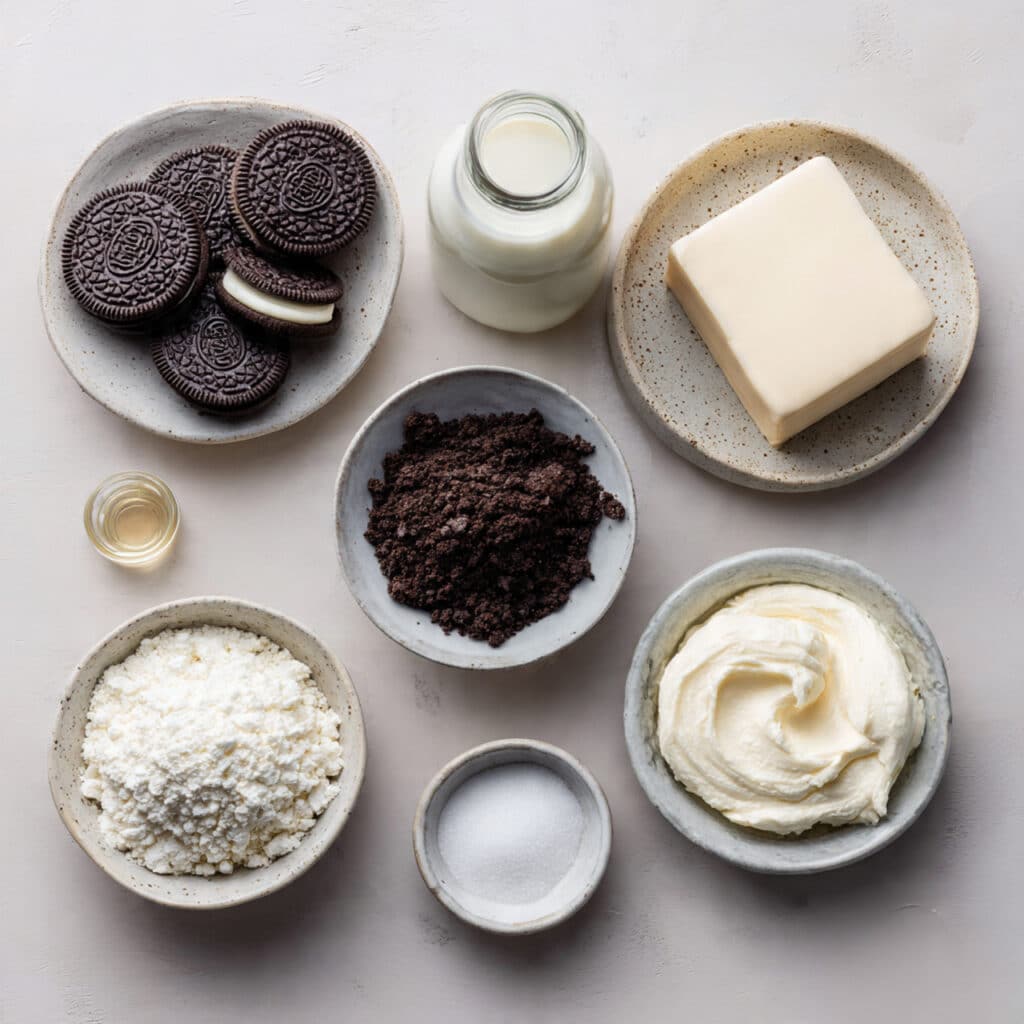
Ingredients That Come Together Beautifully
Now let’s talk about what makes this dessert so irresistible.
- Chocolate Sandwich Cookies: 20 cookies, crushed, they provide that signature chocolate crunch and flavor.
- Heavy Cream: 2 cups, whipped to create a light and airy texture.
- Cream Cheese: 200 grams, softened, adds richness and structure.
- Powdered Sugar: 1/2 cup, sweetens the mousse smoothly.
- Vanilla Extract: 1 teaspoon, enhances the overall flavor.
- Extra Cookies for Topping: 6 whole cookies, for garnish and presentation.
Easy Swaps If You Want to Experiment
And if you feel like switching things up, here are a few ideas.
Chocolate Sandwich Cookies: Try golden cookies for a vanilla twist.
Cream Cheese: Swap with mascarpone for an even creamier texture.
Powdered Sugar: Use a sugar substitute if you prefer a lower sugar option.
Spotlight on the Stars of the Dish
Let’s take a closer look at what really makes this dessert shine.
Chocolate Sandwich Cookies: These bring that iconic flavor and a slight crunch that balances the mousse.
Heavy Cream: This is what gives the mousse its airy, cloud-like consistency.
Let’s Build These Delicious Layers Together
Now comes the fun part, assembling everything step by step.
- Preheat Your Equipment: No heat needed, but chill your mixing bowl for better whipping.
- Combine Ingredients: Beat the cream cheese, powdered sugar, and vanilla until smooth.
- Prepare Your Cooking Vessel: Whip the heavy cream separately until soft peaks form.
- Assemble the Dish: Gently fold whipped cream into the cream cheese mixture until combined.
- Cook to Perfection: Layer crushed cookies and mousse in cups, repeating until filled.
- Finishing Touches: Top each cup with a whole cookie for that classic look.
- Serve and Enjoy: Chill for at least 2 hours before serving for best texture.
The Magic of Texture and Flavor
What makes this dessert stand out is the balance. You get the soft, creamy mousse that melts in your mouth, paired with the slightly crunchy cookie layers that add depth. The sweetness is just right, not overpowering, and the vanilla ties everything together beautifully.
Helpful Tips to Make It Even Better
If you want to take it up a notch, keep these in mind.
- Chill the dessert overnight for even better flavor.
- Use clear cups for a visually appealing presentation.
- Add a drizzle of chocolate syrup for extra indulgence.
What to Avoid for Best Results
A few small mistakes can change the outcome, so here is what to watch out for.
- Overmixing the mousse, which can make it dense.
- Not chilling long enough, which affects the texture.
- Using warm cream, which will not whip properly.
Nutritional Snapshot
Servings: 6
Calories per serving: 320
Note: These are approximate values.
Time Breakdown
Prep Time: 20 minutes
Cook Time: 0 minutes
Total Time: 20 minutes
Make Ahead and Storage Tips
One of the best parts about this dessert is how well it fits into your schedule. You can prepare it a day in advance and store it covered in the fridge. It stays fresh for up to 3 days. Freezing is not recommended as it can affect the creamy texture, but refrigeration works perfectly.
How to Serve These Sweet Cups
Serve them chilled straight from the fridge for the best experience. They pair beautifully with a cup of coffee or a glass of cold milk. You can also dress them up with whipped cream or chocolate shavings for special occasions.
Creative Ways to Use Leftovers
If you somehow have leftovers, you can turn them into something new.
Use the mousse as a cake filling, spread it over pancakes, or layer it into a larger trifle for a different presentation.
Extra Tips for the Best Results
A little attention to detail goes a long way here. Always taste the mousse before layering to adjust sweetness if needed, and keep your ingredients fresh for the best flavor.
Make It Look As Good As It Tastes
Presentation matters, and these cups are naturally stunning. Use transparent cups, layer carefully, and keep the edges clean. A single cookie on top adds a simple but elegant touch.
Fun Variations to Try Next Time
- Add chocolate chips between layers for extra texture.
- Use flavored extracts like almond for a twist.
- Mix in crushed nuts for a crunchy surprise.
- Add a layer of chocolate ganache for richness.
FAQ’s
Q1: Can I make this dessert ahead of time?
Yes, it actually tastes better after a few hours in the fridge.
Q2: Can I use whipped topping instead of heavy cream?
Yes, but the texture may be slightly less rich.
Q3: How long does it last in the fridge?
Up to 3 days when stored properly.
Q4: Can I freeze it?
It is not recommended as the texture may change.
Q5: Can I reduce the sugar?
Yes, adjust according to your taste.
Q6: What cups should I use?
Clear cups are ideal for presentation.
Q7: Can I add fruits?
Yes, strawberries pair nicely with the flavors.
Q8: Is this kid-friendly?
Absolutely, kids love the cookies and cream flavor.
Q9: Can I make it in one large dish?
Yes, just layer it the same way.
Q10: Can I use low-fat cream cheese?
Yes, but it may slightly affect the richness.
Conclusion
And there you have it, a dessert that is simple, comforting, and absolutely satisfying. Each spoonful brings together creamy, crunchy, and sweet in the best way possible. Let me tell you, it is worth every bite, and once you try it, you will keep coming back to it again and again.
Print
Oreo Cream Mousse Cups
Creamy, light and indulgent Oreo mousse cups layered with chocolate cookie crumbs and fluffy cream filling, perfect for a quick no-bake dessert.
- Total Time: 20 minutes
- Yield: 6 servings 1x
Ingredients
- 20 chocolate sandwich cookies, crushed
- 2 cups heavy cream
- 200 grams cream cheese, softened
- 1/2 cup powdered sugar
- 1 teaspoon vanilla extract
- 6 whole chocolate sandwich cookies for topping
Instructions
- Chill a mixing bowl to prepare for whipping.
- Beat cream cheese, powdered sugar, and vanilla extract until smooth.
- In a separate bowl, whip heavy cream until soft peaks form.
- Gently fold whipped cream into the cream cheese mixture.
- Layer crushed cookies and mousse in serving cups.
- Repeat layers until cups are filled.
- Top with whole cookies and chill for at least 2 hours before serving.
Notes
- Use cold cream for best whipping results
- Chill before serving for best texture
- Do not overmix to keep mousse light
- Prep Time: 20 minutes
- Cook Time: 0 minutes
- Category: Dessert
- Method: No-Bake
- Cuisine: International
- Diet: Vegetarian
Nutrition
- Serving Size: 1 cup
- Calories: 320
- Sugar: 18g
- Sodium: 180mg
- Fat: 22g
- Saturated Fat: 13g
- Unsaturated Fat: 7g
- Trans Fat: 0g
- Carbohydrates: 28g
- Fiber: 1g
- Protein: 4g
- Cholesterol: 55mg
Keywords: oreo mousse, cookies and cream dessert, no bake dessert, mousse cups