Payday Bars
If you’re craving something chewy, nutty, and just the right amount of sweet and salty, you’re going to fall head over heels for these Payday Bars. They’re rich, golden, and packed with roasted peanuts layered over soft, caramel-like nougat. The moment you sink your teeth into one, you’re hit with a comforting crunch and a melt-in-your-mouth center that keeps you reaching for another.
Behind the Recipe
This recipe came about on a cozy afternoon when I was flipping through childhood memories. I remembered the way my grandma always had a stash of candy bars tucked away in a drawer, and one of the first I’d always grab was a Payday. Sweet, salty, and satisfying. Recreating that magic in bar form? Absolutely necessary. These bars bring back that nostalgia with a homemade twist that feels even more indulgent and personal.
Recipe Origin or Trivia
Payday candy bars have been around since the 1930s, developed during the Great Depression when chocolate was expensive and hard to come by. Unlike most candy bars of its time, the Payday stood out because it didn’t have a chocolate coating. Instead, it leaned into simplicity caramel and peanuts, nothing more. That combo became iconic, and today, recreating them at home is both a delicious treat and a nod to a sweet piece of candy history.
Why You’ll Love Payday Bars
These bars are a little slice of indulgence that never fails to deliver. Let me break down exactly why you’re going to fall in love with them.
Versatile: Perfect for lunchboxes, holiday trays, or midnight cravings they fit every occasion.
Budget-Friendly: Simple pantry staples make this treat easy on your wallet.
Quick and Easy: Minimal ingredients and no oven required they come together in a snap.
Customizable: Add a drizzle of chocolate or swap in different nuts if you’re feeling adventurous.
Crowd-Pleasing: Everyone loves a sweet and salty snack, making these perfect for gatherings.
Make-Ahead Friendly: Store them in the fridge and enjoy them all week long.
Great for Leftovers: If you manage not to eat them all, they stay fresh for days.
Chef’s Pro Tips for Perfect Results
These little bars are pretty simple, but here’s how to take them to next-level delicious.
- Use fresh peanuts: Stale peanuts will ruin the whole vibe. Go for freshly roasted, salted ones.
- Don’t overheat the base: Keep the heat low when melting the peanut butter and chips to avoid burning.
- Line your pan well: Use parchment paper for easy removal and perfect clean cuts.
- Let them set fully: Be patient. Cutting too early will leave you with a sticky mess.
- Chill before slicing: Pop them in the fridge for at least an hour to get those sharp, candy-bar-like edges.
Kitchen Tools You’ll Need
Making Payday Bars at home requires just a few kitchen basics.
Saucepan: For melting the creamy base without burning.
Spatula: Ideal for stirring and smoothing out the mixture.
9×13-inch Baking Dish: The perfect size for a thick, satisfying bar.
Parchment Paper: Makes cleanup and lifting the bars out a breeze.
Knife: A sharp one helps you slice through the peanuts cleanly.
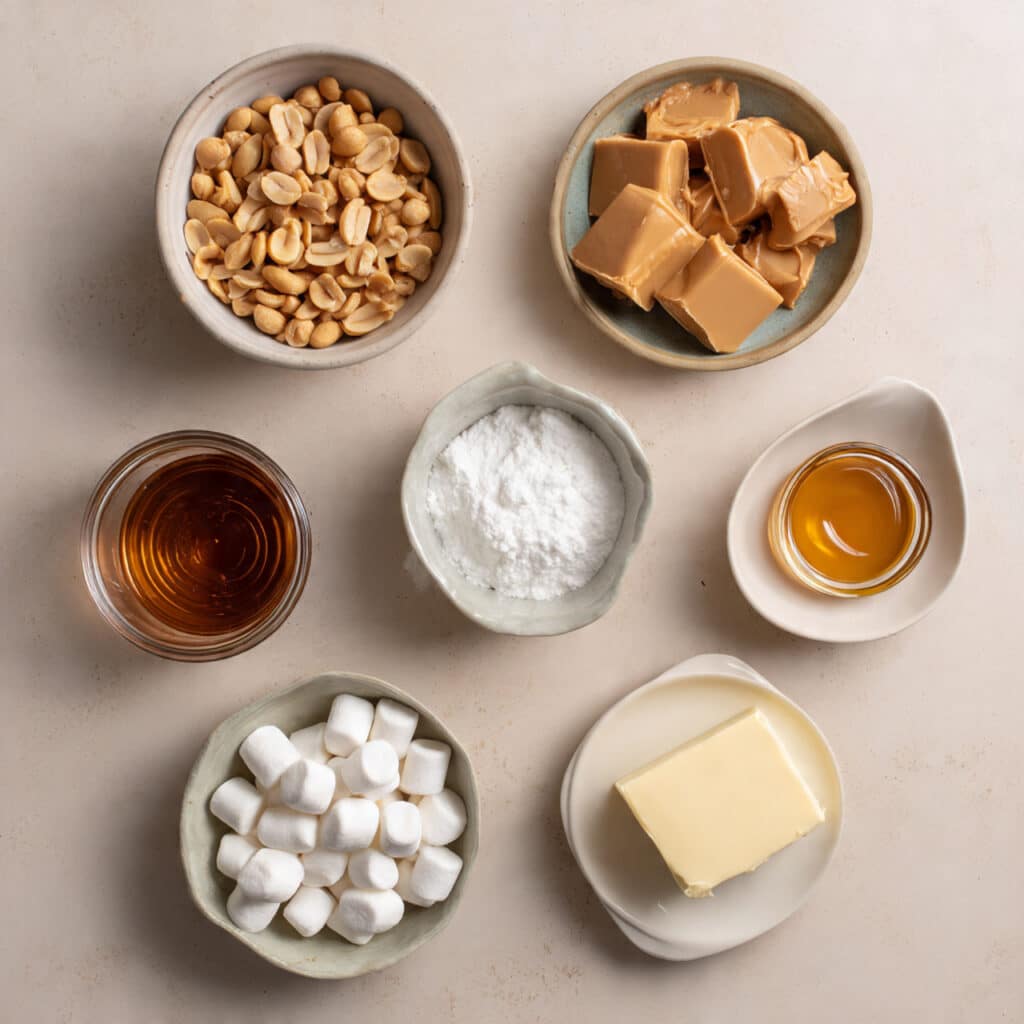
Ingredients in Payday Bars
The ingredients here are few but work together like a dream. Each one plays a vital role in creating that iconic chewy-salty-sweet balance.
- Salted Roasted Peanuts: 3 cups. These add crunch, salt, and the signature Payday texture.
- Peanut Butter Chips: 2 cups. They melt down to form the base’s rich, nutty sweetness.
- Mini Marshmallows: 2 cups. Provide a chewy texture and help bind the layers.
- Sweetened Condensed Milk: 1 can (14 oz). Adds moisture and a soft caramel flavor.
- Butter: 2 tablespoons. Helps smooth out the texture and adds richness.
- Vanilla Extract: 1 teaspoon. Rounds out the sweetness with warm flavor notes.
Ingredient Substitutions
Life happens, and sometimes you need a swap. Here are a few that work well.
Peanut Butter Chips: Butterscotch chips or white chocolate chips.
Mini Marshmallows: Use marshmallow fluff in equal volume.
Salted Roasted Peanuts: Try honey-roasted for a touch of sweetness or cashews for a creamy crunch.
Sweetened Condensed Milk: Evaporated milk with added sugar can work in a pinch.
Ingredient Spotlight
Peanut Butter Chips: These little guys are magic in this recipe. They melt down into a smooth, creamy base with a rich peanut flavor that mimics the inside of a Payday bar.
Salted Peanuts: The real hero here. They provide contrast in texture and a burst of salty crunch that balances the sweet, chewy center perfectly.
Instructions for Making Payday Bars
Alright, apron on and let’s get to the fun part. Here’s how to make your own batch of Payday Bars from scratch.
- Preheat Your Equipment:
No preheating needed! But go ahead and line a 9×13 baking dish with parchment paper for easy removal later. - Combine Ingredients:
In a saucepan over medium-low heat, melt the peanut butter chips, sweetened condensed milk, butter, and vanilla. Stir constantly until smooth. Remove from heat and fold in the mini marshmallows until they’re just melted and incorporated. - Prepare Your Cooking Vessel:
Pour half of the salted peanuts into the bottom of the lined baking dish, spreading them out evenly. - Assemble the Dish:
Pour the melted mixture over the peanuts. Use a spatula to spread it evenly, then top with the remaining peanuts, pressing them lightly into the surface. - Cook to Perfection:
No baking required. Let the bars sit at room temperature for 1 hour, then refrigerate for another hour to firm up. - Finishing Touches:
Once chilled, lift the bars out using the parchment, and cut into squares or rectangles — whatever your heart desires. - Serve and Enjoy:
Serve chilled or at room temp for that perfect chewy bite. Trust me, they won’t last long!
Texture & Flavor Secrets
What really makes these bars shine is the contrast. The gooey, chewy nougat-like center plays beautifully against the crunch of the salted peanuts on top and bottom. The flavor hits a sweet spot literally with buttery richness, a warm vanilla finish, and just enough salt to balance it all out.
Cooking Tips & Tricks
Here are a few bonus secrets to help your bars come out picture-perfect:
- Use parchment paper with extra overhang to lift the bars out easily.
- Chop peanuts slightly if you prefer a more refined top layer.
- Warm your knife under hot water before slicing for ultra-clean cuts.
What to Avoid
These bars are forgiving, but a few missteps can throw things off.
- Don’t use unsalted peanuts unless you like very sweet bars.
- Avoid high heat when melting ingredients to prevent scorching.
- Skipping chill time will make cutting them a sticky mess.
Nutrition Facts
Servings: 24
Calories per serving: 280
Note: These are approximate values.
Preparation Time
Prep Time: 10 minutes
Cook Time: 10 minutes
Total Time: 1 hour 20 minutes (including chill time)
Make-Ahead and Storage Tips
Payday Bars are the ultimate prep-ahead treat. You can make them days in advance and keep them in an airtight container in the fridge for up to a week. They also freeze beautifully. Just wrap tightly and thaw before serving. To re-soften, leave them at room temp for about 15 minutes.
How to Serve Payday Bars
Serve these beauties on a dessert tray alongside chocolate-dipped pretzels or other candy-inspired bars. They pair beautifully with coffee or hot chocolate and are perfect for gift tins, parties, or bake sales.
Creative Leftover Transformations
Got extras? Here are a few ideas to reinvent them:
- Chop and sprinkle over vanilla ice cream for a candy sundae.
- Mix into brownie batter for a peanutty twist.
- Crumble and use as a sweet-salty topping for yogurt parfaits.
Additional Tips
Want to elevate your bars even more?
- Add a sprinkle of flaky sea salt on top for an artisan look.
- Line the pan with foil and parchment for extra lift-out ease.
- Press bars firmly to help them hold their shape once chilled.
Make It a Showstopper
Presentation matters, especially when gifting or entertaining. Arrange your bars on a sleek white platter, drizzle with a bit of melted chocolate if you’re feeling extra, and scatter a few extra peanuts around for that bakery-style look.
Variations to Try
Ready to experiment? These ideas will keep things exciting:
- Chocolate-Dipped: Dip one end of each bar in melted chocolate.
- Maple Peanut Bars: Add 1 teaspoon of maple extract for a new flavor profile.
- Almond Joy Twist: Swap peanuts for almonds and add shredded coconut.
- White Chocolate Swirl: Stir in white chocolate chips for a layered flavor.
- Crunchy Layer: Add crushed pretzels between the peanut layers for extra texture.
FAQ’s
Q1: Can I use natural peanut butter instead of chips?
A1: It won’t have the same texture or sweetness, so stick with peanut butter chips for best results.
Q2: How long do these bars last?
A2: Up to 7 days in the fridge or 2 months in the freezer.
Q3: Can I make them nut-free?
A3: You can try sunflower seeds and sunbutter, though the flavor will differ.
Q4: Do they need to be refrigerated?
A4: Yes, for best texture and to keep them firm.
Q5: What’s the best way to cut them cleanly?
A5: Use a hot, sharp knife and wipe between cuts.
Q6: Can I double the recipe?
A6: Absolutely. Use a larger pan or make two batches.
Q7: Are they gluten-free?
A7: Yes, just double-check your ingredient labels.
Q8: What kind of peanuts should I use?
A8: Salted roasted peanuts work best for that classic flavor.
Q9: Can I use honey roasted peanuts?
A9: Definitely, it adds a touch more sweetness and crunch.
Q10: Can I skip the marshmallows?
A10: Not recommended, they help bind the bars and give them that chewy texture.
Conclusion
There you have it, a nostalgic treat turned homemade masterpiece. Payday Bars are everything we love about sweet and salty snacks, packed into one easy recipe. Whether you’re making them for a party or sneaking one with your afternoon coffee, trust me, it’s worth every bite.
Print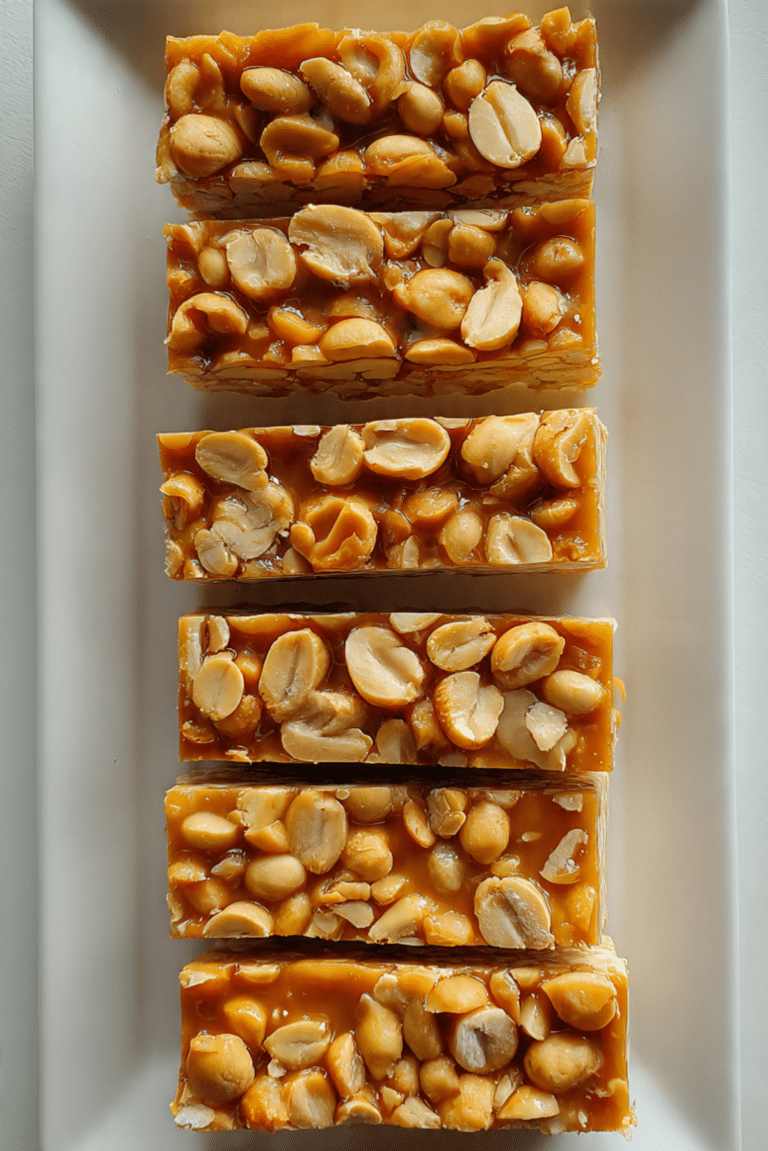
Payday Bars
These homemade Payday Bars deliver the perfect balance of sweet, salty, chewy, and crunchy. Packed with roasted peanuts and a smooth peanut butter base, they’re a no-bake treat that comes together fast and satisfies every craving.
- Total Time: 1 hour 20 minutes
- Yield: 24 bars 1x
Ingredients
- 3 cups salted roasted peanuts
- 2 cups peanut butter chips
- 2 cups mini marshmallows
- 1 can (14 oz) sweetened condensed milk
- 2 tablespoons butter
- 1 teaspoon vanilla extract
Instructions
- Line a 9×13 baking dish with parchment paper and set aside.
- In a saucepan over medium-low heat, melt together the peanut butter chips, sweetened condensed milk, butter, and vanilla, stirring constantly until smooth.
- Remove from heat and fold in mini marshmallows until they melt and combine into the mixture.
- Pour half of the peanuts into the bottom of the lined dish and spread them evenly.
- Pour the melted mixture over the peanuts and spread out evenly with a spatula.
- Top with the remaining peanuts, pressing them gently into the surface.
- Let bars set at room temperature for 1 hour, then refrigerate for at least another hour.
- Once firm, lift out using the parchment paper and slice into bars.
Notes
- Chilling the bars before slicing makes cutting much easier and cleaner.
- Use parchment paper with overhang for easy removal from the pan.
- For extra flair, drizzle with melted chocolate before serving.
- Prep Time: 10 minutes
- Cook Time: 10 minutes
- Category: Dessert
- Method: No-Bake
- Cuisine: American
- Diet: Vegetarian
Nutrition
- Serving Size: 1 bar
- Calories: 280
- Sugar: 19g
- Sodium: 120mg
- Fat: 16g
- Saturated Fat: 5g
- Unsaturated Fat: 9g
- Trans Fat: 0g
- Carbohydrates: 30g
- Fiber: 2g
- Protein: 6g
- Cholesterol: 8mg
Keywords: payday bars, homemade candy bar, no bake peanut bars, sweet and salty treats, peanut caramel bars