S’mores bars
If there’s one dessert that instantly brings back memories of campfires, laughter, and sticky fingers, it’s s’mores. These S’mores Bars wrap all that gooey, toasty magic into one decadent, portable square. Imagine a golden graham cracker crust, thick melted chocolate, pockets of peanut butter cups, and toasty marshmallows all melting together into something wildly irresistible. Trust me, you’re going to love this.
Behind the Recipe
I came up with this recipe after a rainy weekend canceled our camping trip. The kids were bummed, and honestly, so was I. I wanted to bring the feeling of roasting marshmallows under the stars straight into our kitchen. So I layered everything we love about classic s’mores into a single tray bake. What came out was even better than expected chewy, gooey, chocolatey bars with just the right touch of crunch. No fire required.
Recipe Origin or Trivia
The classic s’more has been around for nearly a century, with the first printed recipe appearing in a 1927 Girl Scouts handbook. The name itself is a contraction of “some more,” because really, who can stop at just one? Traditionally made with graham crackers, chocolate, and toasted marshmallows, s’mores have become an iconic American treat. These bars are a fun, mess-free spin on that nostalgic favorite, and perfect for sharing all year long.
Why You’ll Love S’mores bars
When you need a crowd-pleaser or just a little kitchen fun, this recipe delivers big time.
Versatile: Perfect for bake sales, potlucks, lunchbox treats, or just a midnight snack.
Budget-Friendly: Uses pantry staples, making it both accessible and affordable.
Quick and Easy: Simple layers, no campfire, and ready in under an hour.
Customizable: Add peanut butter cups, swap chocolates, or throw in nuts.
Crowd-Pleasing: Everyone from toddlers to grandparents loves these gooey bites.
Make-Ahead Friendly: Bake, chill, and slice ahead of time for easy grab-and-go.
Great for Leftovers: Stores beautifully and tastes even better the next day.
Chef’s Pro Tips for Perfect Results
S’mores bars are simple, but a few tricks can take them from good to unforgettable.
- Line your pan with parchment: This makes cleanup a breeze and helps lift out the bars neatly.
- Use mini marshmallows: They toast up evenly and nestle perfectly into the dough.
- Chill before cutting: Letting the bars cool completely helps get cleaner slices.
- Reserve some chocolate for the top: Press a few chunks in after baking for an extra melty finish.
- Don’t overbake: Pull them as soon as the edges are golden so the center stays gooey.
Kitchen Tools You’ll Need
A few basic tools are all you need to make these beauties.
Mixing Bowls: For combining crust and dough ingredients.
9×13-inch Baking Pan: The perfect size for a thick, chewy bar.
Parchment Paper: Keeps the bars from sticking and makes slicing easier.
Spatula: For spreading dough and lifting out the baked bars.
Sharp Knife: Essential for clean, even slices.
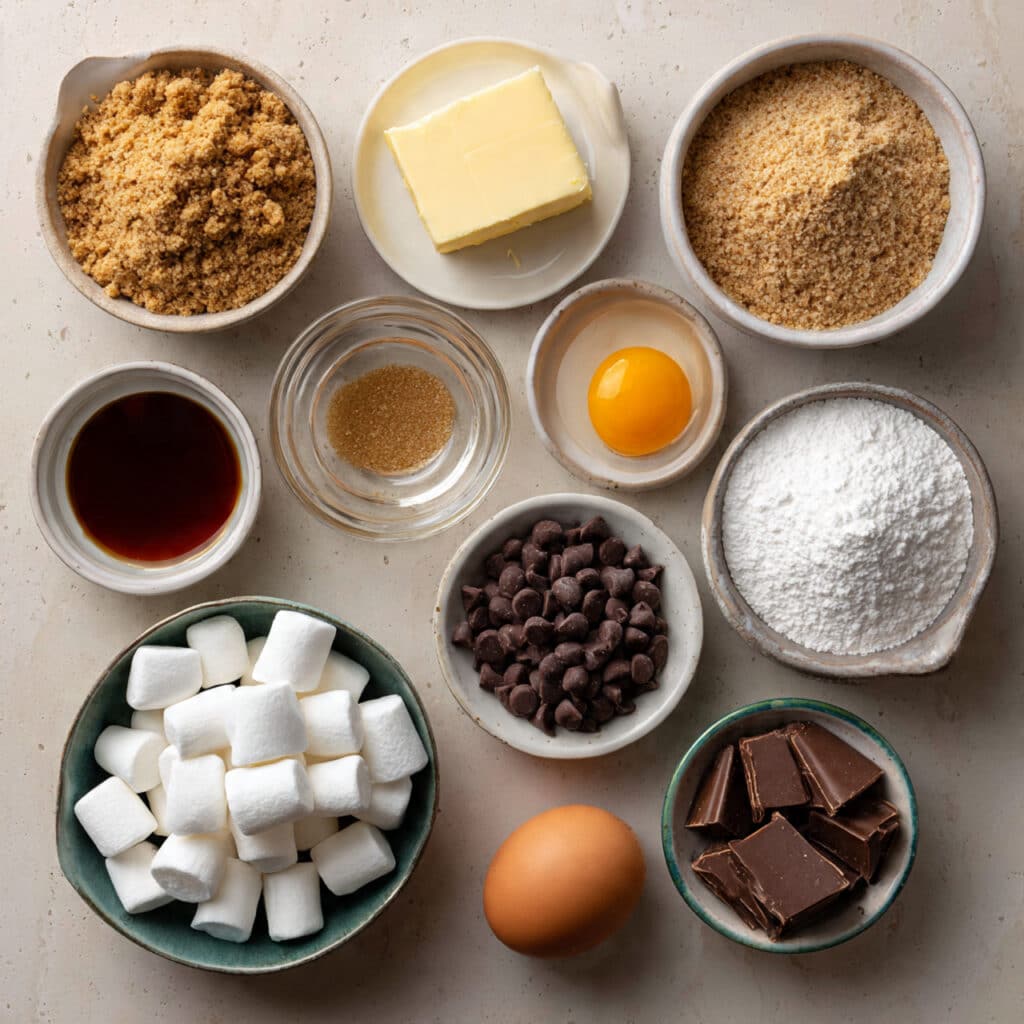
Ingredients in S’mores bars
Every bite is a dreamy combination of sweet and chewy textures. Here’s what you’ll need:
- Graham Cracker Crumbs: 2 cups – The nutty, toasty base that gives the crust its signature flavor.
- Unsalted Butter: 1 cup (melted) – Binds the crumbs and adds rich flavor.
- Brown Sugar: 1 cup – Brings sweetness and a soft, chewy texture.
- All-Purpose Flour: 1 ¼ cups – Adds structure to the dough layer.
- Salt: ½ teaspoon – Balances the sweetness.
- Vanilla Extract: 1 teaspoon – Adds warm, cozy depth.
- Egg: 1 large – Helps bind the dough.
- Mini Chocolate Chips: 1 cup – Melts beautifully into every bite.
- Mini Peanut Butter Cups: 1 cup (halved) – A fun twist for extra indulgence.
- Mini Marshmallows: 2 cups – Toast up golden and gooey on top.
Ingredient Substitutions
Want to switch things up? Here are some easy swaps.
Graham Cracker Crumbs: Use crushed digestive biscuits or vanilla wafers.
Butter: Coconut oil works if you want a dairy-free version.
Brown Sugar: Substitute with coconut sugar for a slightly different flavor.
Mini Peanut Butter Cups: Use chopped caramel chocolates or leave them out.
Mini Marshmallows: Cut full-size marshmallows into halves or quarters.
Ingredient Spotlight
Graham Cracker Crumbs: These bring in that classic campfire taste, with just enough crunch and warmth to create the perfect crust.
Mini Peanut Butter Cups: They melt slightly into the dough, adding creamy, nutty richness that takes these bars over the top.
Instructions for Making S’mores bars
Making these is just as fun as eating them. And now, let’s dive into the steps:
- Preheat Your Equipment:
Preheat your oven to 350°F (175°C). Line a 9×13-inch baking pan with parchment paper, letting the edges hang over for easy lifting. - Combine Ingredients:
In a mixing bowl, stir together the graham cracker crumbs and melted butter until evenly combined. Press into the bottom of your prepared pan. - Prepare Your Cooking Vessel:
In another bowl, beat the brown sugar, flour, salt, egg, and vanilla until smooth. Gently fold in the mini chocolate chips and half of the marshmallows. - Assemble the Dish:
Spread the dough mixture evenly over the crust. Press in the halved peanut butter cups, and scatter the remaining marshmallows over the top. - Cook to Perfection:
Bake for 22 to 25 minutes, or until the top is golden and the edges are set. The marshmallows should be lightly toasted. - Finishing Touches:
Let the bars cool completely in the pan before lifting them out using the parchment. Slice into squares or rectangles. - Serve and Enjoy:
Serve as is, or warm slightly for extra gooeyness. Perfect with a cold glass of milk or a hot cup of cocoa.
Texture & Flavor Secrets
These bars are all about contrast. The base is firm and buttery, while the center stays chewy with pockets of melty chocolate and creamy peanut butter. The marshmallows toast to a golden crisp on top, giving you that roasted, slightly smoky finish. Every bite hits sweet, salty, crunchy, and gooey all in one.
Cooking Tips & Tricks
Here’s how to make sure your batch turns out absolutely perfect:
- Cool Completely: Rushing the cooling will make the bars messy to cut.
- Use Fresh Marshmallows: Stale ones won’t melt as well.
- Press Gently: Don’t flatten the top too much, or the marshmallows won’t toast properly.
- Use an Offset Spatula: Helps spread the dough mixture evenly.
What to Avoid
A few small missteps can ruin the magic. Here’s what to steer clear of:
- Overbaking: Makes the bars dry instead of chewy.
- Too Much Topping: Overloading with chocolate or marshmallows can cause overflow.
- Cutting While Warm: You’ll get messy, uneven slices if you don’t let them cool fully.
Nutrition Facts
Servings: 16 bars
Calories per serving: 290
Note: These are approximate values.
Preparation Time
Prep Time: 15 minutes
Cook Time: 25 minutes
Total Time: 40 minutes
Make-Ahead and Storage Tips
These bars are perfect for making ahead. Let them cool, slice them, and store in an airtight container at room temperature for up to 4 days. You can also freeze them for up to 2 months just wrap each bar individually in plastic and pop them into a freezer bag. To enjoy, thaw overnight or reheat gently in the microwave.
How to Serve S’mores bars
These bars shine on their own, but they also pair beautifully with:
- A scoop of vanilla ice cream on top
- A drizzle of warm chocolate or caramel sauce
- Crushed graham crackers sprinkled over for crunch
- A warm beverage like hot cocoa or coffee
Creative Leftover Transformations
Got a few leftover bars? Here’s how to remix them:
- S’mores Milkshake: Blend with vanilla ice cream and milk.
- Bar Crumble Sundae: Crumble over ice cream for a sundae topping.
- S’mores Sandwich: Place between two cookies and microwave for 10 seconds.
Additional Tips
- Use good quality chocolate: It really makes a difference in richness.
- Don’t skip the parchment: You’ll thank yourself at cleanup time.
- Play with flavor: Add cinnamon, nutmeg, or even a hint of espresso powder for extra depth.
Make It a Showstopper
To make these bars stand out even more, press a few extra chocolate chips and marshmallows on top right after baking. Let them melt in for a bakery-style finish. Slice into clean squares and serve on a rustic wooden board or marble tray for that picture-perfect presentation.
Variations to Try
- Nutella Swirl: Add dollops of Nutella before baking and swirl through the top layer.
- Cookie Dough Topping: Add crumbled cookie dough instead of the classic dough layer.
- Coconut Twist: Sprinkle shredded coconut before baking for a tropical vibe.
- Dark Chocolate Upgrade: Use dark chocolate chunks for a deeper flavor.
- Gluten-Free Version: Swap graham crumbs and flour with gluten-free alternatives.
FAQ’s
Q1: Can I use large marshmallows instead of mini?
Yes, just cut them into smaller pieces so they toast evenly and melt well.
Q2: Do these need to be refrigerated?
No, they’re best stored at room temperature in an airtight container.
Q3: Can I use milk chocolate instead of semi-sweet?
Absolutely. Use your favorite chocolate to make them your own.
Q4: Can I freeze these bars?
Yes. Wrap tightly and freeze for up to 2 months.
Q5: Can I leave out the peanut butter cups?
Of course. You can replace them with extra chocolate chips or another add-in.
Q6: What’s the best way to cut them cleanly?
Chill completely and use a sharp knife wiped clean between slices.
Q7: Can I double the recipe?
Yes, just use a larger pan or two standard pans.
Q8: Can I use margarine instead of butter?
Butter gives better flavor, but margarine works in a pinch.
Q9: How do I make them extra gooey?
Add a few extra marshmallows and chocolate chips to the top just after baking.
Q10: Are these safe for nut allergies?
Skip the peanut butter cups and check all labels to be safe.
Conclusion
S’mores bars are everything we love about a classic fireside treat, all baked into a tray of happiness. Whether you’re making them for a party, packing them in lunchboxes, or just treating yourself on a rainy day, they bring joy in every bite. Let me tell you, it’s worth every crumb. So go ahead and whip up a batch your kitchen is about to smell amazing.
Print
S’mores bars
These gooey S’mores Bars pack all the flavor of classic campfire treats into one easy, bake-and-slice dessert loaded with chocolate, marshmallows, and graham cracker goodness.
- Total Time: 40 minutes
- Yield: 16 bars 1x
Ingredients
- 2 cups graham cracker crumbs
- 1 cup unsalted butter, melted
- 1 cup brown sugar
- 1 1/4 cups all-purpose flour
- 1/2 teaspoon salt
- 1 teaspoon vanilla extract
- 1 large egg
- 1 cup mini chocolate chips
- 1 cup mini peanut butter cups, halved
- 2 cups mini marshmallows
Instructions
- Preheat your oven to 350°F (175°C) and line a 9×13-inch baking pan with parchment paper.
- In a mixing bowl, stir together graham cracker crumbs and melted butter until fully combined. Press into the bottom of the prepared pan to form the crust.
- In another bowl, mix brown sugar, flour, salt, egg, and vanilla until smooth. Fold in mini chocolate chips and half the marshmallows.
- Spread the dough mixture evenly over the crust. Gently press in halved peanut butter cups and sprinkle remaining marshmallows on top.
- Bake for 22 to 25 minutes, or until golden brown and marshmallows are lightly toasted.
- Cool completely in the pan before lifting out with parchment and slicing into bars.
Notes
- Cool fully before slicing for clean cuts.
- Press a few extra chocolate chips or marshmallows on top after baking for a decorative finish.
- Store in an airtight container at room temperature for up to 4 days.
- Prep Time: 15 minutes
- Cook Time: 25 minutes
- Category: Dessert
- Method: Baking
- Cuisine: American
- Diet: Vegetarian
Nutrition
- Serving Size: 1 bar
- Calories: 290
- Sugar: 24g
- Sodium: 140mg
- Fat: 15g
- Saturated Fat: 8g
- Unsaturated Fat: 6g
- Trans Fat: 0g
- Carbohydrates: 36g
- Fiber: 1g
- Protein: 3g
- Cholesterol: 30mg
Keywords: S’mores bars, easy dessert bars, chocolate marshmallow bars, graham cracker dessert