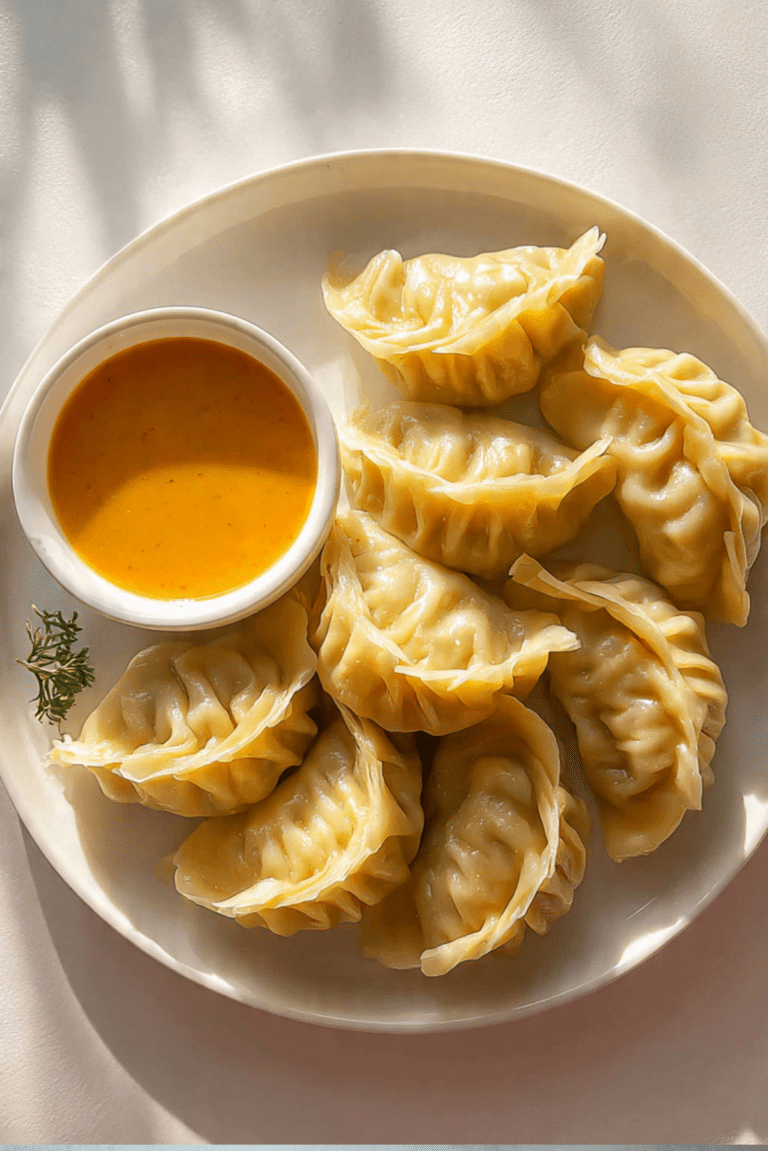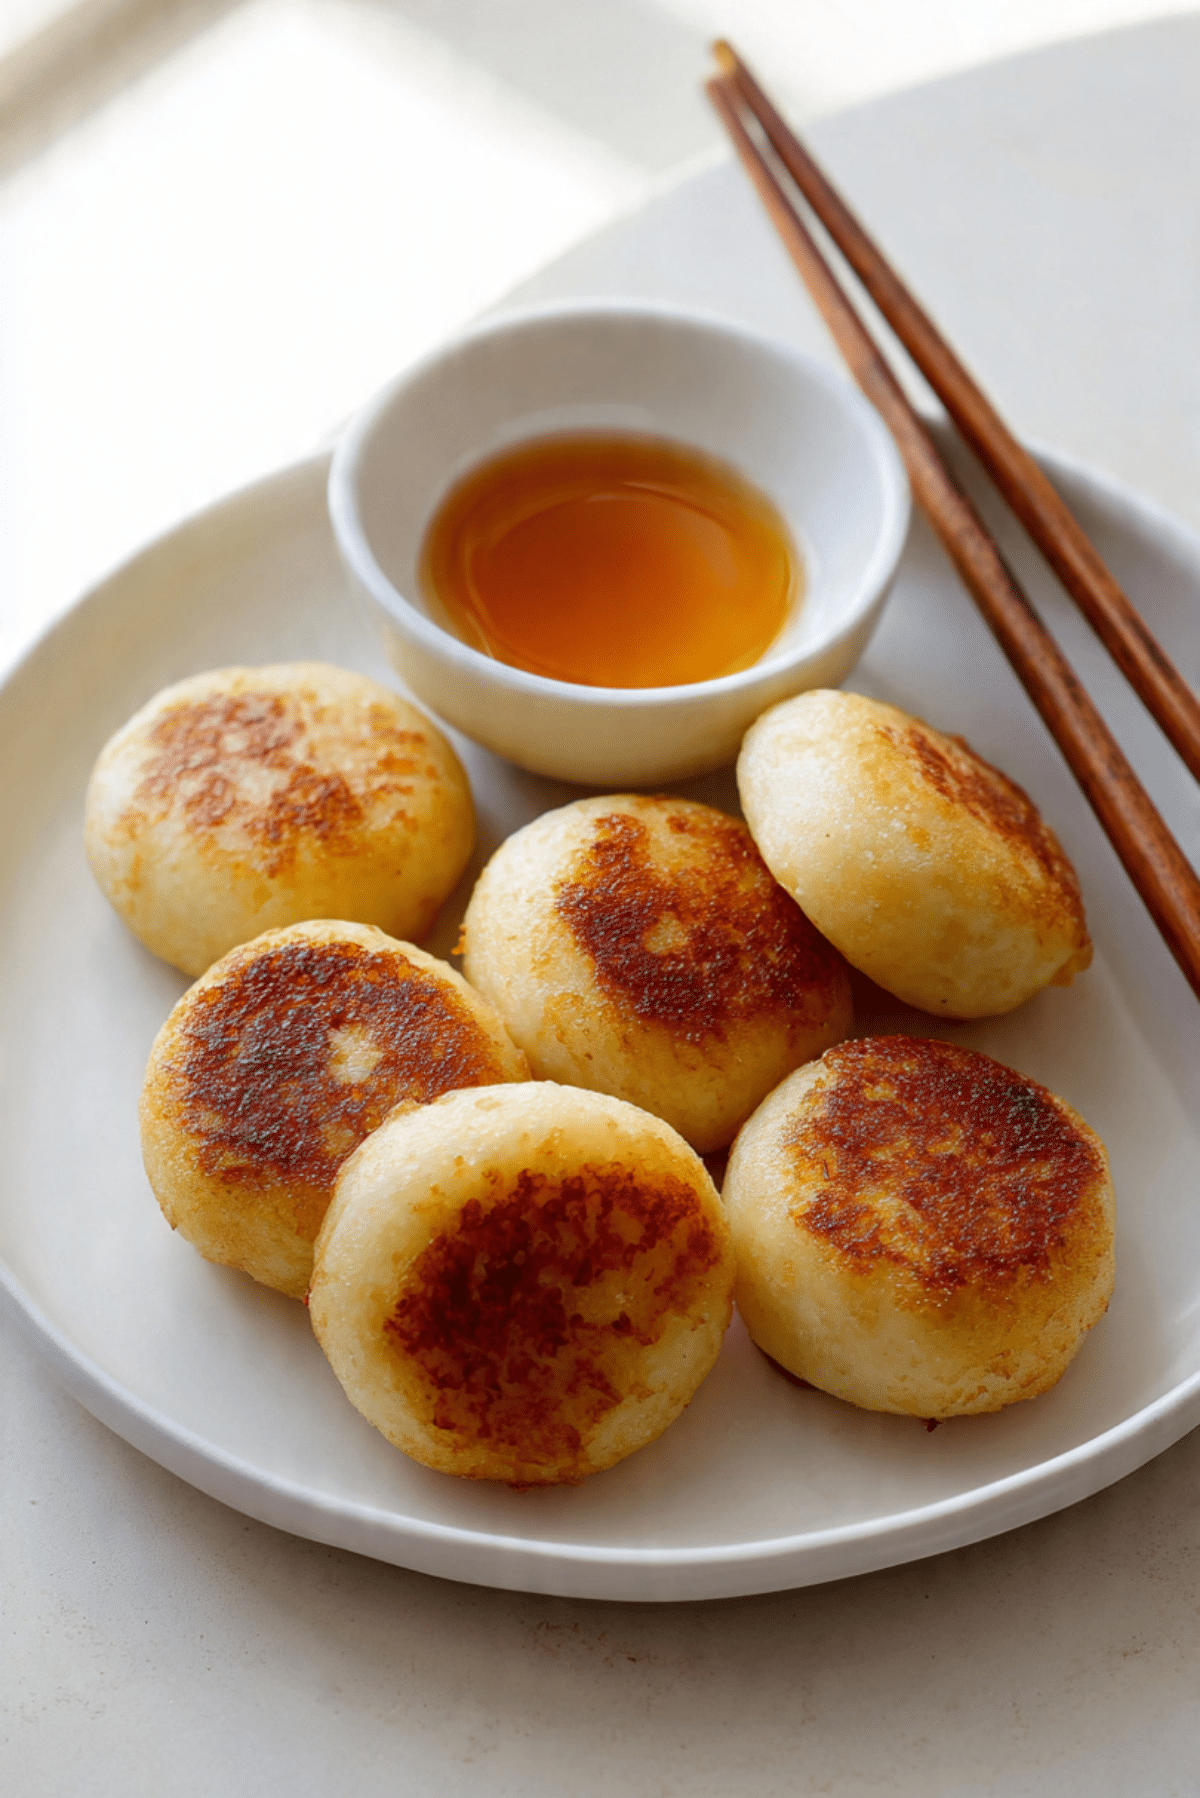
Sweet Cheese Mochi
Soft, chewy, and just the right amount of sweet, Sweet Cheese Mochi is that perfect little treat you never knew you needed. It melts in your mouth with the richness of cheese tucked inside a golden crust. Pair it with your favorite warm drink or enjoy it on its own, and you’ll see why this dessert is absolutely irresistible.
Behind the Recipe
It all started on a chilly afternoon when I was craving something cozy yet indulgent. I had some sweet rice flour in the pantry and a block of cream cheese in the fridge, and inspiration struck. What if I combined the pillowy chew of mochi with the creamy, melty goodness of cheese? That experiment turned into a tradition, and now Sweet Cheese Mochi is my go-to comfort snack.
Recipe Origin or Trivia
Mochi has deep roots in Japanese culture, originally made as a ceremonial food during New Year celebrations. Over the years, it’s evolved into countless variations, both savory and sweet. This version, filled with cheese and lightly pan-fried, draws inspiration from both traditional mochi and the Korean-style hotteok blending East Asian flavors in the most delightful way.
Why You’ll Love Sweet Cheese Mochi
Get ready to fall in love with this simple yet indulgent snack.
Versatile: Enjoy it warm or cold, as dessert or breakfast it fits any moment.
Budget-Friendly: Uses simple pantry staples and a small amount of cheese.
Quick and Easy: Ready in under 30 minutes from start to finish.
Customizable: Swap in different cheeses or add a sprinkle of cinnamon for extra flair.
Crowd-Pleasing: Kids and adults both adore these chewy, cheesy bites.
Make-Ahead Friendly: Make the dough in advance and fry when you’re ready.
Great for Leftovers: Reheat in a pan or microwave they’re just as good the next day.
Chef’s Pro Tips for Perfect Results
Getting these just right is easier than you think with a few tricks up your sleeve.
- Use glutinous rice flour (not regular rice flour) for that signature chewy texture.
- Let the cheese chill before stuffing so it doesn’t ooze too early.
- Don’t overfill or the mochi may tear during cooking.
- Use a nonstick pan and keep the heat medium-low to prevent burning.
- Let them rest for a minute after frying the cheese sets up beautifully.
Kitchen Tools You’ll Need
To make the cooking process a breeze, here’s what you’ll want on hand.
Mixing Bowl: To bring your dough together smoothly.
Measuring Cups & Spoons: Accuracy matters in dough-making.
Nonstick Pan: Prevents sticking and ensures golden crusts.
Spatula or Tongs: Helps with flipping without tearing the mochi.
Small Plate or Board: Perfect for shaping and stuffing the mochi.
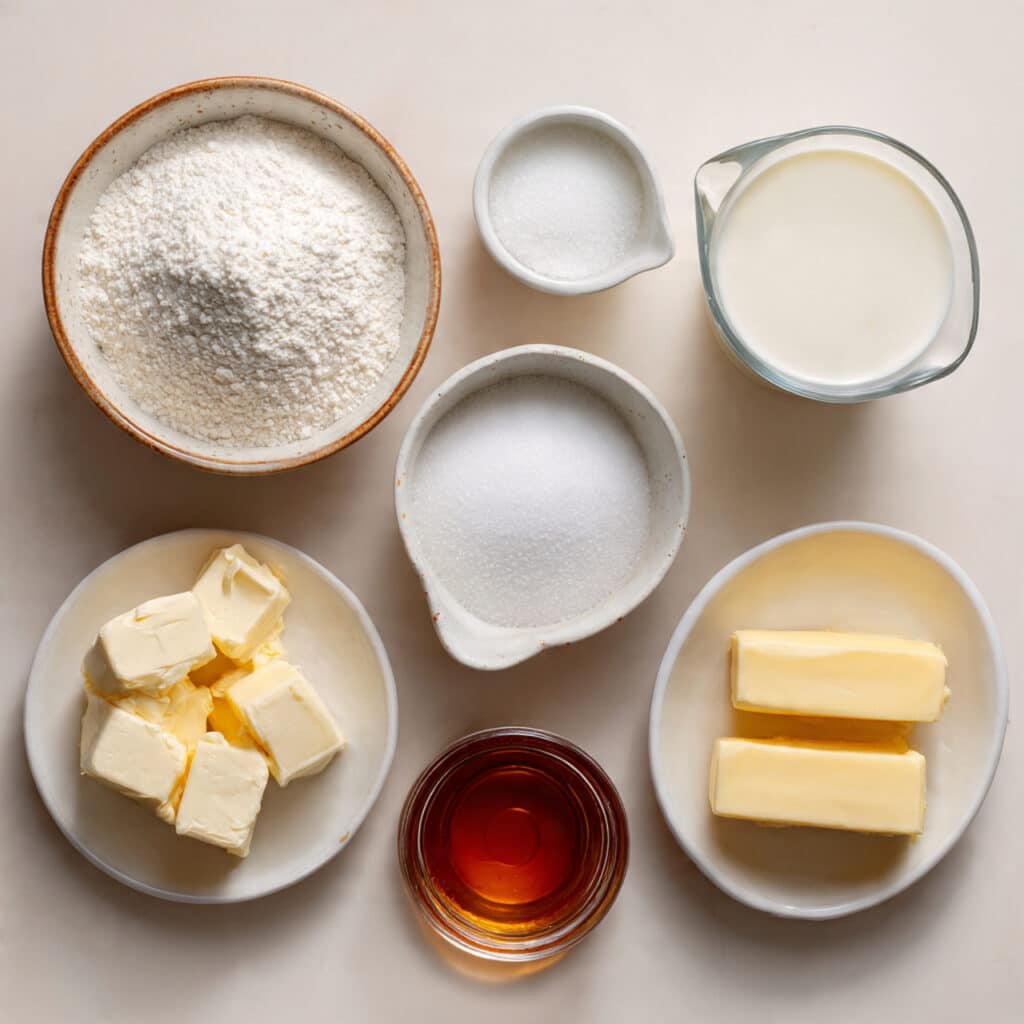
Ingredients in Sweet Cheese Mochi
This delightful recipe brings together simple ingredients that transform into something magical.
- Glutinous Rice Flour: 1 cup The base of the mochi, giving it that chewy bounce.
- Granulated Sugar: 2 tablespoons Adds just enough sweetness.
- Milk: 2/3 cup Binds the dough and adds a tender texture.
- Cream Cheese: 4 ounces, cut into small cubes Melts into a gooey, creamy center.
- Butter or Oil: 1 tablespoon For frying, adding a golden crust.
- Optional Honey or Syrup: For dipping, if you like a sweet touch on the side.
Ingredient Substitutions
Let’s make it work with what you have.
Milk: Almond or oat milk for a dairy-free version.
Cream Cheese: Try mozzarella or shredded cheddar for a savory twist.
Sugar: Use coconut sugar for a deeper caramel flavor.
Ingredient Spotlight
Glutinous Rice Flour: This isn’t your average rice flour. It gives mochi its legendary chew and stretch, and it’s essential for achieving the right consistency.
Cream Cheese: Its rich creaminess melts beautifully, offering a sweet-savory surprise in every bite.
Instructions for Making Sweet Cheese Mochi
Alright, let’s get to the fun part. Making mochi might seem tricky, but it’s actually pretty relaxing once you get into the rhythm.
- Preheat Your Equipment:
Set your nonstick skillet on medium-low heat so it’s ready when your mochi are shaped. - Combine Ingredients:
In a mixing bowl, whisk together glutinous rice flour, sugar, and milk until a smooth dough forms. - Prepare Your Cooking Vessel:
Lightly oil your nonstick pan and set it aside while you shape the mochi. - Assemble the Dish:
Divide the dough into small balls. Flatten each one into a disc and place a cube of cream cheese in the center. Pinch to seal and gently roll into a ball again, flatten slightly. - Cook to Perfection:
Place the mochi in the pan and cook for 3 to 4 minutes on each side until golden brown and crisp on the outside. - Finishing Touches:
Let the mochi rest for 1 minute before serving. Optional: serve with a drizzle of honey or dipping sauce on the side. - Serve and Enjoy:
Serve warm for the best gooey texture, or let them cool for a firmer bite. Either way, they’re pure bliss.
Texture & Flavor Secrets
Biting into one of these treats gives you that golden, slightly crisp shell with a stretchy, soft mochi layer and a creamy, gooey cheese core. The flavor is gently sweet with a hint of saltiness from the cheese a balance that’s hard to resist.
Cooking Tips & Tricks
- Use damp hands when handling dough to prevent sticking.
- Make sure the cheese cubes are fully sealed to avoid leakage.
- Flip only once to keep the mochi intact.
- Serve immediately for that ultimate cheesy stretch.
What to Avoid
We’ve all made a few missteps here’s how to sidestep the common ones.
- Using regular rice flour: It won’t give the chewy texture you need.
- Overfilling with cheese: Tempting, but messy when it leaks.
- Too much heat: This can burn the outside before the inside is cooked.
Nutrition Facts
Servings: 4
Calories per serving: 210
Note: These are approximate values.
Preparation Time
Prep Time: 10 minutes
Cook Time: 10 minutes
Total Time: 20 minutes
Make-Ahead and Storage Tips
You can shape and fill the mochi a few hours ahead and store them covered in the fridge until you’re ready to fry. Cooked mochi can be refrigerated for up to 2 days and reheated in a pan or microwave. Avoid freezing, as it changes the texture.
How to Serve Sweet Cheese Mochi
Serve them warm as a dessert, a mid-day snack, or even a playful brunch side. Pair with green tea, hot cocoa, or even a cold glass of milk. For presentation, stack them in a circle with a dipping sauce in the center it’s charming and fun to share.
Creative Leftover Transformations
- Slice leftover mochi in half and toast them lightly for a warm treat.
- Dip in chocolate and chill for a dessert twist.
- Chop and toss into a sweet-savory salad bowl.
Additional Tips
- Lightly dust your hands with cornstarch if dough feels sticky.
- Let the mochi rest before serving for a better bite.
- For extra sweetness, mix a bit of honey into the dough.
Make It a Showstopper
Use a glossy plate and place the mochi in a fan shape. Add a small dipping bowl with syrup or honey in the center and garnish the plate with a tiny sprig of mint or dusting of powdered sugar.
Variations to Try
- Matcha Cheese Mochi: Add 1 teaspoon matcha powder to the dough.
- Chocolate Filled: Swap cheese with a square of dark chocolate.
- Savory Twist: Use garlic herb cream cheese for a fusion snack.
- Sweet Red Bean: Use sweetened red bean paste instead of cheese.
- Cinnamon Sugar Dust: Coat warm mochi in a cinnamon-sugar mix.
FAQ’s
Q1: Can I bake instead of pan-frying the mochi?
A1: Pan-frying gives the best texture, but you can bake at 375°F for 10–12 minutes until golden.
Q2: Can I freeze them after cooking?
A2: Freezing changes the chewy texture, so it’s not recommended.
Q3: Is there a vegan version?
A3: Use plant-based milk and vegan cream cheese for a tasty vegan option.
Q4: What can I use if I don’t have glutinous rice flour?
A4: Unfortunately, there’s no perfect substitute. Regular rice flour won’t work.
Q5: Why is my mochi dough too sticky?
A5: Add a tiny bit more flour or use oiled hands when shaping.
Q6: Can I use other cheeses?
A6: Yes! Mozzarella or brie work well too.
Q7: How do I keep the cheese from leaking?
A7: Make sure the dough is well sealed and chill the cheese cubes first.
Q8: Can I double the recipe?
A8: Absolutely, just cook in batches.
Q9: How do I reheat leftovers?
A9: Pan-fry for a couple minutes or microwave until warm.
Q10: Is this gluten free?
A10: Yes, glutinous rice flour is gluten free despite the name.
Conclusion
Sweet Cheese Mochi is one of those snacks that surprises you with how comforting it is. Simple, quick, and oh-so-satisfying, it’s the perfect little joy to make at home. Give it a try, and trust me, you’re going to love this.
Print
Sweet Cheese Mochi
Soft, chewy, and filled with melty cream cheese, Sweet Cheese Mochi is a quick and comforting treat with the perfect balance of sweet and savory.
- Total Time: 20 minutes
- Yield: 4 servings 1x
Ingredients
- 1 cup glutinous rice flour
- 2 tablespoons granulated sugar
- 2/3 cup milk
- 4 ounces cream cheese, cut into small cubes
- 1 tablespoon butter or oil (for frying)
- Optional: honey or syrup for dipping
Instructions
- In a bowl, mix glutinous rice flour, sugar, and milk until a smooth dough forms.
- Divide the dough into small balls, flatten each, and place a cube of cream cheese in the center. Seal and gently shape into discs.
- Preheat a nonstick pan over medium-low heat and lightly grease it.
- Place mochi in the pan and cook for 3 to 4 minutes per side until golden and crisp.
- Let rest for 1 minute before serving. Optionally, serve with honey or syrup on the side.
Notes
- Use glutinous rice flour, not regular rice flour, for the right texture.
- Chill cheese cubes before filling to prevent leaks.
- Damp hands make shaping easier.
- Prep Time: 10 minutes
- Cook Time: 10 minutes
- Category: Dessert
- Method: Pan-frying
- Cuisine: Asian-Inspired
- Diet: Vegetarian
Nutrition
- Serving Size: 1 serving
- Calories: 210
- Sugar: 5g
- Sodium: 90mg
- Fat: 9g
- Saturated Fat: 5g
- Unsaturated Fat: 3g
- Trans Fat: 0g
- Carbohydrates: 28g
- Fiber: 0g
- Protein: 4g
- Cholesterol: 20mg
Keywords: sweet cheese mochi, mochi dessert, cheesy mochi snack, Asian sweet, easy mochi recipe