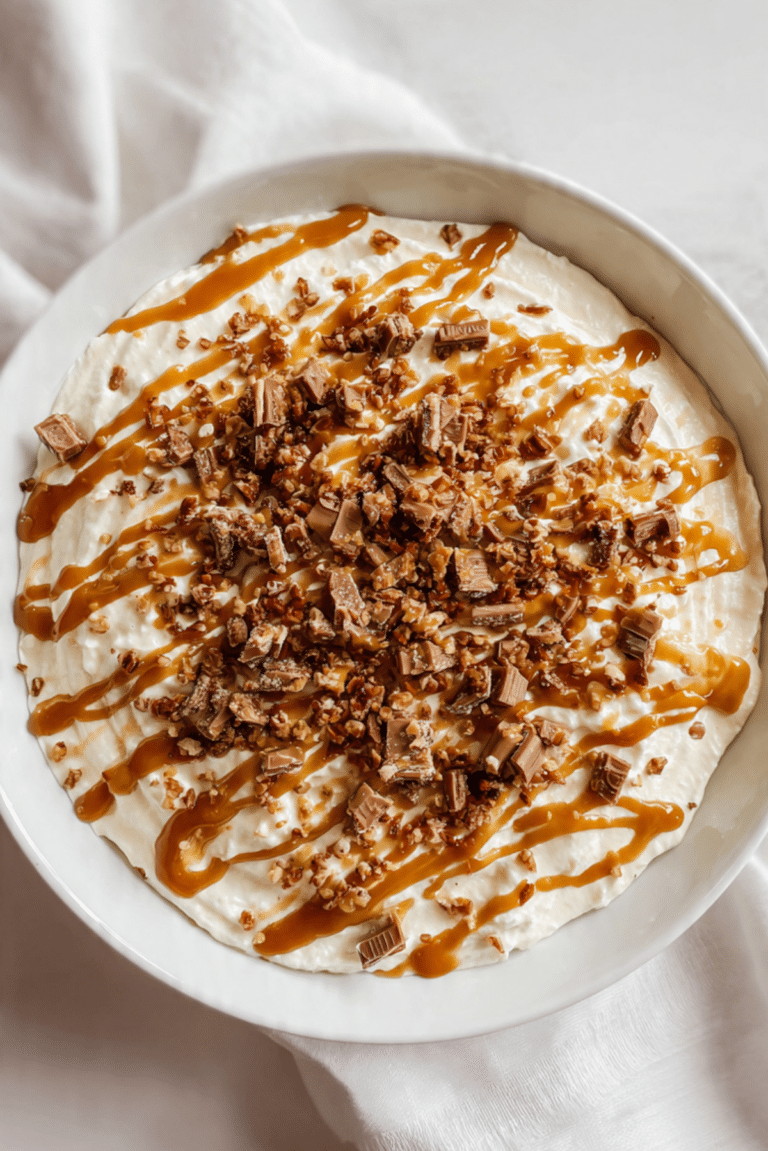
Twix Cookie Cups
There is something almost magical about biting into a dessert that has layers. First the soft crumble, then that slow stretch of caramel, and finally the smooth chocolate that melts just enough on your tongue. These Twix Cookie Cups bring all of that together in one perfect little bite. Trust me, you’re going to love this. They feel nostalgic, indulgent, and just a little bit fancy, even though they are surprisingly simple to make at home.
Why These Little Cookie Cups Steal the Show
There is something about handheld desserts that makes them impossible to resist. They look adorable on a tray, they are easy to serve, and everyone instinctively reaches for one. These cookie cups take inspiration from a classic candy bar and turn it into a bakery style treat that feels homemade and heartfelt.
The golden shortbread base gives that buttery snap, the caramel adds chewiness and depth, and the chocolate on top seals everything together. This one’s a total game changer for bake sales, holiday trays, or even just a quiet night when you want something sweet and satisfying.
A Sweet Treat with Candy Bar Roots
The inspiration behind these cookie cups comes from the beloved layered candy bar that combines biscuit, caramel, and chocolate. That trio has been winning hearts for decades. By transforming those flavors into a baked dessert, we get something that feels both familiar and new.
Shortbread itself has a long history in European baking, known for its rich buttery flavor and crumbly texture. Pairing it with caramel and chocolate is a natural evolution. It keeps the spirit of the original treat while giving it a homemade touch that feels warm and personal.
Why You’ll Keep Coming Back to This Recipe
Before we even step into the kitchen, let me tell you why this recipe deserves a permanent spot in your rotation.
Versatile: These cookie cups work for parties, lunchbox treats, or a simple after dinner dessert. You can dress them up with flaky salt or keep them classic and smooth.
Budget-Friendly: The ingredients are simple pantry staples plus caramel and chocolate. Nothing fancy, just honest baking basics.
Quick and Easy: The dough comes together in minutes, and the layers are straightforward. No complicated techniques here.
Customizable: Swap the chocolate, adjust the caramel thickness, or even add a sprinkle of nuts if you like texture.
Crowd-Pleasing: Buttery, chewy, chocolatey. It hits all the right notes, and everyone recognizes the flavor combination.
Make-Ahead Friendly: You can bake the bases ahead of time and fill them later, which makes entertaining so much easier.
Great for Leftovers: If there are any, they store beautifully and taste just as good the next day.
Pro Tips for Bakery Style Results
Now let’s lean into that expert touch that makes these feel truly special.
- Use room temperature butter so the dough creams smoothly and evenly.
- Press the dough firmly into the muffin tin so the cups hold their shape after baking.
- Do not overbake, the edges should be lightly golden, not dark brown.
- Let the caramel cool slightly before adding chocolate so the layers stay defined.
- Chill briefly after adding chocolate to get that clean, glossy top.
Kitchen Tools That Make It Easy
Before we start mixing, let’s make sure you have what you need.
Muffin Tin: This shapes the cookie cups perfectly and gives them structure.
Mixing Bowls: One for dry ingredients and one for creaming butter and sugar.
Hand Mixer or Stand Mixer: Helps create a light, fluffy base for the dough.
Small Saucepan: Useful for gently warming the caramel if needed.
Cooling Rack: Allows the cookie cups to cool evenly before filling.
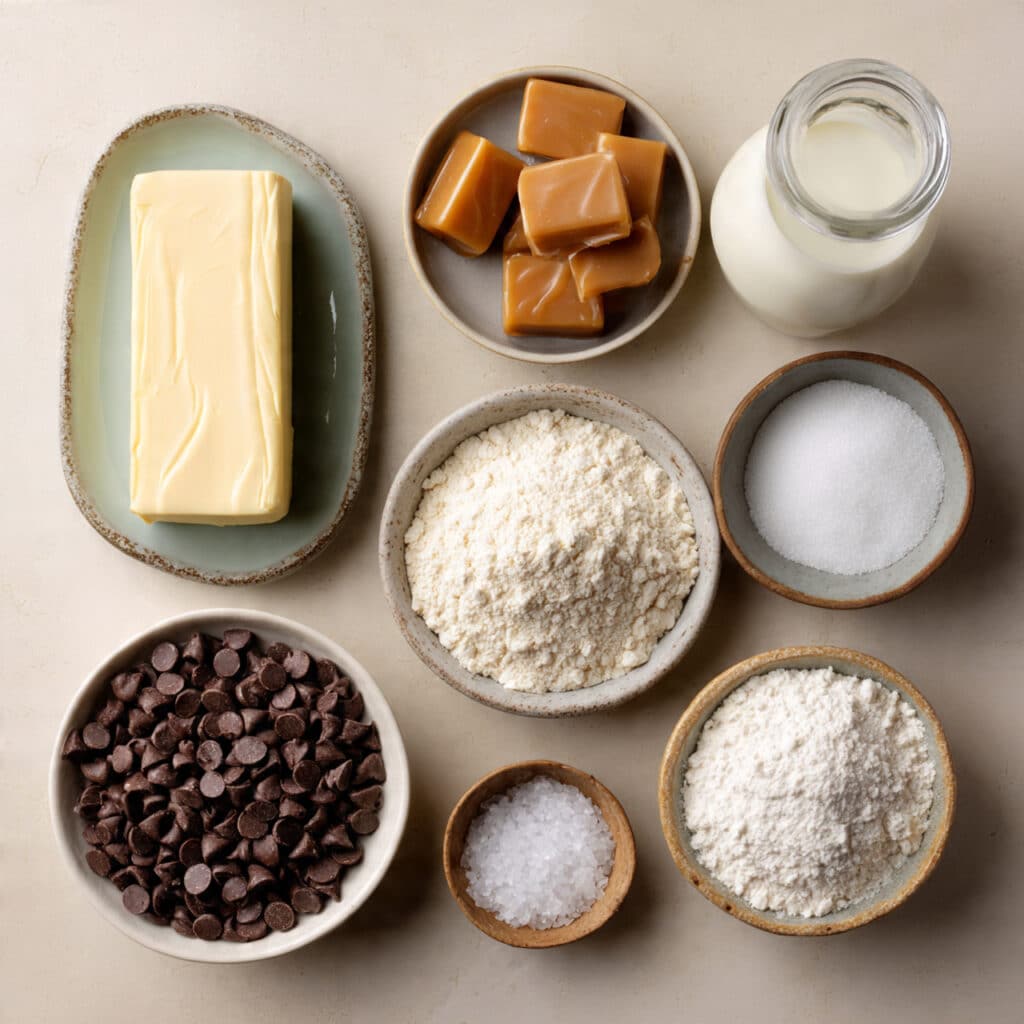
The Ingredients That Make the Magic Happen
There is a beautiful harmony in this short ingredient list. Each element plays its part in creating layers of flavor and texture.
- Unsalted Butter: 1 cup, 227 grams, softened. Provides richness and that classic shortbread texture.
- Granulated Sugar: 1,2 cup, 100 grams. Sweetens and helps create a tender crumb.
- All Purpose Flour: 2 cups, 250 grams. Forms the sturdy yet crumbly base.
- Salt: 1,4 teaspoon, 1 gram. Balances the sweetness and enhances flavor.
- Soft Caramel Candies: 1 1,2 cups, 240 grams, unwrapped. Melted to create the chewy center.
- Heavy Cream: 2 tablespoons, 30 milliliters. Helps smooth the caramel.
- Milk Chocolate Chips: 1 cup, 170 grams. Melted for that silky top layer.
- Flaky Sea Salt: Optional, 1 teaspoon. Adds a gentle contrast to the sweetness.
Easy Ingredient Swaps If You Need Them
Sometimes you work with what you have, and that is part of the fun.
Milk Chocolate Chips: Use semi sweet chocolate for a slightly richer finish.
Soft Caramel Candies: Substitute homemade caramel sauce that is thick and spoonable.
Heavy Cream: Use full fat milk in a pinch, though the caramel may be slightly less rich.
Flaky Sea Salt: Skip it or use a tiny pinch of fine salt instead.
Spotlight on the Stars of the Show
Let’s take a closer look at what really makes these shine.
Unsalted Butter: This is the backbone of the shortbread. Its richness creates that melt in your mouth texture.
Soft Caramel Candies: When melted with cream, they become silky and chewy, giving that signature layered bite.
Let’s Bake These Beautiful Layers Together
Now comes the fun part. Tie on your apron, and let’s bring these to life.
- Preheat Your Equipment: Preheat your oven to 350 degrees Fahrenheit, 175 degrees Celsius. Lightly grease a standard 12 cup muffin tin.
- Combine Ingredients: In a bowl, cream the softened butter and granulated sugar until light and fluffy. Add flour and salt, mixing until a soft dough forms.
- Prepare Your Cooking Vessel: Divide the dough evenly among the muffin cups. Press firmly into the bottom and slightly up the sides to create a cup shape.
- Assemble the Dish: Bake for 12 to 15 minutes until lightly golden. Let cool in the pan for 10 minutes, then gently press the centers down if needed to keep the cup shape.
- Cook to Perfection: In a small saucepan over low heat, melt the caramel candies with heavy cream, stirring until smooth. Spoon the caramel evenly into each cooled cookie base.
- Finishing Touches: Melt the chocolate chips in short intervals in the microwave, stirring until smooth. Spoon over the caramel layer and spread gently. Sprinkle with flaky sea salt if using.
- Serve and Enjoy: Allow the chocolate to set at room temperature or chill for 20 minutes. Remove from the tin and serve.
The Texture and Flavor Story
What makes these so irresistible is the contrast. The base is tender and slightly crumbly, the caramel is soft and chewy, and the chocolate top is smooth with a delicate snap once set. As they sit, the flavors deepen. The butter becomes more pronounced, the caramel settles into the crust, and the chocolate ties it all together.
Let me tell you, it’s worth every bite.
Helpful Tips for Perfect Results Every Time
If you want to make sure these turn out beautifully, keep these in mind.
- Do not overfill the caramel layer, it can overflow once the chocolate is added.
- Let each layer cool slightly before adding the next for clean separation.
- Use a spoon to gently twist the cups out of the tin if they stick.
- Store at room temperature in an airtight container for best texture.
Common Mistakes and How to Avoid Them
Even simple recipes have little traps, so here is what to watch for.
- Overbaking the base, which makes it too hard instead of tender. Remove when lightly golden.
- Adding chocolate to very hot caramel, which can cause blending of layers.
- Not pressing the dough firmly, which can cause crumbling when removing from the pan.
Nutrition Overview
Servings: 12 cookie cups
Calories per serving: 320
Note: These are approximate values.
Time Breakdown
Prep Time: 20 minutes
Cook Time: 15 minutes
Total Time: 35 minutes
Make Ahead and Storage Advice
You can bake the cookie bases a day in advance and store them in an airtight container. Fill them with caramel and chocolate the next day for the freshest finish.
Store fully assembled cookie cups at room temperature for up to 3 days. For longer storage, refrigerate for up to 1 week and allow to come to room temperature before serving. They can also be frozen for up to 2 months in a sealed container. Thaw overnight in the refrigerator.
Serving Ideas That Make Them Shine
Arrange them on a white platter with a light dusting of powdered sugar around the edges. Pair them with coffee, hot chocolate, or a cold glass of milk. They also look beautiful stacked slightly for a dessert table centerpiece.
Creative Ways to Use Leftovers
Chop leftover cookie cups and fold them into vanilla ice cream for a decadent mix in. Crumble them over yogurt for a sweet breakfast treat. Or warm slightly and serve over a scoop of ice cream.
Extra Little Tricks for Even Better Flavor
Let the cookie cups sit for a few hours before serving, the flavors settle and deepen. Use high quality chocolate for a smoother melt. And always taste your caramel before filling, it should be rich and balanced.
Turn Them Into a Showstopper
Drizzle a thin line of melted white chocolate across the top for contrast. Add a tiny pinch of flaky salt right before serving so it catches the light. Presentation makes a difference, and these deserve to look as good as they taste.
Fun Variations to Try
- Add a thin layer of peanut butter between the caramel and chocolate.
- Use dark chocolate for a deeper flavor profile.
- Stir finely chopped toasted nuts into the caramel.
- Add a hint of vanilla extract to the dough for extra warmth.
- Swirl a little caramel into the chocolate topping for a marbled look.
FAQ’s
Q1: Can I make these without a muffin tin?
Yes, you can shape small rounds on a baking sheet and press the centers down after baking, though they will not be as deep.
Q2: Can I use homemade caramel?
Absolutely. Just make sure it is thick enough to hold its shape inside the cups.
Q3: How do I keep the cups from sticking?
Grease the tin well and let them cool slightly before removing.
Q4: Can I freeze them?
Yes, store in an airtight container and thaw before serving.
Q5: Can I use dark chocolate instead of milk chocolate?
Yes, it will create a richer, slightly less sweet flavor.
Q6: Do they need to be refrigerated?
Not necessarily, but refrigeration helps them last longer.
Q7: Why did my caramel turn hard?
It may have been overheated. Melt gently over low heat.
Q8: Can I double the recipe?
Yes, simply double all ingredients and bake in batches.
Q9: How do I get clean chocolate tops?
Spread gently with the back of a spoon and let set undisturbed.
Q10: Can I add extra toppings?
Yes, chopped nuts or a light sprinkle of salt work beautifully.
Conclusion
These Twix Cookie Cups are everything you want in a dessert, buttery, chewy, chocolatey, and completely satisfying. They bring that familiar candy bar flavor into your own kitchen in the most comforting way. Give them a try, share them with someone you love, and enjoy every layered bite.
Print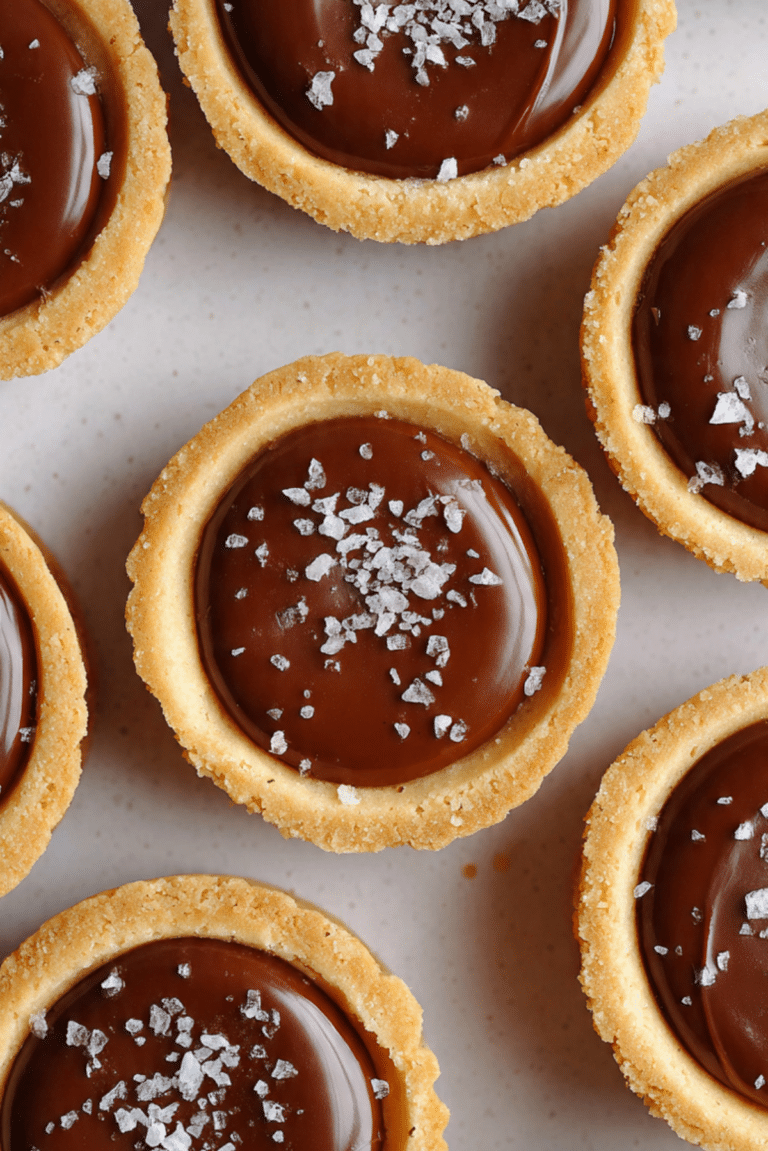
Twix Cookie Cups
Buttery shortbread cookie cups filled with soft caramel and topped with smooth melted milk chocolate, finished with a touch of flaky sea salt for the perfect sweet and salty bite.
- Total Time: 35 minutes
- Yield: 12 cookie cups 1x
Ingredients
- 1 cup (227 grams) unsalted butter, softened
- 1/2 cup (100 grams) granulated sugar
- 2 cups (250 grams) all purpose flour
- 1/4 teaspoon (1 gram) salt
- 1 1/2 cups (240 grams) soft caramel candies, unwrapped
- 2 tablespoons (30 milliliters) heavy cream
- 1 cup (170 grams) milk chocolate chips
- 1 teaspoon flaky sea salt (optional)
Instructions
- Preheat oven to 350 degrees Fahrenheit (175 degrees Celsius) and lightly grease a 12 cup muffin tin.
- Cream softened butter and granulated sugar until light and fluffy.
- Add flour and salt, mixing until a soft dough forms.
- Divide dough evenly among muffin cups and press firmly into the bottom and slightly up the sides to form cups.
- Bake for 12 to 15 minutes until lightly golden. Cool in the pan for 10 minutes.
- In a small saucepan over low heat, melt caramel candies with heavy cream, stirring until smooth.
- Spoon melted caramel evenly into each cooled cookie cup.
- Melt milk chocolate chips in short intervals in the microwave, stirring until smooth, then spoon over the caramel layer.
- Sprinkle with flaky sea salt if desired and allow chocolate to set before removing from the tin.
Notes
- Do not overbake the cookie base to keep it tender.
- Allow caramel to cool slightly before adding chocolate to keep layers distinct.
- Store in an airtight container at room temperature for up to 3 days.
- Prep Time: 20 minutes
- Cook Time: 15 minutes
- Category: Dessert
- Method: Baking
- Cuisine: American
- Diet: Vegetarian
Nutrition
- Serving Size: 1 cookie cup
- Calories: 320
- Sugar: 24g
- Sodium: 85mg
- Fat: 20g
- Saturated Fat: 12g
- Unsaturated Fat: 6g
- Trans Fat: 0g
- Carbohydrates: 34g
- Fiber: 1g
- Protein: 3g
- Cholesterol: 45mg
Keywords: Twix cookie cups, caramel chocolate cookie cups, shortbread caramel dessert, layered cookie cups, homemade candy bar dessert