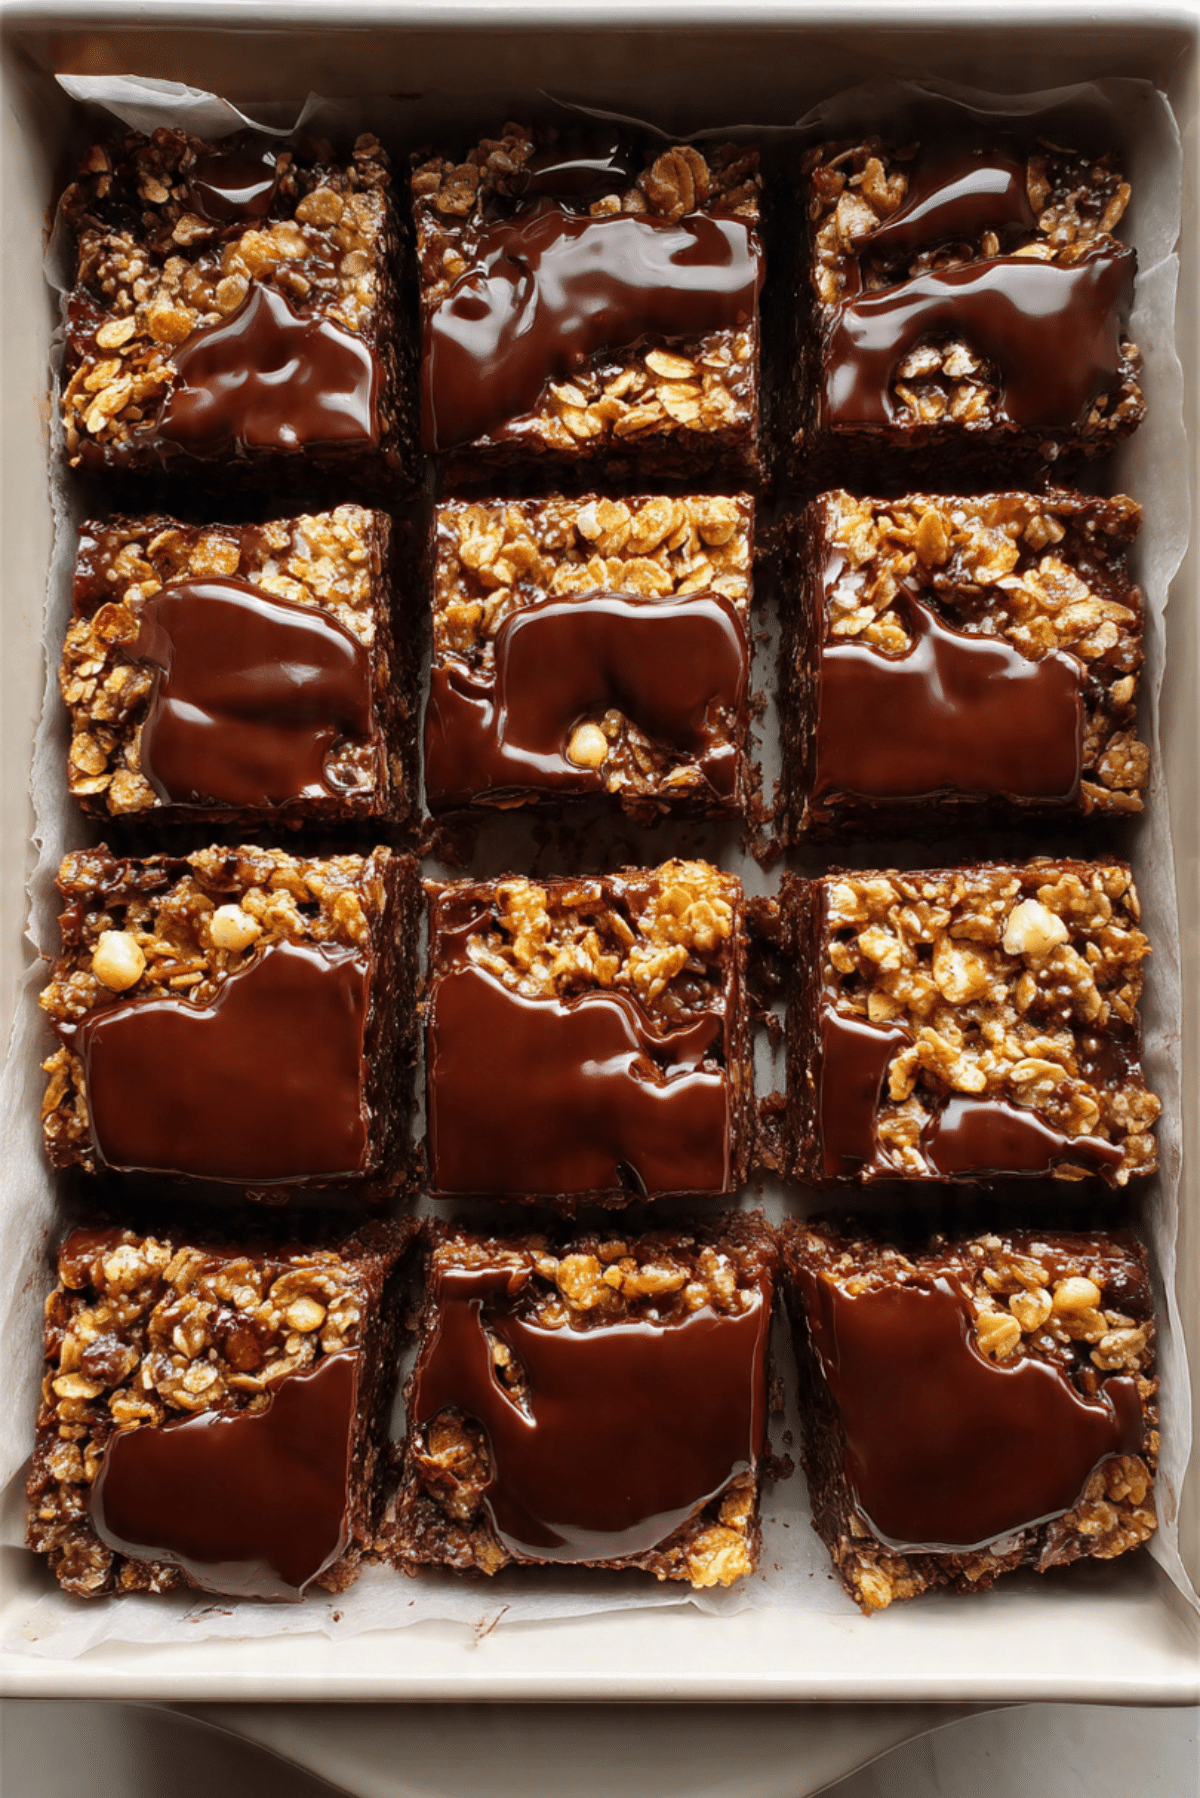
CHOCOLATE CRUNCH SUPERFOOD CAKE
There is something almost impossible to resist about a pan of rich chocolate topped with crisp, crackly texture, especially when it gives you that little contrast between glossy, fudgy softness and that satisfying crunch on top. This is the kind of treat that feels playful and comforting at the same time, the kind you cut into squares and somehow keep coming back to for just one more bite. Trust me, you’re going to love this.
Why This Chocolate Treat Keeps Everyone Coming Back
Some desserts are all about elegance, and some are all about pure fun. This one lands beautifully in the middle. It has that deep cocoa flavor you want from a chocolate dessert, but it also brings a crispy bite that makes every mouthful more exciting. The texture alone is enough to win people over, and once that glossy chocolate layer melts into the cereal mixture, it becomes a total game-changer.
It is the kind of dessert that works for an after-school snack, a party tray, a lunchbox extra, or a simple weekend baking session when you want something easy but still memorable. Let me tell you, it’s worth every bite.
The Sweet Story Behind Crunchy Chocolate Bakes
Chocolate cereal cakes and no-bake crunch bars have been beloved in home kitchens for decades, mostly because they turn pantry basics into something that feels festive. Across different regions, families have made their own versions using puffed grains, rice cereal, cornflakes, cocoa, peanut butter, or melted chocolate. The beauty of this style of dessert is how adaptable it is.
This version leans into that familiar homemade spirit, while bringing in a slightly more wholesome twist with ingredients like oats, seeds, and dark chocolate. It still feels indulgent, still feels nostalgic, and still delivers that irresistible crunch that makes these tray bakes so popular.
Why This One Earns a Spot in Your Dessert Rotation
Before we get into the details, it helps to know exactly why this dessert works so well. It is simple, dependable, and just flexible enough to fit what you already have in the kitchen.
Versatile: You can serve it chilled for a firmer bite or at room temperature for a softer, fudgier texture. It also works as a dessert square, snack bar, or little sweet bite with coffee.
Budget-Friendly: Most of the ingredients are pantry staples, and even the extras like seeds and dark chocolate stretch beautifully across the whole batch. You get a generous tray without needing anything overly fancy.
Quick and Easy: There is no complicated batter here, and the process is refreshingly straightforward. Melt, mix, press, chill, and slice.
Customizable: You can swap cereals, adjust the sweetness, or add different superfood mix-ins depending on what you like. It is very forgiving, which is always a gift in the kitchen.
Crowd-Pleasing: The mix of chocolate richness and crispy texture makes it appealing to both kids and adults. It is familiar enough to feel comforting and different enough to feel special.
Make-Ahead Friendly: This dessert actually benefits from a little chill time, which makes it perfect for preparing ahead. Once set, it slices neatly and stores well.
Great for Leftovers: Leftover squares keep their texture nicely, especially when stored properly. They are ideal for grabbing straight from the fridge when you need a quick sweet fix.
Smart Little Secrets for the Best Texture
Now let’s get into the details that make the difference between good and really, really good. A few thoughtful choices can help you get that glossy finish and crisp bite just right.
- Use a mix of dark chocolate and peanut butter so the coating stays rich, smooth, and easy to spread.
- Stir gently once the cereal goes in, so the pieces stay crisp instead of getting crushed.
- Press the mixture firmly into the pan, but not so hard that you flatten all the texture.
- Let the topping cool slightly before slicing, which helps you get clean, neat squares.
- Toasting the oats and seeds for a few minutes can deepen the nutty flavor and make the whole tray taste even better.
Kitchen Tools That Make It Easy
Before you start, it helps to gather the basics so the process feels relaxed and smooth from the very beginning.
Medium Saucepan: This is where you will melt the chocolate, peanut butter, and sweetener into one glossy mixture.
Mixing Bowl: A large bowl gives you enough room to fold the crunchy ingredients together without making a mess.
Spatula: A flexible spatula helps coat every bit of cereal and scrape all that melted chocolate goodness into the pan.
8×8-inch Baking Pan or Similar Tray: This gives the dessert enough depth for thick, satisfying squares.
Parchment Paper: Lining the pan makes removal and slicing much easier.
Sharp Knife: Once chilled, a clean sharp knife helps you cut tidy squares without dragging through the topping.
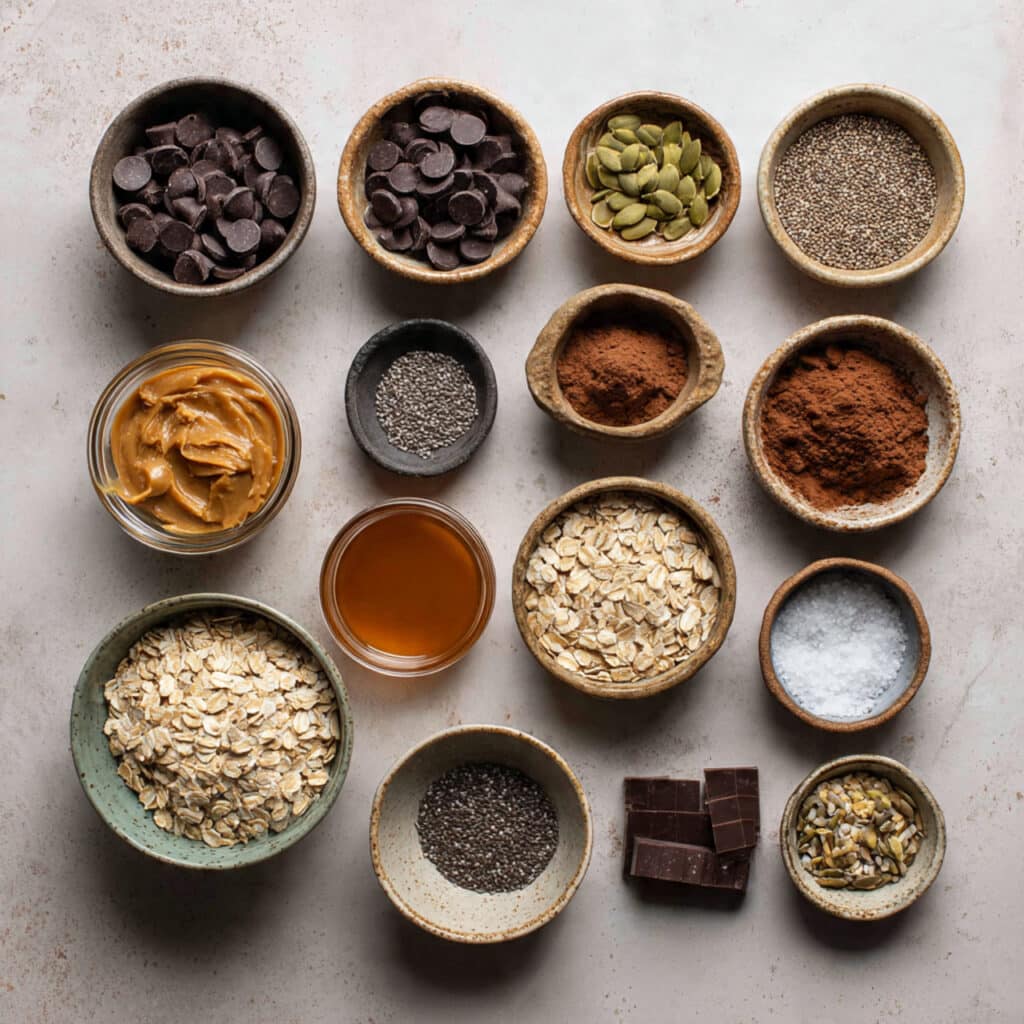
The Ingredients That Build All That Crunch and Chocolate
The magic here comes from simple ingredients that each bring something useful to the pan. Some add crunch, some bring richness, and some quietly boost the flavor in the background until everything tastes balanced and complete.
- Dark Chocolate Chips: 2 cups, divided, these create the rich chocolate base and glossy topping.
- Natural Peanut Butter: 3/4 cup, this adds creaminess, helps bind the mixture, and gives a subtle nutty depth.
- Honey: 1/3 cup, it brings gentle sweetness and helps hold the bars together.
- Unsweetened Cocoa Powder: 1/4 cup, this deepens the chocolate flavor without making the mixture overly sweet.
- Vanilla Extract: 1 teaspoon, it rounds out the cocoa notes and adds warmth.
- Crispy Rice Cereal: 3 cups, this gives the dessert its light, airy crunch.
- Rolled Oats: 1 cup, they add a heartier bite and a slightly wholesome chew.
- Pumpkin Seeds: 1/2 cup, these bring a nutty crunch and a little extra texture.
- Chia Seeds: 2 tablespoons, they add subtle texture and a superfood touch.
- Flaky Sea Salt: 1/4 teaspoon, this brightens the chocolate and keeps the sweetness balanced.
Easy Swaps That Still Work Beautifully
One of the nicest things about this dessert is how flexible it is. So if your pantry looks a little different today, you still have plenty of room to make it work.
Natural Peanut Butter: Almond butter or sunflower seed butter.
Honey: Maple syrup or brown rice syrup.
Crispy Rice Cereal: Cornflakes, puffed rice, or crushed bran flakes.
Pumpkin Seeds: Sunflower seeds or chopped almonds.
Dark Chocolate Chips: Semisweet chocolate chips.
Rolled Oats: Quick oats, though the texture will be slightly softer.
The Ingredients That Really Steal the Show
At this point, you can probably already see how each ingredient helps, but there are two that do the heaviest lifting when it comes to flavor and texture.
Dark Chocolate Chips: This is where the dessert gets its rich, deep, almost brownie-like character. Using dark chocolate keeps the sweetness from taking over and gives the bars a more balanced finish.
Crispy Rice Cereal: This is the ingredient that makes the whole tray so fun to eat. It keeps the texture light, crackly, and satisfying, even with all that melted chocolate wrapped around it.
Let’s Turn It Into Something You’ll Want to Slice Immediately
Now that everything is ready, this is the part where the kitchen starts smelling amazing and the mixture comes together fast. Here are the steps you’re going to follow, and each one brings you closer to that chilled tray of glossy, crunchy goodness.
- Preheat Your Equipment: If you want a toastier flavor, preheat your oven to 350°F and spread the oats and pumpkin seeds on a small baking sheet for 5 minutes. Otherwise, simply line an 8×8-inch pan with parchment paper and set it aside.
- Combine Ingredients: In a medium saucepan over low heat, melt 1 1/2 cups of the dark chocolate chips with the peanut butter, honey, cocoa powder, and vanilla extract. Stir until the mixture is smooth, shiny, and fully combined.
- Prepare Your Cooking Vessel: Place the crispy rice cereal, rolled oats, pumpkin seeds, chia seeds, and sea salt in a large mixing bowl. Toss lightly so the smaller ingredients distribute evenly.
- Assemble the Dish: Pour the warm chocolate mixture over the dry ingredients and fold gently until everything is evenly coated. Transfer the mixture to the lined pan and press it into an even layer. Melt the remaining 1/2 cup chocolate chips and spread over the top for that glossy finish.
- Cook to Perfection: This is a no-bake dessert, so instead of baking, chill the pan in the refrigerator for 1 to 2 hours, or until firm and set.
- Finishing Touches: Once chilled, let the pan sit at room temperature for about 5 minutes. Slice into squares with a sharp knife for clean edges and a neat finish.
- Serve and Enjoy: Serve chilled or just slightly softened at room temperature. Every square should give you a little snap on top and a rich, chewy crunch underneath.
The Texture Story, and Why Every Bite Feels So Good
This dessert is all about contrast, and that is what makes it so memorable. The melted chocolate sets into a smooth top layer that feels almost fudgy as it warms on your tongue, while the cereal underneath stays crisp and light. Then the oats and seeds come in with a nuttier, more grounded texture that keeps the sweetness from feeling one-note.
Flavor-wise, the cocoa and dark chocolate bring richness first, then the peanut butter follows with warmth and depth. A tiny bit of salt lifts everything and makes the whole thing taste fuller. It is crunchy, chocolatey, lightly nutty, and just sweet enough to feel like a real treat.
Helpful Little Tricks for Even Better Results
Once you have made it once, you will probably start adding your own spin. Still, these simple tips help right from the start.
- Use low heat: Chocolate melts best gently, and slow heat keeps it smooth instead of grainy.
- Line the pan well: A good parchment sling makes lifting and slicing much easier later.
- Chill before cutting: This keeps the squares neat and helps the top layer stay glossy.
- Use a warm knife: A knife dipped in warm water and dried can glide through the bars more cleanly.
What Can Go Wrong, and How to Avoid It
Even simple desserts have a few little traps, but they are easy to sidestep once you know what to watch for.
- Overheating the chocolate: This can make the mixture thick or dull. Keep the heat low and stir patiently.
- Crushing the cereal too much: Heavy mixing can knock out the crunch. Fold gently until coated.
- Not pressing evenly into the pan: Uneven thickness can make some squares fall apart. Smooth the surface carefully before chilling.
- Cutting too early: If the dessert is not fully set, the slices can look messy. Give it enough time in the fridge.
A Quick Look at the Nutrition
This is definitely a treat, but it also has a little more substance than a standard candy-style bar thanks to the oats, seeds, and dark chocolate.
Servings: 16 squares
Calories per serving: 210
Note: These are approximate values.
Timing So You Can Plan It Easily
One reason this dessert is so handy is that most of the work is done in just a few minutes. The fridge does the rest.
Prep Time: 15 minutes
Cook Time: 5 minutes
Total Time: 20 minutes, plus chilling time
Make-Ahead and Storage Tips That Actually Help
And now that you know how easy it is to make, let’s talk about keeping it fresh. This dessert is wonderfully make-ahead friendly, which makes it great for busy weeks or party prep.
You can prepare the full tray a day or two in advance and keep it covered in the refrigerator until you are ready to slice and serve. Once cut, store the squares in an airtight container with parchment between layers to prevent sticking. They will keep well in the fridge for up to 1 week.
For longer storage, freeze the squares in a single layer until firm, then transfer them to a freezer-safe container. They can be frozen for up to 2 months. To serve, let them sit in the fridge overnight or rest at room temperature for 15 to 20 minutes. If you prefer a softer bite, a short rest on the counter brings the texture back beautifully.
The Best Ways to Serve It
This dessert is easygoing enough to fit into lots of different moments, which is part of its charm. It looks lovely cut into neat squares and arranged on a simple platter for sharing.
Serve it with cold milk, hot coffee, or a mug of cocoa for a cozy pairing. It also works beautifully on a dessert tray with fresh strawberries or banana slices on the side. For a slightly more polished presentation, dust the serving plate lightly with cocoa powder and stack the squares in a casual little tower.
Fun Ideas for Transforming Leftovers
If you happen to have leftovers, and that is a big if, there are a few clever ways to turn them into something fresh the next day.
Crumble a square over yogurt for a crunchy chocolate breakfast topping. Chop it into small pieces and fold into vanilla frozen yogurt for a quick homemade-style dessert. You can also tuck pieces into lunchboxes or press a crumbled square over oatmeal for a sweet finish with extra texture.
Extra Tips for Flavor, Freshness, and Ease
Sometimes the smallest touches make the biggest difference, and this dessert has plenty of room for those little upgrades.
Try using a good-quality dark chocolate for a deeper flavor and smoother melt. Taste your peanut butter before using it, since very salty brands can shift the balance. Keep the bars chilled in warm weather so the top stays firm and glossy. And if you like a little extra contrast, a tiny sprinkle of sea salt on top just before chilling is absolutely lovely.
How to Make It Look Like a Bakery-Worthy Tray
Presentation matters, especially with a dessert that already has such a beautiful texture. The glossy top and pebbly crunch deserve to be shown off.
Slice the bars into even squares or slim rectangles for a cleaner, more polished look. Wipe the knife between cuts so the edges stay tidy. Arrange them on a white or neutral plate to let the dark chocolate stand out. A light scatter of pumpkin seeds on top before the chocolate sets can also make the tray look extra special without much effort.
Variations to Try When You Want Something a Little Different
Once you have the base down, it is easy to play. This dessert welcomes small twists without losing what makes it good.
Nutty Coconut Version: Add 1/3 cup unsweetened shredded coconut for extra chew and tropical warmth.
Extra Seeded Crunch: Increase the pumpkin seeds and add sunflower seeds for a more textured, hearty bite.
Mocha Twist: Stir 1 teaspoon instant espresso powder into the melted chocolate mixture to deepen the cocoa flavor.
Peanut Butter Lover’s Version: Swirl a few spoonfuls of warmed peanut butter through the top before chilling.
Fruit and Crunch Mix: Fold in 1/3 cup chopped dried cherries or raisins for little sweet-tart bursts throughout.
FAQ’s
Q1: Can I make this without peanut butter?
Yes, absolutely. Almond butter or sunflower seed butter both work well and still help bind the mixture.
Q2: Does this need to be baked?
No, it is a no-bake dessert. The only heat involved is melting the chocolate mixture, then the tray chills until set.
Q3: Can I use milk chocolate instead of dark chocolate?
You can, though the bars will be sweeter. Dark chocolate gives a richer and more balanced flavor.
Q4: How do I keep the bars from falling apart?
Make sure the dry ingredients are evenly coated and press the mixture firmly into the pan. Chilling fully also helps the bars hold their shape.
Q5: Can I make it gluten free?
Yes, just use certified gluten-free crispy rice cereal and certified gluten-free oats.
Q6: How long does it take to set?
Most trays are ready in about 1 to 2 hours in the refrigerator, depending on thickness and fridge temperature.
Q7: Can I add nuts?
Yes, chopped almonds, peanuts, or walnuts can be added for even more crunch, though the current version already has good texture from the seeds.
Q8: Is this very sweet?
It is sweet, but not overwhelmingly so. The dark chocolate and cocoa powder help keep the flavor balanced.
Q9: Can I cut it into bars instead of squares?
Yes, and bars actually make it feel even more snackable. Just use a long sharp knife for clean lines.
Q10: What is the best way to serve it?
Chilled is great for a firmer bite, while room temperature gives a softer, slightly fudgier texture. Both are delicious.
Conclusion
Some desserts just know how to make people happy, and this one does it with crunch, chocolate, and the easiest kind of kitchen magic. It is simple enough for an everyday sweet treat, but satisfying enough to bring out when you want something that feels a little special too. Trust me, once you hear that first crisp slice and taste that rich chocolatey bite, this one is going to earn a regular place in your kitchen.
Print
CHOCOLATE CRUNCH SUPERFOOD CAKE
A rich and crunchy no-bake chocolate cake made with dark chocolate, peanut butter, crispy rice cereal, oats, and seeds, then finished with a glossy chocolate topping and chilled until sliceable.
- Total Time: 20 minutes, plus chilling time
- Yield: 16 squares 1x
Ingredients
- 2 cups dark chocolate chips, divided
- 3/4 cup natural peanut butter
- 1/3 cup honey
- 1/4 cup unsweetened cocoa powder
- 1 teaspoon vanilla extract
- 3 cups crispy rice cereal
- 1 cup rolled oats
- 1/2 cup pumpkin seeds
- 2 tablespoons chia seeds
- 1/4 teaspoon flaky sea salt
Instructions
- If desired, preheat the oven to 350°F and toast the rolled oats and pumpkin seeds on a small baking sheet for 5 minutes, then let them cool slightly. Line an 8×8-inch pan with parchment paper.
- In a medium saucepan over low heat, melt 1 1/2 cups of the dark chocolate chips with the peanut butter, honey, cocoa powder, and vanilla extract. Stir until smooth and glossy.
- In a large mixing bowl, combine the crispy rice cereal, rolled oats, pumpkin seeds, chia seeds, and flaky sea salt.
- Pour the warm chocolate mixture over the dry ingredients and fold gently until evenly coated.
- Transfer the mixture to the lined pan and press it into an even layer.
- Melt the remaining 1/2 cup dark chocolate chips and spread over the top.
- Refrigerate for 1 to 2 hours, or until firm and fully set.
- Let sit at room temperature for 5 minutes, then slice into 16 squares and serve.
Notes
- Use certified gluten-free oats and cereal if you need a gluten-free version.
- For cleaner slices, warm the knife in hot water and dry it before cutting.
- Store the squares in an airtight container in the refrigerator for up to 1 week.
- Freeze for up to 2 months and thaw in the fridge or at room temperature before serving.
- Prep Time: 15 minutes
- Cook Time: 5 minutes
- Category: Dessert
- Method: No-Bake
- Cuisine: American
- Diet: Vegetarian
Nutrition
- Serving Size: 1 square
- Calories: 210
- Sugar: 11g
- Sodium: 55mg
- Fat: 13g
- Saturated Fat: 5g
- Unsaturated Fat: 7g
- Trans Fat: 0g
- Carbohydrates: 21g
- Fiber: 3g
- Protein: 5g
- Cholesterol: 0mg
Keywords: chocolate crunch cake, no-bake chocolate bars, crispy rice chocolate dessert, peanut butter chocolate cereal bars, superfood chocolate squares